
System for 3D Acquisition and 3D Reconstruction Using Structured
Light for Sewer Line Inspection
Johannes K
¨
unzel
∗1 a
, Darko Vehar
∗2
, Rico Nestler
2
, Karl-Heinz Franke
2
, Anna Hilsmann
1 b
and Peter Eisert
1,3 c
1
Fraunhofer Institute for Telecommunications, Heinrich Hertz Institute, HHI, Einsteinufer 37, 10587 Berlin, Germany
2
Zentrum f
¨
ur Bild- und Signalverarbeitung, Werner-von-Siemens-Straße 12, 98693 Ilmenau, Germany
3
Visual Computing Group, Humboldt University Berlin, Unter den Linden 6, 10099 Berlin, Germany
Keywords:
Single-Shot Structured Light, 3D, Sewer Pipes, Modelling, High-Resolution, Registration.
Abstract:
The assessment of sewer pipe systems is a highly important, but at the same time cumbersome and error-
prone task. We introduce an innovative system based on single-shot structured light modules that facilitates
the detection and classification of spatial defects like jutting intrusions, spallings, or misaligned joints. This
system creates highly accurate 3D measurements with sub-millimeter resolution of pipe surfaces and fuses
them into a holistic 3D model. The benefit of such a holistic 3D model is twofold: on the one hand, it
facilitates the accurate manual sewer pipe assessment, on the other, it simplifies the detection of defects in
downstream automatic systems as it endows the input with highly accurate depth information. In this work,
we provide an extensive overview of the system and give valuable insights into our design choices.
1 INTRODUCTION
Sewage systems only become visible in the life of
most people if they break, nevertheless they are one
brittle keystone of modern society. Therefore, the
thorough assessment of sewage systems is immensely
important, especially as some of these pipes are
older than one hundred years. Today, mobile robots
equipped with cameras are used to provide insights
into sewer pipes and highly trained workers evaluate
them manually to identify damaged sections. Many
recent contributions tried to alleviate this cumber-
some and error-prone annotation task by applying
computer vision methods.
There is an ample amount of literature, with most
approaches relying directly on monocular images or
video sequences as input (often with fisheye lenses),
like (Xie et al., 2019; K
¨
unzel et al., 2018; Hansen
et al., 2015; Zhang et al., 2011), with a recent survey
regarding the detection and classification of defects in
a
https://orcid.org/0000-0002-3561-2758
b
https://orcid.org/0000-0002-2086-0951
c
https://orcid.org/0000-0001-8378-4805
∗
Johannes K
¨
unzel and Darko Vehar have contributed
equally.
(Li et al., 2022). But as the literature shows, many
previous approaches struggle with the detection of
some spatial defects, like for instance misaligned pipe
joints or bent pipes, as they are almost impossible to
detect without depth information. Not to mention the
even harder problem of classifying such defects by
their severeness, as they are often defined by their
depth or spatial extension. Thus, some works tried to
reconstruct the 3D structure from 2D images. In (Es-
quivel et al., 2009; Esquivel et al., 2010), the authors
exploited the strict vertical movement of the camera
for the reconstruction of sewer shafts from monocular
fisheye images, whereas in (Kannala et al., 2008) the
reconstruction is based on tracked keypoints found on
the structured surface. The authors of (Zhang et al.,
2021) extended a basic SLAM approach to leverage
cylindrical regularity in sewer pipes, showing promis-
ing results. However, as all the aforementioned al-
gorithms rely on tracked keypoints, the generated 3D
models are sparse, and the success is susceptible to
the illumination conditions and the structures visi-
ble in the scene. In (Bahnsen et al., 2021) the au-
thors assess different alternative 3D sensors to facil-
itate the inspection of sewer pipes. They compare
passive stereo, active stereo and time-of-flight sensors
Künzel, J., Vehar, D., Nestler, R., Franke, K., Hilsmann, A. and Eisert, P.
System for 3D Acquisition and 3D Reconstruction Using Structured Light for Sewer Line Inspection.
DOI: 10.5220/0011779900003417
In Proceedings of the 18th International Joint Conference on Computer Vision, Imaging and Computer Graphics Theory and Applications (VISIGRAPP 2023) - Volume 5: VISAPP, pages
997-1006
ISBN: 978-989-758-634-7; ISSN: 2184-4321
Copyright
c
2023 by SCITEPRESS – Science and Technology Publications, Lda. Under CC license (CC BY-NC-ND 4.0)
997

and identify the last one as most suitable, as it works
reliably under all simulated lightning conditions and
also in the presence of water. Surprisingly, the authors
exclude systems using structured light up-front, due
to their “low popularity” and “the poor performance
that is expected for this technology under less con-
trolled conditions” for the lighting. So far, research
efforts ((Reiling, 2014; Wang et al., 2013; Dong et al.,
2021)) towards the usage of structured light for the 3d
assessment of pipes mostly analyzed systems with a
front-facing camera (mostly an ultra-wide or fisheye
lens) and a laser projector placed behind, projecting
a radial pattern into the camera image. These sys-
tems feature a rather simple and robust design, but
are limited in the resolution of the imaging. Also, all
forward-facing camera systems share a common dis-
advantage: Areas closest to the camera appear at the
edge of the image where the quality of the geometric-
optical mapping is the worst. Consequently, all eval-
uations based on such imagery are suboptimal com-
pared to systems that capture pipe walls perpendicu-
larly.
The only system to our knowledge with a struc-
tured lightning solution with a perpendicular view
of the pipe surface was presented in (Alzuhiri et al.,
2021). But opposed to our system approach, it only
inspects 120° of the surrounding 360° pipe surface
and also pairs a projector with a stereo camera setup.
They apply a 4-frame phase shifting method using a
static projected pattern and a moving camera. Such
an approach limits a system’s transverse velocity and
consequently its usability and also relies on a pre-
cise inertial measurement unit to perform the 3D re-
construction. We robustly reconstruct the 3D surface
from a single camera image of a projected structured
light pattern without additional sensor data at a trans-
verse speed of up to 100 mm/s. It should be noted
that most conventional non-3D sewer inspection sys-
tems do not exceed this speed.
In this paper, we will demonstrate how some
clever design decisions enable the usage of structured
light sensors in the harsh conditions of sewer pipes
while exploiting their favourable properties to con-
struct 3D pipe models with a sufficient level of detail
for characterization and quantification of damages ac-
cording to DIN-EN 13508, while being robust against
low light and pipe materials of homogeneous appear-
ance. We also explain the robust fusion of the indi-
vidual acquisitions and how the alternative represen-
tation, compromised of a cylindrical base mesh, a tex-
ture and a displacement map, facilitates the applica-
tion of downstream processing task.
Figure 1: Schematic of the camera projection module (left)
and the finished prototype (right) for 3D surface acquisition.
2 HARDWARE DESIGN
In our setup, each of the six modules (Figure 1) con-
sists of a projection and a camera unit and captures
sewer surfaces in 3D according to the principle of
structured light. The projection and camera units con-
tain the same lenses and have the same parallel off-
set imaging beam paths. The system is designed to
capture pipe surfaces with a diameter of 200 mm to
400 mm in 3D with a high-resolution texture using
the methods described in subsection 3.1 and subsec-
tion 3.2. Due to the large differences between the
minimum and maximum object distances, the field of
view (76° vertical, 61° horizontal) and the stereo an-
gle of 29°, a simulation of optical components was
carried out for a careful selection of components to
maximize geometric accuracy and image sharpness.
In particular, the large stereo angle, which results
from the size of the hardware components used and
usually does not exceed 10° in comparable applica-
tions, poses a challenge for the structured light algo-
rithm on the one hand and leads to a high depth res-
olution on the other. The prototype (Figure 1 right)
captures inner walls of the pipe with a spatial resolu-
tion of 0.3 lp/mm and depth resolution of 0.2 mm at φ
200 mm (1.1 lp/mm and 2.3 mm at φ 400 mm).
Six mutually rotated modules are installed in a
carrier (Figure 2) with an outer diameter of 150 mm
and length of 600 mm for full 360 degree 3D capture
of sewer surfaces. The fields of view of the modules
are directed from the central axis to the inner pipe sur-
face and, in their entirety, depict the circumference
completely and overlapping, so that adjacent images
can be registered and combined. A vital design deci-
sion was the placement of all entrance pupils of the
six modules in such a way that they lie on the com-
mon carrier axis to ensure this necessary overlapping
even with a decentered position and different pipe di-
ameters.
In addition to the pattern projection, we installed
a homogeneous texture illumination on each camera
module. Lights for texture and pattern lighting as well
VISAPP 2023 - 18th International Conference on Computer Vision Theory and Applications
998
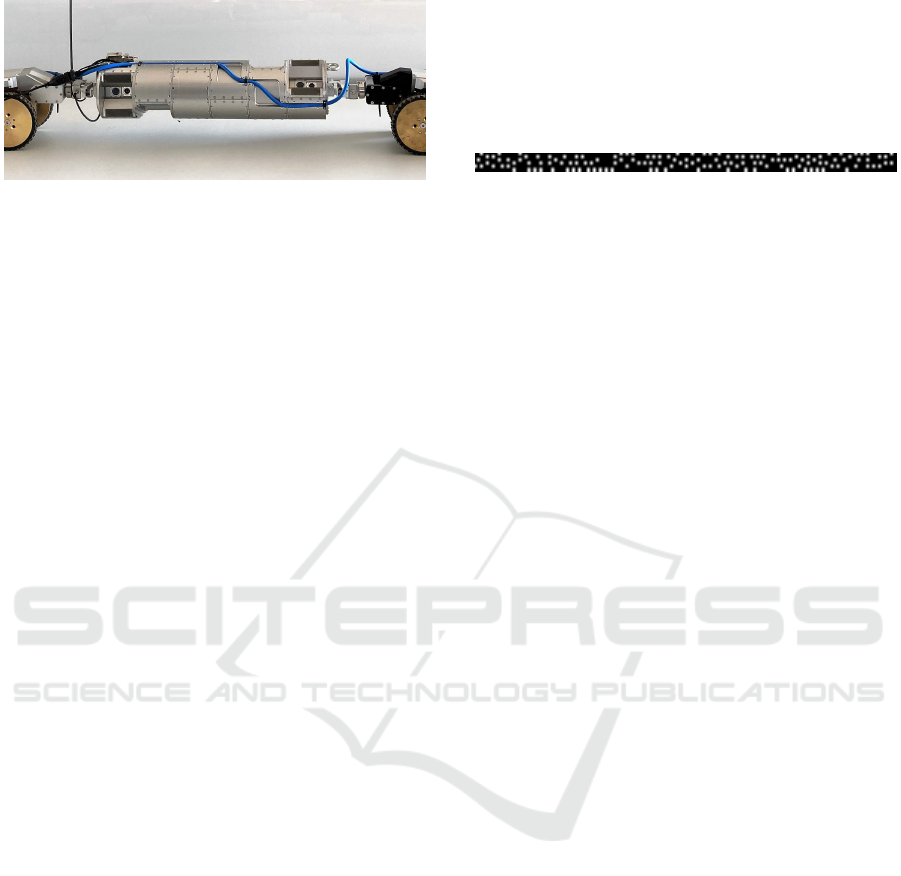
Figure 2: Cylindrical carrier with an outer diameter of 150
mm and length of 600 mm with six structured light modules
for 360 degree capture of sewer pipes.
as the cameras are hardware controlled and the cam-
eras alternately capture the texture and the projected
patterns during continuous travel through the sewer
pipe.
3 3D ACQUISITION
The following section covers the processing chain
from raw camera images to the metrically recon-
structed 3D point clouds of the inspected sewer sec-
tion.
3.1 Single-Shot Structured Light
For our single-shot structured light approach, we use
binary coded spot patterns based on perfect submaps
(Morano et al., 1998). In such pseudo-random ar-
rays, each sub-matrix of a fixed size (codeword) oc-
curs exactly once. If a pattern based on perfect
submaps covers the entire projector image, each pro-
jector pixel is uniquely encoded, which is necessary
to solve the camera-projector correspondence prob-
lem. We choose a binary instead of a color coding
because the projected pattern can be robustly recog-
nized in the camera image without prior knowledge
of the color of the captured surfaces. Additionally,
2D arrays are preferred over 1D sequences when ver-
tical disparity occurs due to non-ideal alignment of
the camera and projector planes and in combination
with lens distortion.
It is not necessary that the pattern spans over
the entire projector image. But its length and
height should cover the horizontal and vertical dis-
parity range, which depends on the external camera-
projector arrangement, the shortest and farthest dis-
tances of the objects to be captured and the lens dis-
tortion. Given these conditions, we generated a pat-
tern Figure 3 of required length and with a unique-
ness within a window size of 6×6 using an exhaustive
search similar to (Morano et al., 1998). In addition to
the required codeword uniqueness, we applied con-
straints on the distribution of points in the pattern to
make the decoding of the captured pattern more ro-
bust and algorithmic efficient. These constraints in-
clude a minimum hamming distance of 3, a minimum
word weight of 4 and 0-connectivity of all non-zero
pixels.
Figure 3: Binary pattern with uniqueness within a window
size of 6×6 which is used in the structured light modules.
The pattern is repeated horizontally and vertically to fill the
entire projector image.
In the next step, the image of the projected pattern
is decoded, which means that each recognized code-
word is linked with its position in the original projec-
tor image. We used a binarization method (Niblack,
1985) to detect the structured light pattern reliably, in
particular on strongly varying backgrounds, e.g. due
to cracks or in areas with highly contrasted textures.
The binary image is then scanned with a predefined
window size and each bit-string read within the win-
dow is trivially found in the lookup table.
3D points are computed from the correspond-
ing points in respective camera and projector images
from the decoding step using the linear triangulation
method from (Hartley and Zisserman, 2003, p. 312).
The intrinsic and extrinsic parameters are obtained
from the calibration subsection 3.3 and the lens dis-
tortion is corrected beforehand in normalized image
coordinates. The resulting 3D point cloud is output as
RGB-D image for further processing.
3.2 Color Texture Preprocessing and 3D
Mapping
The spatially resolved detection of materials, visually
mapped as color (texture) images, enables the identi-
fication of significant regions and also defect features
in sewer lines. In particular, chromaticity is a key fea-
ture for detecting and distinguishing defects in down-
stream processes. Images in our case are disturbed
by color-shading, which represents both chromatic-
ity and brightness shifts. For this purpose, it is nec-
essary to correct systematic influences on the color
textures caused by lighting, lens, sensor, or variable
(unknown) geometry in the primary image data.
Conventional trivial shading correction of the
color image by a planar white reference is not ap-
plicable as the variable distance between camera and
scene objects and the complex shading influences lead
to artifacts like chromatic flares. In order to handle
this, we estimate a reference light from images of
the captured sewer section and correct color shading
System for 3D Acquisition and 3D Reconstruction Using Structured Light for Sewer Line Inspection
999
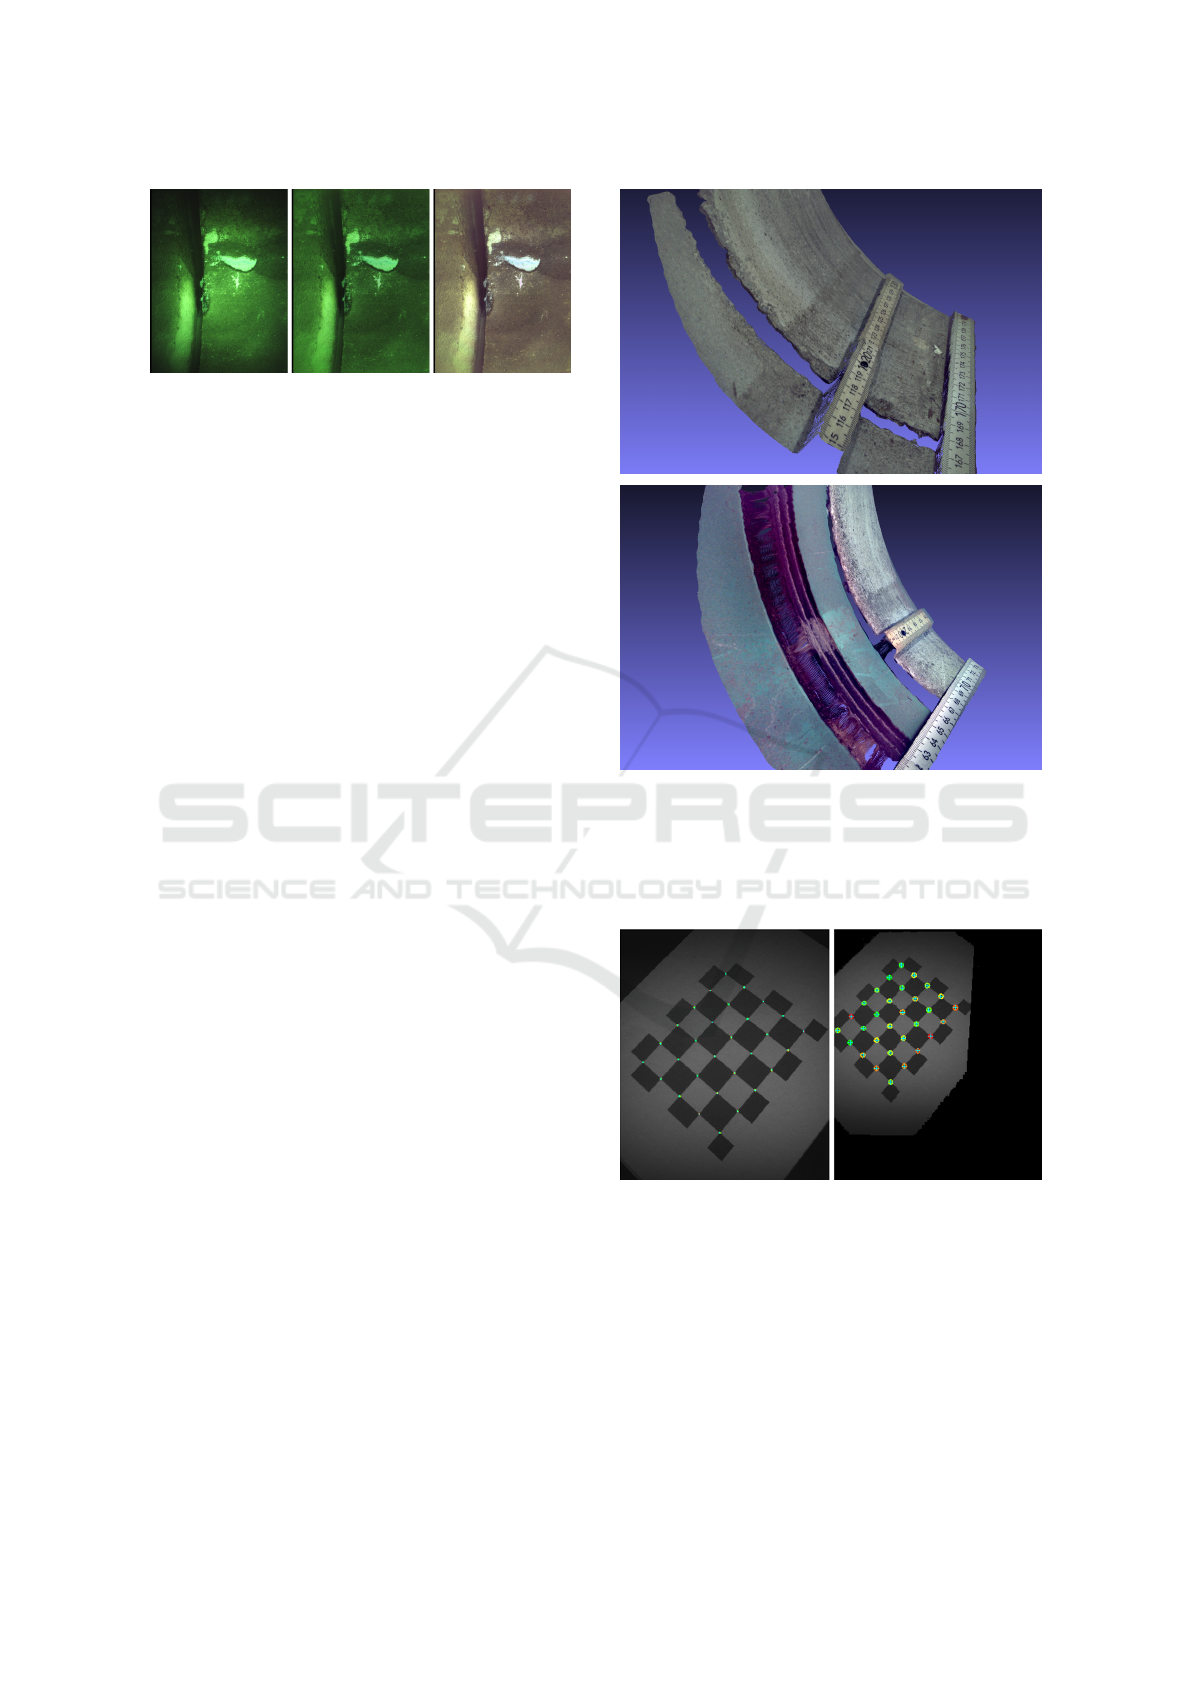
Figure 4: Debayered color image with visible vignetting to-
ward the periphery of the image (left). The result of bright-
ness shading correction (middle) and chromaticity correc-
tion (right).
with lightness and chromaticity features from L*a*b*
color space in all primary color channels. The results
of this correction can be seen in Figure 4.
In addition to the color correction we remove mo-
tion blur caused by movement during image capture.
By using the prior knowledge of a cylindrical pipe ge-
ometry, a depth-graded unfolding using a parametric
1D - Wiener filter (Murli et al., 1999) was used to en-
hance the sharpness of the color texture.
In order to map the preprocessed texture onto the
generated 3D point cloud, texture images are captured
a few milliseconds before and after the structured
light pattern. Using the camera’s intrinsic parameters,
sparse feature detection and matching (AKAZE (Al-
cantarilla et al., 2013)) on the texture images and the
precise timing of the three-image sequence (texture,
3D, texture), the change in camera pose can be esti-
mated at the time the projected pattern (3D) was cap-
tured. The resulting transformation is used to map the
color texture to the 3D point cloud. Results of the pro-
posed mapping procedure for multimodally captured
concrete and plastic pipes are shown in Figure 5.
3.3 Geometric Calibration of
Camera-Projector Modules
We approximate the imaging properties of both the
camera and the projector (inverse camera) of each
structured light module with a pinhole model. It is
represented by a camera calibration matrix consisting
of the effective focal length and the principal point,
which is also used as the center of lens distortion.
To model the significantly observable lens distortion,
we use the radial component of a three-term Brown-
Conrady distortion model (Brown, 1966).
We captured 15-20 calibration images for the in-
trinsic and extrinsic calibration of camera and pro-
jector using a tripod-mounted target with a checker-
board pattern as seen in Figure 6. Target detection,
sub-pixel processing of calibration points and param-
eter optimization were carried out with the toolkit 3D-
Figure 5: 3D color textured point cloud of a connection be-
tween two concrete pipes (top) and between a plastic and
concrete pipe (bottom) as captured by a structured light
module. The level of detail in both texture and 3D can be
seen on the ruler and tape measure, as well as the pipes
stacked at varying depths.
Figure 6: The camera-projector modules are intrinsically
and extrinsically calibrated using several images of a cali-
bration pattern taken at different distances and orientations.
Detected calibration points in camera (left) and projector
(right) are color-coded according to the re-projection error
to visually indicate the precision of a calibration.
EasyCalib (Vehar et al., 2018).
For intrinsic calibration, the camera matrix is
determined from images of a calibration target, its
known world points and the corresponding image
points. For both the projector and the extrinsic cal-
VISAPP 2023 - 18th International Conference on Computer Vision Theory and Applications
1000

ibration of a camera-projector module an extra step
is needed. Instead of a single image, we captured a
pair of images for each target pose – an image of the
calibration target with the projected pattern off and
the ambient light on and vice versa. The processing
of the target images is done in the same way as for
the camera calibration. Decoding the pattern gives us
the geometric mapping between the image planes of
the projector and the camera. We use local homogra-
phies around each checkerboard corner to transfer cal-
ibration points between camera and projector images
(Moreno and Taubin, 2012). An identical optimiza-
tion as for the intrinsic camera calibration was used
to estimate the projector calibration matrix as well as
the orientation and pose of the projector with respect
to the camera (extrinsics).
4 GENERATION OF 3D MODELS
The 3D measurement process delivers its data in a
texture and a depth map accompanied by the intrin-
sic camera calibration matrix and the global pose esti-
mated by the odometry (T
i, j
). The parameters i and j
are the module identifier and the counter of the acqui-
sitions done by this module, respectively. The overall
goal is to pass on the 3D data to a downstream process
for an automatic annotation of defects. Therefore, we
decided to represent our 3D model by a cylindrical
mesh, a high-resolution texture, and a displacement
map encoding the difference from an ideal cylinder.
This combination is easily digestible to subsequent AI
algorithms for defect detection, but can also be ren-
dered for manual assessment.
In the following section, we describe the pro-
cessing pipeline to generate the output representation
from the high-resolution 3D measurements.
4.1 Local Registration
In order to register all depth maps, i.e. sewer pipe seg-
ments into a mutual coordinate system, the first step is
to calculate relative 3D rigid transformations between
neighboring segments, followed by a global optimiza-
tion into one coordinate systems (next section). In or-
der to automatically determine the registration targets
for the local registrations, we utilize the information
about the coarse position of the pipe segment to de-
termine the nearest neighbors. For each of these, we
calculate a mockup point cloud, calculated from the
known pipe diameter and the approximate distance
between the acquisition module and the pipe surface
and project it onto the target point cloud to get a quick
estimate of the overlap. This omits the time consum-
ing creation of the true point cloud from the depth
map. By setting a threshold to separate the neighbor-
ing segments, we build the foundation to setup a reg-
istration graph like in a Graph-SLAM (Grisetti et al.,
2010) setting, as depicted in Figure 7, in order to yield
consistent registrations between all segments.
Figure 7: Schematic of the graph-like structure used as
foundation of the registration. Each node represents the
location of a pipe segment, initialized using the odometry
information. The edges represent the pairwise registration
between two nodes.
With the utilization of the Graph-SLAM frame-
work, we can interpret the global position of each pipe
segment as a node in a graph. The rigid 3D transfor-
mation between two of these segments forms a con-
necting edge. In the Graph-SLAM literature, this is
referred to as a measurement. We follow two differ-
ent approaches with mutual benefits in order to rel-
atively register two individual 3D pipe segments, as
described in the following.
Feature-Based Registration. As the depth map as-
signs depth measurement to (almost) each pixel in
the texture map, we utilize a sophisticated detection
and matching of SIFT features, based on the work of
(Furch and Eisert, 2013). For the matched feature of
the texture map, we extract the associated depth mea-
surements from the depth map. Pairs with a missing
measurement in one or both acquisitions get rejected
from the registration. Subsequently, we estimate the
rigid transformation between both point clouds using
Singular Value Decomposition.
Projection-Based Registration. The feature-based
method struggles in regions with low textural and ge-
ometrical variation, especially for the case of pipes
made of plastic or similar materials, leading to slight
misalignments creating unpleasant visual artifacts. To
avoid these, we instead utilize again the projection of
the individual pipe segments onto each other to es-
tablish 3D correspondences in order to calculate the
transformation between them. This method heavily
relies on the information from the odometry, which
defines the initial placement of the segments and
therefore their overlap. The odometry in our scenario,
System for 3D Acquisition and 3D Reconstruction Using Structured Light for Sewer Line Inspection
1001

on the other hand, has access to a sensor using a cable
between the robot and the base station to measure the
traveled distance and makes the described registration
therefore an favorable alternative in the absence of
distinctive visual features.
4.2 Global non-Linear Quadratic
Optimization
To optimize the global registration of the segments,
we formulate our problem as a pose graph-based
SLAM problem in three dimensions. The initial poses
of the different segments are given by the odometry as
P
i, j
= [p
T
i, j
, q
T
i, j
]
T
,
where p is a 3D vector representing the position and q
is a quaternion representing the orientation. The rela-
tive pose constraints delivered by the pairwise relative
registrations are given by
T
k,l
i, j
= [(p
k,l
i, j
)
T
, (q
k,l
i, j
)
T
]
T
= [
ˆ
p
T
,
ˆ
q
T
]
T
,
where k and l denote the module and segment iden-
tifier of the query segment, respectively, and
ˆ
p and
ˆ
q
are used as a concise representation. Please refer to
Figure 7 for a visualization of the graph for the global
registration. The residual can then be calculated by
δ =
R(q
i, j
)
T
(p
k,l
− p
i, j
) −
ˆ
p
2vec((q
−1
i, j
q
k,l
)
ˆ
q
−1
)
with
ˆ
p and
ˆ
q being a concise notation of the relative
pose constraint between the two involved segments,
vec(q) the vector part and R(q) the rotation matrix
of the quaternion. Additionally, the residuals can be
weighted by the covariance matrices of the registra-
tions. Thus, we can take into account the lower reli-
ability of the projection-based registration. We also
incorporate prior knowledge into the graph pose es-
timation, as we expect the pipes to be approximately
straight. To do so, we add additional constraints be-
tween the first and the last acquisition of each mod-
ule. We solve the equation system with Ceres (Agar-
wal et al., 2022) to get the final poses of the different
segments T
i, j
= [p
T
i, j
, q
T
i, j
]
T
.
4.3 Integration of Uncertainty and
Prior Knowledge
The Graph-SLAM framework (Grisetti et al., 2010)
enables us to associate each measurement with an
estimation of the uncertainty, by weighting the pose
parameters with a covariance matrix. Thus, we
weight the feature-based registrations higher than the
projection-based, accounting the expected higher pre-
cision. We also use this re-weighting, the odometry
information and the assumption of straight pipes to
introduce additional regularization edges between the
first and the last segment of each module. To this end,
we manually set the entries in the respective covari-
ance matrices to constrain the rotation and translation.
4.4 Creation of Texture and
Displacement Maps
Our final representation comprises a cylindrical mesh
with a detailed texture and displacement map, facil-
itating e.g.,the following AI algorithms, as they can
easily analyze these maps. To this end, we fit a cylin-
der to the registered point clouds of the individual
pipe segments. Afterwards, we transform all points
accordingly to align the model of the pipe with one
axis of the Euclidean coordinate system and transform
the 3D coordinates of the points into cylindrical coor-
dinates, so that each point P of the point cloud C
i, j
is
defined by P = (ρ, φ, z), with ρ representing the ax-
ial distance, φ the azimuth and z the axial coordinate.
Depending on the desired output resolution, we de-
fine an equally spaced grid, with the size of each grid
cell being set to the desired resolution (for example
0.1mm) and utilizing the cylindrical coordinates, as-
sign each point to one grid cell. Depending on the
resolution of the input point clouds, and the desired
output resolution, the number of points assigned to
each cell varies. The final axial distance and texture
gets calculated by the mean over all points assigned
to the respective cell. With a spatial resolution of 0.2
mm, the resulting texture and displacement maps for
0.5m of modelled pipe have a resolution of 2500 pix-
els (dimension along the pipe axis) and 4965 pixels
(along the circumference of the pipe).
5 RESULTS
5.1 Evaluation of the 3D Acquisition
In order to demonstrate the consistency and reliability
of the 3D measurement for a module, we captured and
evaluated ruled and real geometries (planes and cylin-
ders) based on the distance of a plane to the center of
the camera, the radius of the cylinder and the overall
error of the 3D reconstruction compared to the ideal
model.
In particular, we analyze the accuracy of the deter-
mined intrinsic and extrinsic parameters of the mod-
ules as well as the consistency and suitability of the
3D measurements to support the subsequent defect
detection.
VISAPP 2023 - 18th International Conference on Computer Vision Theory and Applications
1002

Table 1: Median distance, RMS and maximum error of the
captured point clouds to the fitted plane for each camera-
projector module. Distances, RMS and maximum errors
are given in millimeters.
Module # median(d) RMS err. Max err.
d = 90 mm
1 90.91 0.09 0.28
2 89.70 0.10 0.30
3 90.32 0.07 0.36
4 89.94 0.07 0.64
5 89.89 0.06 0.29
6 89.81 0.07 0.45
d = 140 mm
1 140.54 0.12 0.58
2 139.25 0.15 0.58
3 140.42 0.16 0.59
4 140.08 0.14 0.62
5 140.19 0.14 0.71
6 139.58 0.17 0.71
5.1.1 Experimental Setup
For the plane fitting, an ideally white and planar board
was positioned in front of the module and perpendic-
ular to the principal axis of the camera (projector).
The board was captured at the approximate distances
of 90 mm and 140 mm to the camera center, repre-
senting flat sections of the used 3D measuring space.
Furthermore, three pipes with diameters of 200 mm,
300 mm, and 400 mm were captured in 3D. The mod-
ules were manually placed in the same positions as
possible and aligned visually. The exact definition
of the object distance from the view of the later ap-
plication cases of the module is irrelevant. Contrary
to the measured planes, the vitrified clay and con-
crete pipes deviate slightly from ideal cylinders and
have artificially added point- and line-shape defects
with a depth of 1-2 mm. We determine the parame-
ters of the plane and cylinder using the least squares
method from a non-defect-free subset (10×10 grid)
of the reconstructed 3D point clouds. We evaluate
the Euclidean distances of the measured points (inte-
gral shape deviations characterized by RMS and max-
imum errors) from the ideal plane or the ideal cylin-
der. To check the plausibility, we additionally deter-
mine distances of the camera to the plane and cylinder
radii.
5.1.2 Results
The resulting medians of the distances in Table 1 cor-
respond to the real distances of the manually aligned
and positioned plane. Very small RMS errors are due
to the large stereo angle and precise system calibra-
tion. The maximum error of the plane (d = 90 mm) for
each module was observed at the corner of the image.
At a distance d = 140 mm, surface deviations can be
Table 2: Estimated cylinder diameter from captured point
clouds by each camera-projector module. The errors in the
last two columns refer to the deviation of all 3D points from
the fitted cylinder. Distances, RMS and maximum errors are
given in millimeters.
Module # Diameter RMS err. Max err.
φ 200 mm
1 200.50 0.09 0.68
2 201.04 0.10 0.94
3 200.96 0.08 0.83
4 202.32 0.09 1.00
5 201.95 0.09 0.47
6 201.98 0.10 0.57
φ 300 mm
1 300.58 0.18 0.90
2 298.58 0.19 1.01
3 299.73 0.18 0.99
4 302.09 0.18 0.93
5 302.73 0.17 1.08
6 301.10 0.17 0.97
φ 400 mm
1 402.34 0.30 2.07
2 394.96 0.28 2.42
3 396.38 0.26 1.98
4 403.76 0.32 2.83
5 401.99 0.29 1.98
6 397.42 0.29 2.20
seen as yellow areas in Figure 10 (right) which occur
in a similar way with other modules. These two ob-
servations are the result of an imprecisely determined
lens distortion model.
The results of the second experiment, in which
pipes of different diameters were measured, are
shown in Table 2. The estimated diameters corre-
spond very well to the real ones. Since only approxi-
mately 1/6 of the entire pipe circumference was cap-
tured each time, the errors can also be attributed to
the cylinder fitting. The RMS and maximum errors
for 200 mm diameter cylinders correspond to the val-
ues from the experiment with the plane at 90 mm.
The values for the φ 300 mm and 400 mm are fur-
ther skewed by real shape defects and damages to the
surface which can be seen in the middle and the right
image of Figure 11. The image of the 400 mm cylin-
der clearly shows that the module was not positioned
in the center of the tube, but this does not affect the
results shown in the table.
We can conclude that the intrinsic and extrin-
sic parameters have been precisely determined and
that the resulting 3D reconstructions of each mod-
ule meets the accuracy requirement. With the help
of the data from the 3D module, defects can be de-
scribed more meaningfully using 3D information and
defect areas with geometric properties could be de-
tected more easily and reliably.
System for 3D Acquisition and 3D Reconstruction Using Structured Light for Sewer Line Inspection
1003
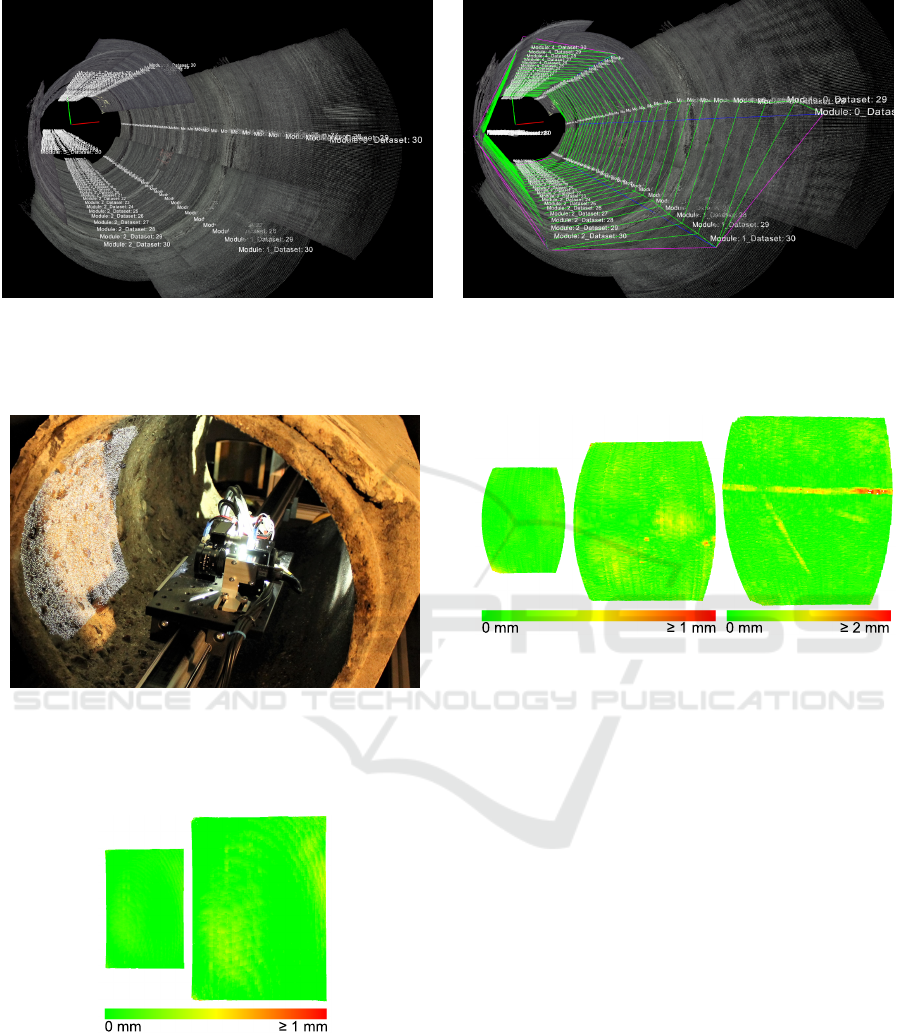
(a) Initial placement. (b) After registration.
Figure 8: Sample result of the registration of 30 consecutive pipe segments. The initial configuration is depicted on the left
side, with strongly visible misalignments, especially around the circumference. The right side shows the final configuration
after the registration (green edges: feature-based, purple edges: projection-based, blue edges: regularization edges).
Figure 9: Experimental setup for evaluating the generated
3D point cloud of a real sewer section. Please note that
the rig shown was only used to evaluate different camera-
projector setups during our research. The final robot is de-
picted in Figure 2.
0 mm ≥ 1 mm
Figure 10: Color coded difference of 3D points to an ideal
plane at 90 mm (left) and 140 mm (right) distance. The
deviations visible as yellow areas on the right are caused by
the imprecise radial distortion parameters.
5.2 Evaluation of the Registration and
Modelling
We acquired test data from several test drives us-
ing the developed robot equipped with the proposed
0 mm 0 mm≥ 1 mm
≥ 2 mm
Figure 11: Color coded difference of 3D points to a fitted
200 mm (left), 300 mm (middle) and 400 mm (right) diam-
eter cylinder. Both real shape defects and surface damages
can be seen clearly. Note the different color coding of the
largest cylinder on the right.
single-shot structured light modules. The measure-
ment of the precise actual 3D geometry of the test
pipes is a substantial challenge, which we could not
tackle in the scope of this work. We therefore present
and discuss some representative qualitative results.
An example of the registration process can be seen in
Figure 8. The unequal length of the different stripes
is due to the special arrangement of the modules, as
described in section 2. After the registration, the dif-
ferent segments got aligned successfully, mostly by
utilizing the feature-based registration. Only at the
end, the projection-based registration method came
into operation, as the overlap was too small to identify
and match enough feature points.
The images in Figure 12 showcase the influence
of the regularization edges. The visible bending is
mainly caused by the plastic pipe section, which ex-
hibits almost no visual or spatial features to track.
Therefore, the global registration accumulates errors
from the projection-based registrations utilized there,
resulting in a apparently bent pipe. The regularization
VISAPP 2023 - 18th International Conference on Computer Vision Theory and Applications
1004
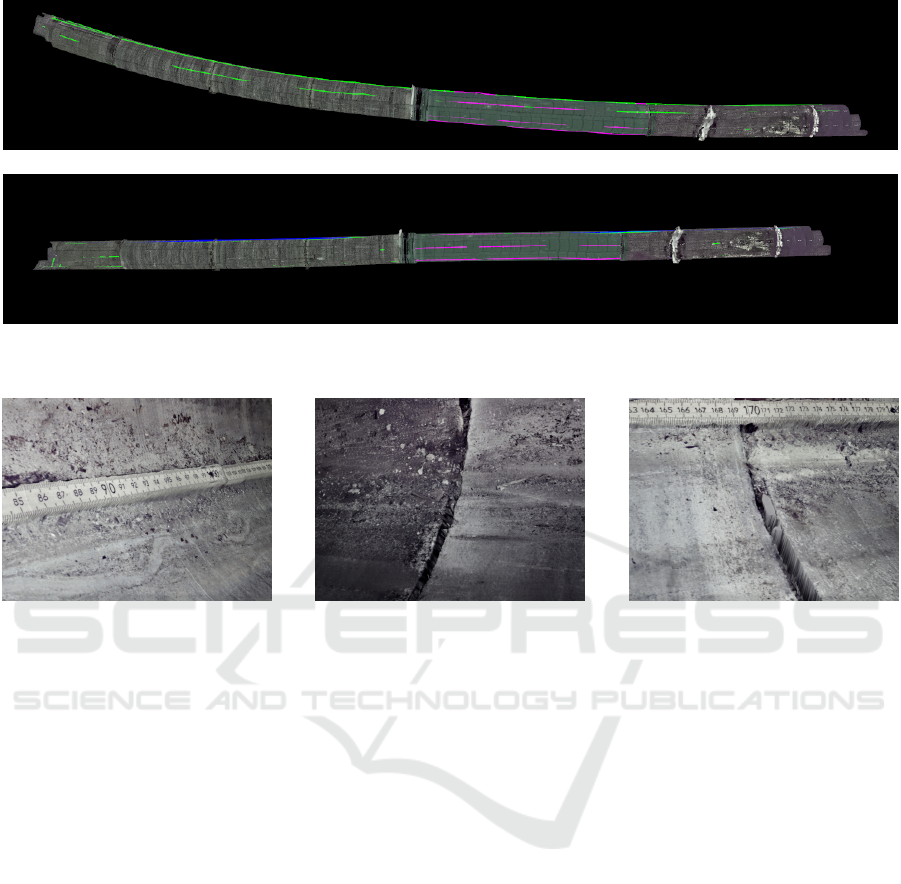
Figure 12: Example image showing an apparently bent pipe, caused by the accumulation of small local registration errors
(upper image) and the corrected geometry, due to the additional regularization edges (blue, lower image).
Figure 13: Samples results rendered using the texture and displacement maps of the individual pipes with subdivision of the
initial cylindrical mesh.
edges correct this issue, by constraining the allowed
deviation from a straight pipe.
To visualize the final 3D models, we configured a
computer graphics suite to apply the texture and dis-
placement map to the cylindrical mesh. We used sub-
division for the coarse mesh triangles to account for
the high-resolution displacement maps. Some repre-
sentative rendered images are depicted in Figure 13
highlighting the fine resolution and the metric mea-
surement of the sewer pipe.
6 CONCLUSION
We presented a sophisticated approach to generate
highly accurate metric 3D models of sewer pipes,
using specifically designed single-shot 3D modules.
Our work demonstrates how an intelligent design
and elaborated algorithms can bring structured light
techniques into action, despite the rugged conditions
present. The availability of highly accurate sewer pipe
models endowed with precise depth information en-
ables an abundance of new working directions and
opens up new possibilities for pattern recognition on
this data. Obviously, they can support and simplify
image processing and, in this form, can be easily
made available to neural networks for defect detec-
tion. We also strongly believe that they also enable the
accurate classification of the detected features, based
on their geometric and optical characteristics. Addi-
tionally, they can be also used to train generative pro-
cesses for the production of artificial training data, to
satisfy the demand of data-driven approaches. We see
our further research directions in the system’s mini-
mization and the proof of the enhancement of the de-
tection results when depth information is used as an
additional input.
ACKNOWLEDGEMENT
This work is supported by the German Federal Min-
istry of Education and Research (Auzuka, grant no.
13N13891) and by the German Federal Ministry
for Economic Affairs and Climate Action (BIMKIT,
grant no. 01MK21001H).
System for 3D Acquisition and 3D Reconstruction Using Structured Light for Sewer Line Inspection
1005

REFERENCES
Agarwal, S., Mierle, K., and Team, T. C. S. (2022). Ceres
Solver.
Alcantarilla, P. F., Nuevo, J., and Bartoli, A. (2013). Fast
explicit diffusion for accelerated features in nonlin-
ear scale spaces. In British Machine Vision Conf.
(BMVC).
Alzuhiri, M., Rathnakumar, R., Liu, Y., and Deng, Y.
(2021). CAAP: A Novel Structured Light Based Sens-
ing and Probabilistic Diagnostic Technique for Pipe
Internal Corrosion Detection and Localization. Tech-
nical report.
Bahnsen, C. H., Johansen, A. S., Philipsen, M. P., Hen-
riksen, J. W., Nasrollahi, K., and Moeslund, T. B.
(2021). 3D Sensors for Sewer Inspection: A Quanti-
tative Review and Analysis. Sensors (Basel, Switzer-
land), 21(7):2553.
Brown, D. C. (1966). Decentering distortion of lenses. Pho-
tometric Engineering, 32(3).
Dong, Y., Fang, C., Zhu, L., Yan, N., and Zhang, X. (2021).
The calibration method of the circle-structured light
measurement system for inner surfaces considering
systematic errors. Measurement Science and Technol-
ogy, 32(7):075012.
Esquivel, S., Koch, R., and Rehse, H. (2009). Pattern
Recognition, 31st DAGM Symposium, Jena, Ger-
many, September 9-11, 2009. Proceedings. In [”Den-
zler, {Notni, Joachim and}, {S
¨
uße, Gunther and}, and
Herbert”], editors, Pattern Recognition, volume 5748
of Lecture Notes in Computer Science, pages 332–
341. Springer Berlin Heidelberg. Series Title: Lecture
Notes in Computer Science.
Esquivel, S., Koch, R., and Rehse, H. (2010). Time budget
evaluation for image-based reconstruction of sewer
shafts. In Proceedings of SPIE, Real-Time Image and
Video Processing 2010, pages 77240M–77240M–12.
Furch, J. and Eisert, P. (2013). An Iterative Method for Im-
proving Feature Matches. In 2013 International Con-
ference on 3D Vision, 2013 International Conference
on 3D Vision, pages 406–413. IEEE.
Grisetti, G., K
¨
ummerle, R., Stachniss, C., and Burgard, W.
(2010). A Tutorial on Graph-Based SLAM. IEEE In-
telligent Transportation Systems Magazine, 2(4):31–
43.
Hansen, P., Alismail, H., Rander, P., and Browning, B.
(2015). Visual mapping for natural gas pipe inspec-
tion. The International Journal of Robotics Research,
34(4-5):532–558.
Hartley, R. and Zisserman, A. (2003). Multiple View Geom-
etry in Computer Vision. Cambridge University Press,
New York, NY, USA, 2nd edition.
Kannala, J., Brandt, S. S., and Heikkil
¨
a, J. (2008). Measur-
ing and modelling sewer pipes from video. Machine
Vision and Applications, 19(2):73–83.
K
¨
unzel, J., M
¨
oller, R., Waschnewski, J., Werner, T., Eis-
ert, P., and Hilpert, R. (2018). Automatic Analysis of
Sewer Pipes Based on Unrolled Monocular Fisheye
Images. 2018 IEEE Winter Conference on Applica-
tions of Computer Vision (WACV), pages 2019–2027.
Li, Y., Wang, H., Dang, L. M., Song, H.-K., and Moon, H.
(2022). Vision-Based Defect Inspection and Condi-
tion Assessment for Sewer Pipes: A Comprehensive
Survey. Sensors (Basel, Switzerland), 22(7):2722.
Morano, R. A., Ozturk, C., Conn, R., Dubin, S., Zietz, S.,
and Nissanov, J. (1998). Structured light using pseu-
dorandom codes. IEEE Transactions on Pattern Anal-
ysis and Machine Intelligence, 20(3):322–327.
Moreno, D. and Taubin, G. (2012). Simple, accurate, and
robust projector-camera calibration. Proceedings -
2nd Joint 3DIM/3DPVT Conference: 3D Imaging,
Modeling, Processing, Visualization and Transmis-
sion, 3DIMPVT 2012, pages 464–471.
Murli, A., D’Amore, L., and De Simone, V. (1999). The
wiener filter and regularization methods for image
restoration problems. In Proceedings 10th Interna-
tional Conference on Image Analysis and Processing,
pages 394–399.
Niblack, W. (1985). An Introduction to Digital Image Pro-
cessing. Strandberg Publishing Company, Topstykket
17, DK-3460 Birkeroed, Denmark.
Reiling, M. (2014). Implementation of a monocular struc-
tured light vision system for pipe inspection robot pi-
rate.
Vehar, D., Nestler, R., and Franke, K.-H. (2018). 3D-
EasyCalib – toolkit for the geometric calibration of
cameras and robots. In 22. Anwendungsbezogener
Workshop zur Erfassung, Modellierung, Verarbeitung
und Auswertung von 3D-Daten, 3D-NordOst, pages
15–26. GFaI e. V.
Wang, Y., Jin, C., and Zhang, Y. (2013). Pipe Defect Detec-
tion and Reconstruction Based on 3D Points Acquired
by the Circular Structured Light Vision. Advances in
Mechanical Engineering, 2013:670487.
Xie, Q., Li, D., Xu, J., Yu, Z., and Wang, J. (2019). Au-
tomatic Detection and Classification of Sewer Defects
via Hierarchical Deep Learning. IEEE Transactions
on Automation Science and Engineering, 16(4):1836–
1847.
Zhang, R., Evans, M. H., Worley, R., Anderson, S. R., and
Mihaylova, L. (2021). Improving SLAM in pipe net-
works by leveraging cylindrical regularity. TAROS
2021: Towards Autonomous Robotic Systems.
Zhang, Y., Hartley, R., Mashford, J., Wang, L., and Burn, S.
(2011). Pipeline Reconstruction from Fisheye Images.
J. WSCG, 19:49–57.
VISAPP 2023 - 18th International Conference on Computer Vision Theory and Applications
1006
