
Kodockly: Using a Tangible Robotic Kit for Teaching Programming
Khaled Mohamed, Yara Dorgham and Nada Sharaf
The German University in Cairo, Cairo, Egypt
Keywords:
Robotics, Tangible User Interface, Programming for Children, Computational Thinking, Educational Robots,
STEM.
Abstract:
Programming has recently become one of the most needed skills. This increased the need and the demand
of teaching children programming and computational thinking at early age. This study aims to investigate
how effectively young children can master the foundations of programming based on tangible robotic user
interface. This was accomplished by designing and implementing, Kodockly, an educational robotic kit for
young children aged from 6 to 11. Children can learn three main programming concepts (Sequential, Con-
ditions, and Loops) while playing with the kits. A sample of N=38 children participated in this research.
Kodockly was tested using between-group experimental design to test the effectiveness of the robotic kits to
teach children programming concepts against the normal teaching methods. The results showed a significant
difference between the two groups with a p-value<0.05 for the learning gain, the engagement level and the
system usability. Accordingly, using Kodockly as an educational robot is considered to be an effective method
to teach young children basics of programming. Kodockly was built for young individuals to attract them
towards Engineering Education.
1 INTRODUCTION
Nowadays, programming, is becoming a fundamental
field. Programming has become a very important area
that inspires and encourages. It has become an im-
portant skill in today’s world. Individuals all over the
world are using different types of programmed appli-
cations for different fields. Everything now depends
basically on technology. This includes health, educa-
tion, finance and not only computer science. Thus, it
is essential for everyone to know how to write their
own programs. It is also a good practice for chil-
dren to learn these fundamental concepts in their early
childhood (Bers et al., 2013).
Teaching programming concepts and robotics al-
lows children to learn important ideas that help them
understand some of the daily objects that they deal
with (Clements and Gullo, 1984; Kanbul and Uzun-
boylu, 2017). Children can understand ideas from
computer science and engineering when learning pro-
gramming concepts and robotics (Elkin et al., 2016).
Moreover, coding using robots shows the children that
they can create with technology because the robot
moves and behaves based on the commands and the
instructions that the child gives it (Kanbul and Uzun-
boylu, 2017). In addition, robots offer tangible and
playful way for children to engage with both the T
of the technology and the E of the engineering in the
early childhood STEM curricula (Bers et al., 2013).
The child can directly view the impact of his or her
programming commands on the actions of the robot
(Kazakoff and Bers, 2014). Therefore, using robotics,
children engage joyfully with the process of learning
how and why motors and sensors work(Sullivan and
Bers, 2016).
The work presented in this paper mainly fo-
cuses on teaching children programming by build-
ing Kodockly, an interactive programmable robot.
Kodockly uses sensors and motors to teach them the
basics of programming, computational thinking, and
some hardware in a simple and fun way. Kodockly
is programmed using tangible wooden blocks. This
makes the robot an off-screen methodology to teach
programming concept. Robots have been chosen be-
cause they have proven to be an effective methodol-
ogy for teaching children logical thinking and pro-
gramming (Estrada, 2017; Kazakoff and Bers, 2014).
Kodockly aims at teaching its children the basic con-
cepts of computational thinking and programming.
This includes sequential programming, conditional
programming and iterative programming. In addition,
some hardware programming concepts are also cov-
ered. Two versions of the Kodockly were designed.
Kodockly 1.0 targets children in the age range of 6 to
Mohamed, K., Dorgham, Y. and Sharaf, N.
Kodockly: Using a Tangible Robotic Kit for Teaching Programming.
DOI: 10.5220/0010446401370147
In Proceedings of the 13th International Conference on Computer Supported Education (CSEDU 2021) - Volume 1, pages 137-147
ISBN: 978-989-758-502-9
Copyright
c
2021 by SCITEPRESS – Science and Technology Publications, Lda. All rights reserved
137

8 whereas Kodockly 2.0 targets children aged 8-11.
After finishing the prototypes, Kodockly was tested
with 38 student. The aim was to know whether the kit
was effective in teaching and whether children found
it enjoyable compared to traditional teaching method-
ologies.
The paper is organized as follows. Section 2
shows some of the previous and related work. Sec-
tion 3 shows the different design details of Kodockly.
Section 4 discusses the different stages and the de-
sign of the experiment. In Section 5, the results of the
experiment are discussed. We finally conclude with
directions to future work.
2 RELATED WORK
A lot of related work has been carried out in the
area of programming for young children. They used
various teaching methods. Some work was done in
the form of serious games that are implemented to
teach children computational thinking and program-
ming skills (Kazimoglu et al., 2012; 2, ). Exam-
ples of these work are Scratch, KIBO, and Cubetto.
Scratch is a block-based visual programming game
that teaches some basics of programming. Students
collect the blocks appropriately by using drag and
drop to create their desired program or game (Armoni
et al., 2015). It allows the children to learn program-
ming by allowing them to build games through build-
ing blocks of code which is written in a simplified
natural language (Kalelio
˘
glu and G
¨
ulbahar, 2014).
KIBO is a robotic kit that is designed for young chil-
dren between 4-7 years. It allows the children to cre-
ate and design their own robot (Elkin et al., 2016).
Children program the robot using tangible code made
of wooden blocks without working with any form of
screens. Cubetto is a robot that is made of tactile and
hard-wearing wood along with a board. It works by
placing the blocks on the board to tell Cubetto where
to go on the mat (Anzo
´
ategui et al., 2017). Differ-
ent colors and shapes of the blocks indicate different
actions of Cubetto. It is made for the age of 3 to 6.
Problem. The struggle is that most of the avail-
able ways to teach children programming concepts
are screen related like Scratch. Screens are now in-
vading our world without any restrictions. Children
became attached to their screens more than human be-
ings. All sorts of entertainments now became screen
related and this is very dangerous on young children
taking them towards many side effects like obesity,
laziness, sleep problems and autism. In addition, the
available robotic kits have a limited number of sensors
and functionalities like KIBO which uses 2 wheels,
motors, distance sensor, sound sensor, light sensor,
and a lantern for light output in its advanced version.
In addition, this advanced version of KIBO uses only
21 wooden blocks which minimum down its function-
alities. Accordingly, children do not have a wide va-
riety of options to program the robot. Furthermore,
KIBO does not allow the children to view or edit the
scanned program which makes it boring and frustrat-
ing for children to repeat all over again if they scanned
something wrong. Moreover, some of the available
robotic kits do not provide advanced programming
concepts for children like Cubetto which do not sup-
port the if-conditional concept in programming.
The aim of this study is to investigate the effect
of using robotic kits in teaching children program-
ming concepts compared to the traditional face-to-
face learning methods. The goal is to examine the
result of using IOT (Internet of Things) systems that
are embedded with sensors, software, electronics, and
connectivity in helping the children to understand the
fundamentals of programming at young age.
3 DESIGN AND
IMPLEMENTATION
Two different versions of Kodockly robot were de-
signed and implemented to support two different age
groups. Kodockly 1.0 was designed for young chil-
dren aging between 6-8 years while Kodockly 2.0 was
designed for children aging between 8-11 years.
The robots are designed to be programmed using
TUI (Tangible User Interface) which is represented
in the wooden programmable blocks . The child can
scan the wooden blocks (command or program) that
he/she wants to execute in order. Tangible wooden
blocks are used instead of GUI (Graphical User Inter-
face), which relies on pictures and words on a com-
puter screen like drag-and-drop, because of many rea-
sons (Horn et al., 2009; Strawhacker et al., 2013;
Wyeth and Purchase, 2002):
• More fun
• More learn-able and enjoyable.
• Improves problem solving behavior.
• Easier for the children than holding a mouse for
dragging and dropping.
• Children seem to be more involved.
• Blocks are familiar and playful objects.
• Ability to see, touch, organize and assemble the
commands.
CSEDU 2021 - 13th International Conference on Computer Supported Education
138
• children can learn and think best when playing,
moving, building and engaging with concrete ob-
jects.
As a result, the robots are programmed using
wooden programming blocks without the use of a
computer, tablet or any other form of a screen. These
wooden blocks are embedded with electronic identi-
fication cards, to uniquely identify each block. Scan-
ners installed in the two robots allow the children to
scan the invisible ID cards of the programming blocks
and send their program to the corresponding robot
to perform their desired function. When the child
wants to design a series of actions to let the robot per-
form, the child will assemble the program as a line of
wooden programming blocks, scan each block by or-
der using the embedded scanner, and watch the robot
performing the desired functions.
3.1 Hardware System Architecture of
Kodockly 1.0 and 2.0
3.1.1 Micro-controller
Any electronic system must have MCU (Micro-
Controller Unit) to operate. A micro-controller is a
small computer on a single integrated circuit( a set of
electronic circuits on one small flat piece or a chip of
semiconductor material that is normally silicon). A
micro-controller contains at least one CPU (processor
cores), memory, and programmable input/output pe-
ripherals to be used in embedded applications. These
robotic kits are implemented based on the Arduino
board. The Arduino board is equipped with a micro-
controller and sets of pins that are used to interface
the sensors and the shields used by the robots. The
robots were implemented using two different types of
Arduino boards to share the workload (Arduino Mega
and Arduino Uno).
3.1.2 Chassis and Motors
The robots consist of wooden chassis that is con-
nected to four wheels to enable the movement of the
robots in different directions. Each wheel is con-
nected to a DC motor so that it can be activated or
deactivated separately. All the DC motors are con-
nected to H-bridge, an electronic circuit that switches
the polarity of a voltage applied to a motor, to allow
the DC motors to run forward or backward.
3.1.3 Scanner of the Blocks
To be able to scan the programmable blocks that
the child sorts them, a scanner is embedded in each
robot that can reads RFID (radio-frequency identifica-
tion) cards. These cards are invisibly attached to the
wooden blocks that are associated with each robot.
Each card is programmed to do a specific function.
Once the robot finishes scanning the program, it will
translate internally the scanned blocks into some pro-
gram or commands that the robot can execute and per-
form.
3.1.4 Color Detection
To let the robot identify different colors, a color sen-
sor is used where it detects the color of the surface in
RGB (red, green, blue) scale.
3.1.5 Light Detection
Light and dark rooms can be recognized using a
photo-resistor or LDR (light-dependent resistor). Us-
ing this resistor, it can read the light intensity of the
surrounding room, and based on the reading, it can
detect whether the room is dark or bright.
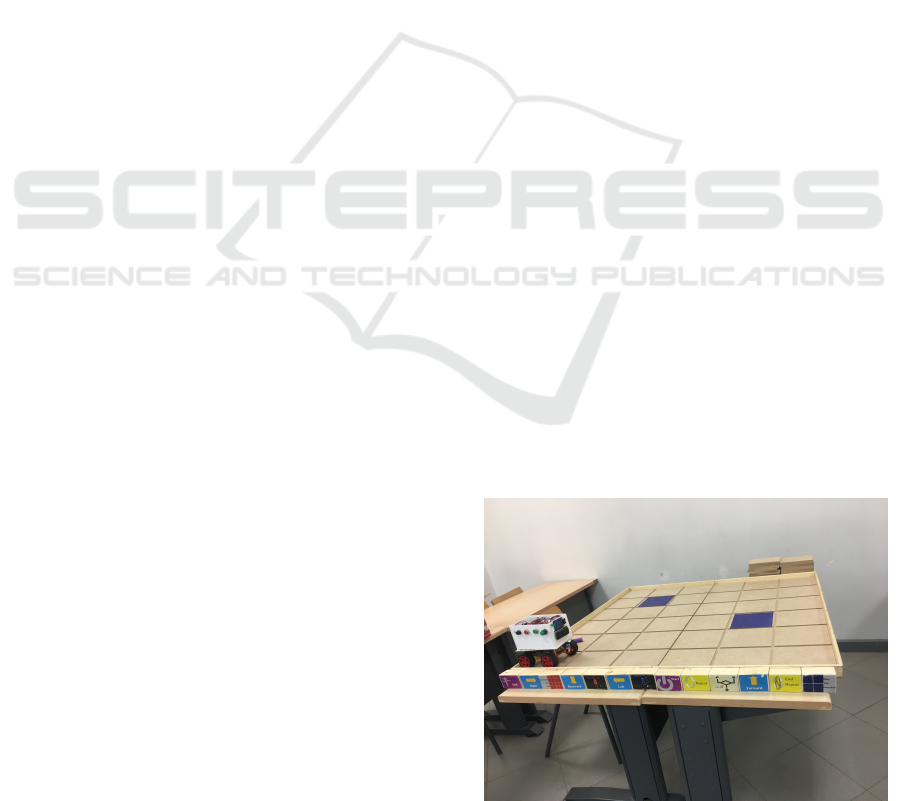
3.2 Kodockly 1.0
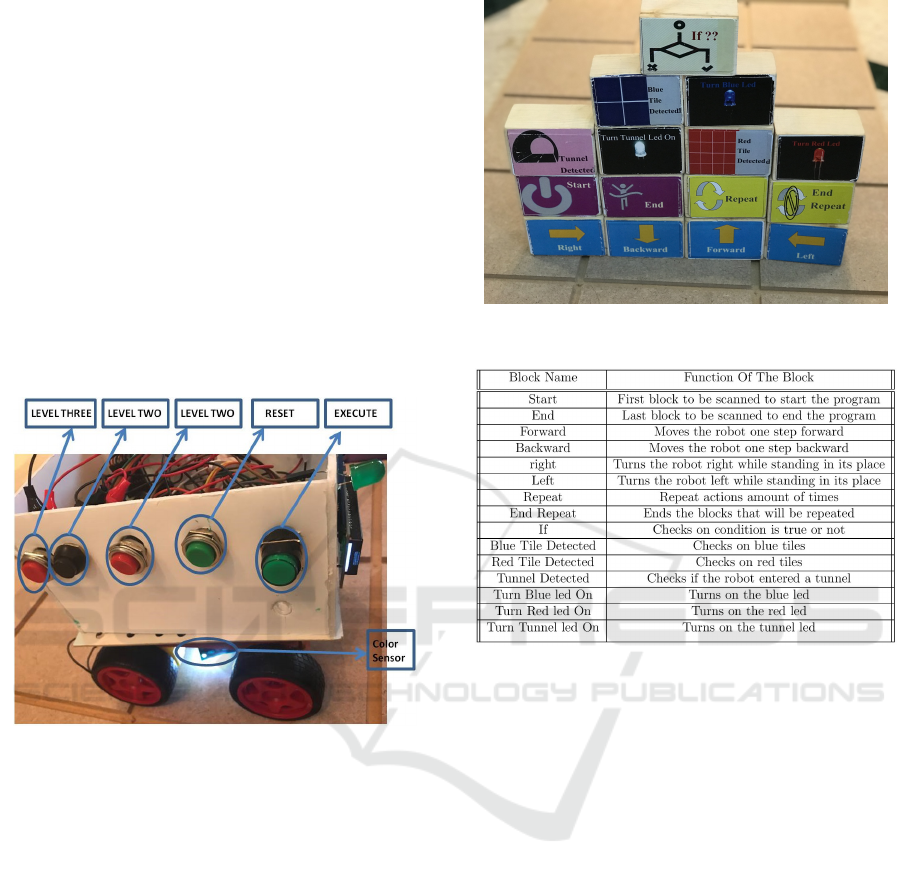
Kodockly 1.0 is a robot that is programmed by the
children using wooden blocks shown in figure 3.
The functionality of each block is shown in figure 4.
Kodockly 1.0 can be used along with a 3D wooden
Maze to teach young children basics of programming
in a kind of a game as shown in figure 1. The game is
composed of levels. Each level is introducing a new
programming concept; each level has sub-levels as the
maze is dynamic so different mazes can be done as the
inner parts of the maze can be changed. Accordingly,
each concept can be practiced many times through
the sub levels, and children will not get the chance
to memorize the answers. The game is focusing on
three concepts sequential, conditional and loops.
Figure 1: Kodockly 1.0 along with the wooden maze.
Kodockly: Using a Tangible Robotic Kit for Teaching Programming
139
The game idea is basically to get the robot out of
the maze while dealing with different cases in each
level. Each level gets harder than the one before it and
introduces much more advanced programming con-
cepts. The game goes as follows: after scanning all
the blocks in order, the execution green button should
be pressed to let the car start executing the scanned
blocks as shown in figure 2. The start block should be
scanned the first one if it is not the case the car will not
move and an error message will be displayed on the
screen. In addition, the end block should be scanned
at the end. If it is not the case the car will not move
and an error message will be displayed on the screen.
In both cases the child should start all over again by
pressing the reset button as shown in figure 2. This
is used to introduce the idea that any program should
have a start and end statements. To make the game
Figure 2: Kodockly 1.0 buttons.
more interesting and to introduce a new concept, the
children have to collect some cards from the maze
while passing through it. After finishing the game,
the children have to sort these cards. These cards are
parts of a flow chart, so the child should sort them in
the way that would give the flow chart of the program
that helped the robot to get out of the maze. The LCD
screen will be displaying every action happening to
the robot while it is executing.
Components of Kodockly 1.0. Kodockly 1.0 used
the color sensor to detect the colors of the tiles in the
maze to detect the obstacles. The photo resistor used
to detect the light intensity to know when the robot
enters a tunnel in the maze. An SD card is added to
add audio files to the project so the speaker can play
them when needed. In addition, the keypad is used
to enter the loop count. An LCD is used as a kind of
feedback for the children to display on it every action
that is happening or any error messages. Furthermore,
Figure 3: Kodockly 1.0 blocks.
Figure 4: Functionalities of the wooden blocks of Kodockly
1.0
a led is used as a feedback for scanning the blocks.
Furthermore, an object detector sensor was attached
in the kit to detect if there is obstacle in front of the
robot to make sure that the robot will not crash into
the walls of the maze.
3.2.1 Game Levels
Level One. This level aims to introduce the sequen-
tial concept in a fun way. The children are asked to
let the robot moves to a certain position in the maze
or moves out of it through a series of steps with no re-
strictions. The blocks that can be used by the children
in this level are six blocks only which are Forward,
Backward, Right, Left, Start and End. Initially, level
one is the activated level, but there is a button shown
in figure 2 that is used to activate level one if another
level is chosen and level one is needed again. In this
level, each block can be scanned more than once.
Level Two. Level two includes the same sequential
concept as level one, but the condition concept will be
introduced. The conditions are applied by adding dif-
CSEDU 2021 - 13th International Conference on Computer Supported Education
140
ferent obstacles in the maze in the path of the robot.
Obstacles added in the game are tunnel, blue tiles and
red tiles. The robot will not be able to pass these ob-
stacles using the six blocks used in level one only, so
this level uses 7 more blocks than level one. The new
blocks used in this level are if, blue tile detected, red
tile detected, tunnel detected, turn blue led on, turn
red led on and turn tunnel led on along with the blocks
of level one. In level two, the robot will not be able to
pass the blue tile if the blue led is not turned on and
will not be able to pass the red tile if the red led is not
turned on and in order to pass the tunnel, the tunnel
led must be turned on. Accordingly, this level intro-
duced the conditions concept. This level is activated
using a black button shown in figure 2.
Level Three. Level three includes the same obsta-
cles used in level two, but here the concept of loops
will be introduced. Accordingly, a restriction is added
that each block cannot be scanned more than three
times at this level. This restriction forced the children
to use the two new blocks of this level to solve the
maze which are repeat and end repeat. Any blocks
scanned after the repeat block and before the end re-
peat block will be repeated as many as the loop count
that was entered using the keypad. This level is acti-
vated using a button shown in figure 2.
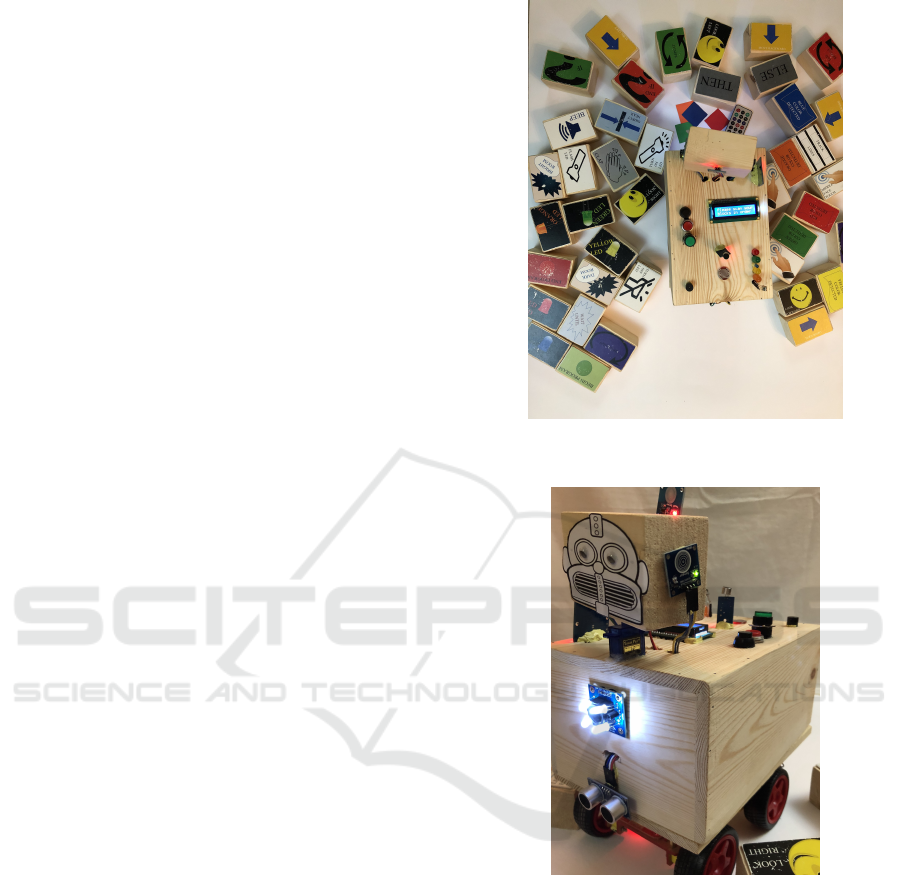
3.3 Kodockly 2.0
Regarding the older age group, Kodockly 2.0 was de-
signed and implemented to teach these children ba-
sics of programming, and sensors based computa-
tional thinking. This robotic kit uses a wide variety of
advanced types of sensors, motors, and actuators that
the children encounter in their daily life to do more
complicated functions. The children can program this
kit using TUI (Tangible User Interface) which is rep-
resented in wooden programmable blocks. Figures 5
and 6 show Kodockly 2.0 robotic kit.
Components of Kodockly 2.0. There are several
electronic components that are used in Kodockly 2.0
to broaden the functionalities in order to help children
learn the programming concepts in an interactive way.
3.3.1 Object Detection
In order to let the robot detects whether there is an ob-
ject in front of it or not, an ultrasonic sensor is used.
This sensor measures the distance by using ultrasonic
waves. The ultrasonic waves are emitted from the
head of the sensor, and the reflected waves are re-
ceived back from the target. The ultrasonic sensor
Figure 5: Kodockly 2.0 along with its programmable
blocks.
Figure 6: Kodockly 2.0 front view.
measures the distance to the target by measuring the
time between the emission and reception.
3.3.2 Color Detection
The used color sensor in Kodockly 2.0 is programmed
to differentiate between 5 different colors which are:
red, green, yellow, orange and blue.
3.3.3 Clap Detection
The robot can recognize claps using the sound sensor
that is embedded. The set point level of the sensor is
adjusted using a potentiometer that is located at the
back of the sensor to spot claps only.
Kodockly: Using a Tangible Robotic Kit for Teaching Programming
141

3.3.4 Head Sensing and Orientation
The robot has a head that is attached to a servo mo-
tor, a motor which allows the control of the angle of
rotation and speed of rotation. This motor is used in
order to let the head rotate to the right, rotate to the
left or look forward. In addition, three touch sensors
are placed to the head of the robot. One on the right,
one on the left, and one in the middle of the head to
detect any touch happens to any part of the head.
3.3.5 Line Tracking
In order to be able to track black lines, line follower
sensor is used. The robot uses two-line follower sen-
sors to be able to follow black lines on the floor. The
idea of having two sensors not only one is that each
one is placed near the front wheels (one at the right
and one at the left). If the right sensor detects that it is
over a black line now, so the robot has to turn slightly
right. Same thing happens when the left sensor de-
tects a black line, the robot has to turn slightly left to
adjust its orientation.
3.3.6 Light Output
Five different LEDs (Light-Emitting Diodes) are
added. Each one has a specific color. The colors of
the embedded LEDs are red, green, yellow, orange,
and blue. They can be programmed to turn on, flash,
or turn off.
3.3.7 Sounds
In order to produce sounds, a buzzer is added so that
it can be programmed to beep. In addition, a speaker
is added to provide more interaction with the child
who is using this kit. For example, once any block is
scanned, a voice is played through the speaker to tell
the child which block is scanned. In addition, when
the robot executes the scanned program, the robot
tells the child through the speaker what it is going to
do right now. It also says what it is checking for if
there was conditions, whether the program structure
is correct or not, and finally some tips can be played
to the child if the program structure was incorrect to
guide him to the part in the scanned program that has
errors.
3.3.8 Feedback
An LCD screen is added to the robot to display some
important tips and messages like displaying what the
robot is executing now, what condition is the robot
checking, was the condition satisfied or not, the loop
count if there was a repetition in the designed pro-
gram, an external event that the robot is waiting for,
and whether the structure of the scanned program is
correct or not.
3.3.9 Robot Control
In order to make things easier for young children, 3
buttons are added to the robot. The green button is
used to let the robot start executing what it scanned.
When the child finishes scanning, he/she will press on
the start execution button to see the robot functioning.
The robot will not function unless the code structure is
correct. The black button is used for help. If the pro-
gram that the child has scanned contains some errors,
the robot will not function, and the child will have the
chance to use this help button. On pressing the help
button, a specific help tip will be played through the
speaker that will guide the child to the part in the pro-
gram that contains the error. Accordingly, the child
can know what is wrong, and what is preventing the
robot from executing the program. The last button
is used to reset all the robot to its default settings.
Usually this button is pressed to start scanning a new
program. Moreover, to enter a counter for repetitions
and loops, an infrared receiver, and infrared remote
control are used. The infrared receiver receives the
signals which are transmitted by the remote, decodes
these signals to a number, and then uses this num-
ber as a counter to do repetitions. Moreover, there
is a mode in the robot that can be activated through
a button to display and edit the scanned program on
the screen with the help of three other buttons (next
instruction, previous instruction, and delete instruc-
tion).
Functionalities of Kodockly 2.0. The child has the
opportunity to select what he/she wants the robot to
do. The child can make a program of whatever num-
ber of wooden blocks he wants from the available
blocks. Forty wooden blocks were built and associ-
ated with this robotic kit as shown in figure 7. Each
of the available wooden blocks is programmed to do
a definite function. Figures 8 and 9 explain the func-
tionality of each block. These programmable blocks
cover the three programming concepts which are se-
quential programming, conditional programming, it-
eration programming.
4 EXPERIMENTAL DESIGN
The work done in this paper studies the effect of using
educational robots to teach young children the main
CSEDU 2021 - 13th International Conference on Computer Supported Education
142

Figure 7: Kodockly 2.0 blocks.
Figure 8: Available Blocks Part I.
concepts of programming compared to the traditional
learning methods. The aim of the experiment is to
prove or reject the null hypothesis. The null hypothe-
sis states that there is no difference between teaching
children programming using the robots and using the
traditional methods. The first hypothesis,H1 , claims
that there is no difference in the learning gain between
the children who used the robots and those who used
Figure 9: Available Blocks Part II.
the traditional methods. The second hypothesis,H2 ,
states that there is no difference in the engagement
level of the children who used the robots and those
who used the traditional methods. The third hypothe-
sis,H3 , states that there is no difference in the system
usability of the robots and the traditional methods.
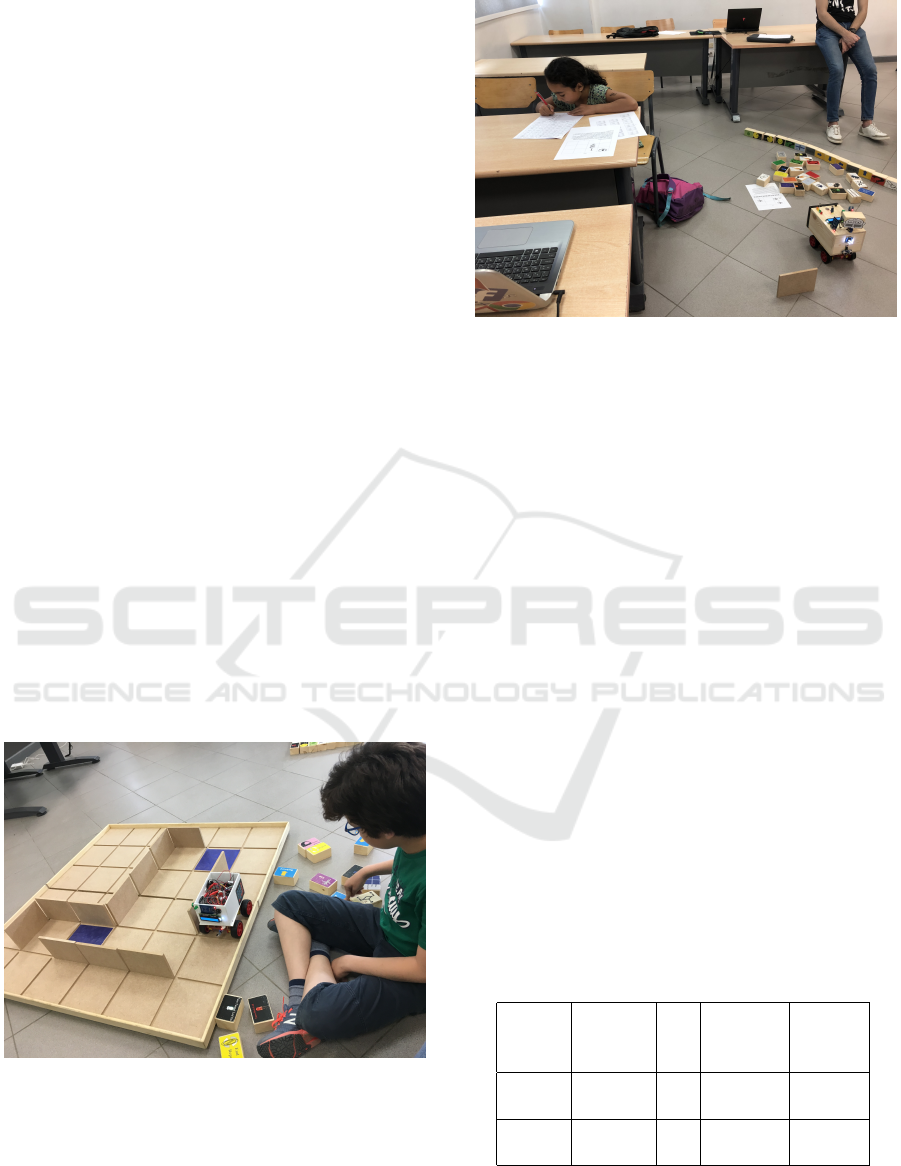
4.1 Focus Group
A focus group was held by the help of a school before
starting the experiment. A focus group is a group of
children trying out the robotic kits before starting the
testing phase. The focus group is made to know the
opinion of the children regarding the kits and if there
are any modifications or improvements that should be
done to make them better. The school provided five
students for each age group to try the kits. Figure 10
shows one of the children of the focus group trying
the kit.
4.1.1 Kodockly 1.0
The five children with the younger age tried Kodockly
1.0. After trying it with the wooden maze, the chil-
dren said that they are allowed to make only one loop
in the game. Consequently, a lot of the mazes could
not be solved in level three. Moreover, the feedback
of scanning the blocks which is flashing the led was
Kodockly: Using a Tangible Robotic Kit for Teaching Programming
143
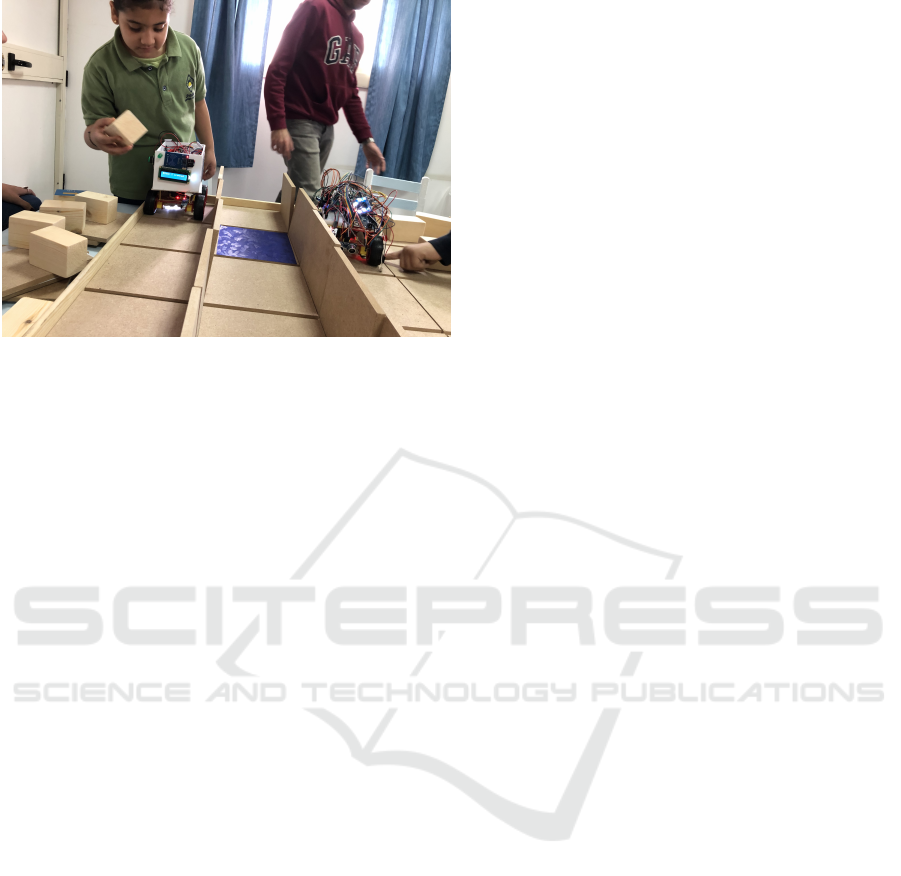
Figure 10: Focus group.
very fast, so some children did not notice that a block
was scanned even if it was scanned. According to the
comments of the children, the robot was modified to
allow the children to make three different loops with
three different loop counts. Furthermore, the feed-
back of the scanning was modified to make the led
flash longer time, so the children could notice it when
it flashes.
4.1.2 Kodockly 2.0
The five children with the older age tried the other
version of Kodockly. The children said that the robot
is taking much time to execute every block. Meaning
that there was some time delay between executing the
function of the block and the execution of the follow-
ing one. This was solved by decreasing the delay time
between the execution of each block. Another com-
ment is that the connections of the robot (including
the wiring and boards) must be totally covered and
invisible. This was supposed to be done before con-
ducting the focus group, but the lack of time did not
allow to make it then. However, the robot was totally
covered, and connections were all hidden before do-
ing the experiment.
4.2 Participants
Thirty Eight children participated in this experiment.
They were divided into two groups according to their
age group, Group A and Group B. Group A consisted
of 22 children aging from 6 to 8 years while group
B consisted of 16 children aging from 8 to 11 years.
Each of the two groups (A & B) were divided into two
sub-groups, experimental group (A1, B1) and control
group (A2, B2). The experimental groups used the
kits, while the control groups were exposed to tradi-
tional learning methods. Regarding the two exper-
imental groups, group A1 tried Kodockly 1.0 while
group B1 tried Kodockly 2.0. There were no any cri-
teria in the selection of the children. However, for en-
suring the experimental homogeneity, everyone must
not have any previous programming experience.
4.3 Measures
4.3.1 Learning Gain Test
The learning gain is how much the child learned from
the activity made. In order to quantify the learn-
ing gain, pre and post tests were used. These tests
aim to measure the variation between the learning re-
sults of the group participants exposed to the tradi-
tional learning methods and the other group exposed
to the educational robots. The tests were different for
each age group. The test of group A, children ag-
ing from 6 to 8, contained three different questions
one for each level or concept(sequential, conditions,
and loops). The test was three mazes on papers with
the theme of Tom and Jerry carton and the child is
asked to solve them through some steps. The test of
group B, children aging from 8 to 11, is a short story
with a problem to solve. The problem targets the
three programming concepts (sequential, conditions,
and loops) however in more advanced level in addi-
tion to some hardware concepts. The children have
the same 40 blocks printed with the test sheet to num-
ber them in order to solve the problem. The tests were
solved twice by each child one time before the activity
and one time after the activity to calculate the infor-
mation gained throughout the activity.
4.3.2 Engagement Level Test
Engagement is the concept of how the person is being
committed to something. Several factors define the
engagement while learning like fun, control, excite-
ment, enjoyment, interest, attention, and enthusiasm.
This test is used to quantify the engagement level of
each child.
4.3.3 System Usability Scale
The system usability test is used to measure how us-
able the system is. The system usability is measured
through different factors like satisfaction of the user.
A system is considered usable if it is efficient, satis-
fying and intuitive.
CSEDU 2021 - 13th International Conference on Computer Supported Education
144
4.4 Procedure
Each child in the two groups was experimented indi-
vidually. Every child was given 45 minutes session to
finish the whole experiment. The process of the ex-
periment consisted of 4 phases. The first phase was a
hard-copied pre-test that the child tries to answer it in
10 minutes. Once the 10 minutes have finished, and
whether the child finished solving the pre-test or not,
the second phase of the experiment starts which lasts
for 25-30 minutes. This phase differs depending on
the group. Group A1 children were introduced to the
programming concepts using Kodockly 1.0. Group
B1 children were introduced to the sensors available
in the robot and learn the three programming con-
cepts by engaging with Kodockly 2.0, knowing how it
works, how it is programmed, and physically realiz-
ing the function of each wooden block. On the other
hand, the children in the control groups (Groups A2
and B2) sit and listen to explanations on the board for
the same programming concepts. Last but not least,
during phase three which lasts for 10 minutes, the par-
ticipants of all groups (A1, A2, B1, B2) were asked
to solve the post-test that is assigned to their group,
which is the same test that was given for them at the
beginning of the session to ensure that both tests have
the same difficulty level and to know how much the
children learned. Finally, they are requested to fill in
the standardized engagement level and system usabil-
ity scale questionnaires in the last 5 minutes. Figures
11 and 12 show two children trying the two versions
of Kodockly.
Figure 11: Testing Kodockly 1.0.
Figure 12: Testing Kodockly 2.0.
5 RESULTS AND DISCUSSION
The learning gain, engagement level, and system us-
ability scale were measured after using the corre-
sponding learning approach to compare between both
learning methods. In this section, the results of all
the previous tests that have been conducted during
the experiment are reported and analyzed using an
independent sample t-test to clarify whether the two
groups (experimental and control groups) are signifi-
cantly different or not.
5.1 Learning Gain Test Results
After analyzing the results, it was shown that the
learning gain of the two experimental groups (the
groups that used the kits) were significantly higher
than the learning gain of the two control groups (the
groups that were taught using traditional learning
methods) with p-value<0.05 as shown in tables 1 and
2. This rejects the hypothesis which stated that there
is no difference in the learning gain between teaching
programming using the traditional learning methods
and teaching programming using the robots (H1).
Table 1: Independent t-test results of the learning gain.
Group Type N Mean Standard
Devia-
tion
A1 Exp. 12 14.0833 6.81520
A2 Control 10 3.7000 6.66750
B1 Exp. 8 6.9375 2.11183
B2 Control 8 4.3750 1.92261
Kodockly: Using a Tangible Robotic Kit for Teaching Programming
145
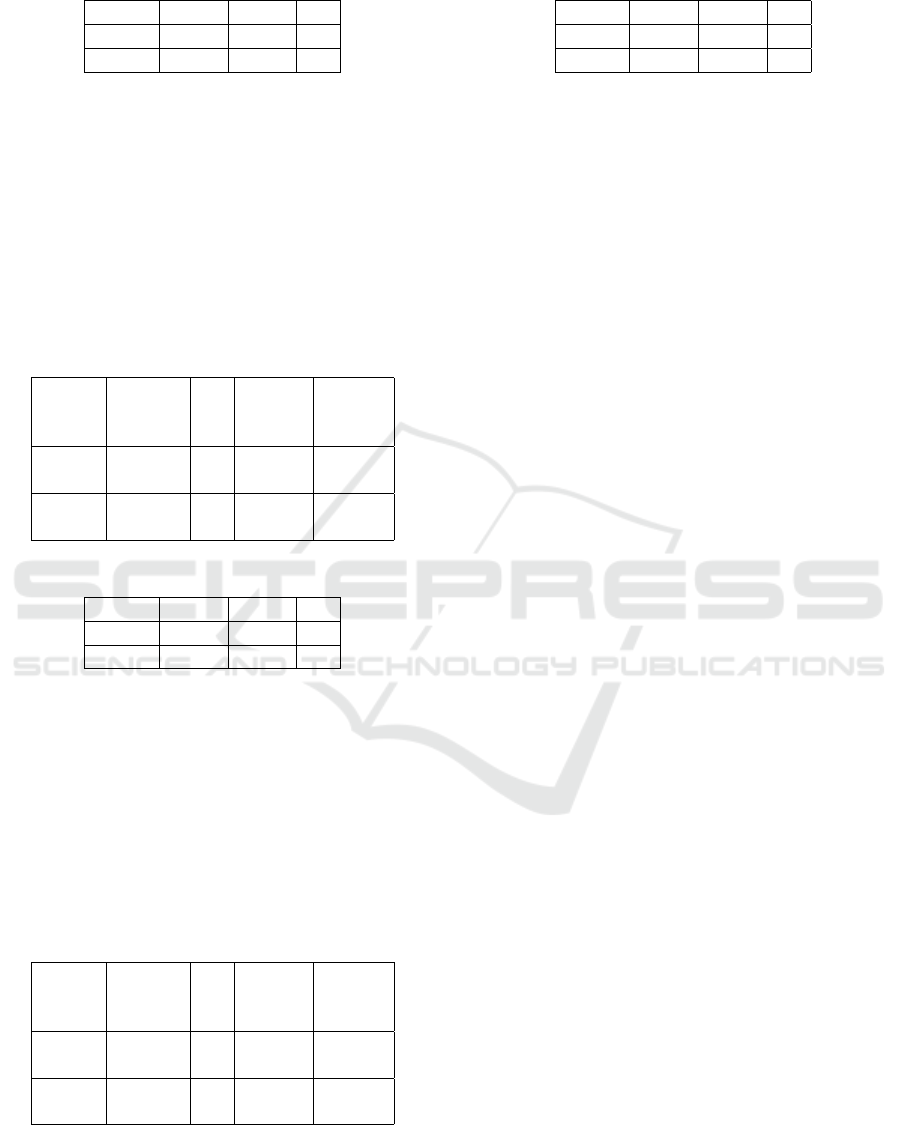
Table 2: Independent t-test results of the learning gain.
Group t p df
A 3.593 0.002 20
B 2.538 0.024 14
5.2 Engagement Level Test Results
The results of the independent t-test showed that en-
gagement level of the participants of both experimen-
tal groups were significantly higher than that of the
control groups with p-value<0.05 as shown in tables
3 and 4. This rejects the hypothesis which stated that
there is no difference in the engagement level between
the usage of the robots and the traditional learning
methods (H2).
Table 3: Independent t-test results of the engagement level.
Group Type N Mean Standard
Devia-
tion
A1 Exp. 12 4.1917 0.56481
A2 Control 10 3.1190 0.73237
B1 Exp. 8 4.1525 0.43657
B2 Control 8 2.9275 0.76999
Table 4: Independent t-test results of the engagement level.
Group t p df
A 3.880 0.001 20
B 3.914 0.002 14
5.3 System Usability Scale Results
The analysis of the results demonstrated that the
usability of both robotic kits were significantly
higher than the traditional learning classroom with p-
value<0.05 as shown in tables 5 and 6. This rejects
the hypothesis which stated that there is no difference
in the system usability of the robots and that of the
traditional learning methods (H3).
Table 5: Independent t-test results of the system usability.
Group Type N Mean Standard
Devia-
tion
A1 Exp. 12 4.1417 0.51250
A2 Control 10 3.1400 0.69793
B1 Exp. 8 4.0 0.48697
B2 Control 8 2.8750 0.64973
Table 6: Independent t-test results of the system usability.
Group t p df
A 3.879 0.001 20
B 3.919 0.002 14
6 CONCLUSION
Studies show that technology is a very strong educa-
tional tool. The integration of technology in educa-
tion can improve the learning process and the results
of the students. It also helps in making learning more
meaningful, easier, and enjoyable. Robotics and pro-
gramming offer a new and exciting way to address the
T of the technology and the E of the engineering that
are most neglected in early childhood STEM educa-
tion.
The work presented in this paper was to imple-
ment two educational robots for young children ag-
ing from 6-8 and from 8-11. These two educational
robots teach the three main programming concepts
(sequential, Conditions, loops) along with some hard-
ware without the use of any computers or screen-time.
The children can program these robots using tangible
programmable wooden blocks. The primary objective
of this study is to test the effective use of that educa-
tional robots in teaching children basics of program-
ming, computational thinking, and hardware. This re-
search demonstrated that young children can master
the foundational concepts regarding programming a
robot in addition to complex programming concepts
such as loops and conditional statements. Kodockly
kits were proven to be more effective and enjoyable
compared to traditional methods.
This study investigated short-term results, so the
future step is to extend the research and test the re-
sults in a long-term study. In addition, new sensors
can be added as well as new programming blocks to
expand the functionalities of the robots. Moreover,
the kits need to tackle more advanced concepts like
nested if-statements and nested loops. Furthermore,
another version of Kodockly could be made for visu-
ally impaired children to give them the opportunity to
learn the basics of programming in an interactive way
that they could understand.
In the future, we also aim to use Kodockly to
teach concepts other than computational thinking.
We will also embed adaptive debugging features into
Kodockly.
CSEDU 2021 - 13th International Conference on Computer Supported Education
146

7 SELECTION AND
PARTICIPATION OF
CHILDREN
The children that participated in the study were ran-
domly selected. We have posted an announcement
about a computational day and we invited children
whose parents signed up. The setting was a fun one
with different stations of games with different aims
and technologies. The platform presented in this pa-
per was one of the stations.
REFERENCES
10 tools to teach kids the basics of programming. https:
//www.hongkiat.com/blog/programming-tools-kids/.
Anzo
´
ategui, L. G. C., Pereira, M. I. A. R., and Jarr
´
ın, M. d.
C. S. (2017). Cubetto for preschoolers: Computer pro-
gramming code to code. In 2017 International Sym-
posium on Computers in Education (SIIE), pages 1–5.
IEEE.
Armoni, M., Meerbaum-Salant, O., and Ben-Ari, M.
(2015). From scratch to “real” programming.
ACM Transactions on Computing Education (TOCE),
14(4):25.
Bers, M., Seddighin, S., and Sullivan, A. (2013). Ready for
robotics: Bringing together the t and e of stem in early
childhood teacher education. Journal of Technology
and Teacher Education, 21(3):355–377.
Clements, D. H. and Gullo, D. F. (1984). Effects of com-
puter programming on young children’s cognition.
Journal of educational psychology, 76(6):1051.
Elkin, M., Sullivan, A., and Bers, M. U. (2016). Program-
ming with the kibo robotics kit in preschool class-
rooms. Computers in the Schools, 33(3):169–186.
Estrada, F. J. (2017). Practical robotics in computer sci-
ence using the lego nxt: An experience report. In
Proceedings of the 2017 ACM Conference on Innova-
tion and Technology in Computer Science Education,
pages 329–334. ACM.
Horn, M. S., Solovey, E. T., Crouser, R. J., and Jacob, R. J.
(2009). Comparing the use of tangible and graphi-
cal programming languages for informal science ed-
ucation. In Proceedings of the SIGCHI Conference
on Human Factors in Computing Systems, pages 975–
984. ACM.
Kalelio
˘
glu, F. and G
¨
ulbahar, Y. (2014). The effects of
teaching programming via scratch on problem solving
skills: A discussion from learners’ perspective. Infor-
matics in Education, 13(1).
Kanbul, S. and Uzunboylu, H. (2017). Importance of coding
education and robotic applications for achieving 21st-
century skills in north cyprus. International Journal
of Emerging Technologies in Learning, 12(1).
Kazakoff, E. R. and Bers, M. U. (2014). Put your robot
in, put your robot out: Sequencing through program-
ming robots in early childhood. Journal of Educa-
tional Computing Research, 50(4):553–573.
Kazimoglu, C., Kiernan, M., Bacon, L., and Mackinnon,
L. (2012). A serious game for developing compu-
tational thinking and learning introductory computer
programming. Procedia-Social and Behavioral Sci-
ences, 47:1991–1999.
Strawhacker, A., Sullivan, A., and Bers, M. U. (2013).
Tui, gui, hui: is a bimodal interface truly worth the
sum of its parts? In Proceedings of the 12th Inter-
national Conference on Interaction Design and Chil-
dren, pages 309–312. ACM.
Sullivan, A. and Bers, M. U. (2016). Robotics in the early
childhood classroom: learning outcomes from an 8-
week robotics curriculum in pre-kindergarten through
second grade. International Journal of Technology
and Design Education, 26(1):3–20.
Wyeth, P. and Purchase, H. C. (2002). Tangible program-
ming elements for young children. In CHI’02 ex-
tended abstracts on Human factors in computing sys-
tems, pages 774–775. ACM.
Kodockly: Using a Tangible Robotic Kit for Teaching Programming
147
