
MeshPipe: A Python-based Tool for Easy Automation and
Demonstration of Geometry Processing Pipelines
Joan Fons, Antoni Chica
a
and Carlos Andujar
b
ViRVIG, Universitat Polit
`
ecnica de Cataluna, Barcelona, Spain
Keywords:
Geometry Processing, Polygonal Meshes.
Abstract:
The popularization of inexpensive 3D scanning, 3D printing, 3D publishing and AR/VR display technologies
have renewed the interest in open-source tools providing the geometry processing algorithms required to clean,
repair, enrich, optimize and modify point-based and polygonal-based models. Nowadays, there is a large
variety of such open-source tools whose user community includes 3D experts but also 3D enthusiasts and
professionals from other disciplines. In this paper we present a Python-based tool that addresses two major
caveats of current solutions: the lack of easy-to-use methods for the creation of custom geometry processing
pipelines (automation), and the lack of a suitable visual interface for quickly testing, comparing and sharing
different pipelines, supporting rapid iterations and providing dynamic feedback to the user (demonstration).
From the user’s point of view, the tool is a 3D viewer with an integrated Python console from which internal
or external Python code can be executed. We provide an easy-to-use but powerful API for element selection
and geometry processing. Key algorithms are provided by a high-level C++ library exposed to the viewer via
Python-C++ bindings. Unlike competing open-source alternatives, our tool has a minimal learning curve and
typical pipelines can be written in a few lines of Python code.
1 INTRODUCTION
Point-based and polygonal-based models are the cen-
tral part of an increasing number of popular applica-
tions including 3D scanning (e.g. via photogramme-
try tools), 3D modeling (e.g. Blender, Tinkercad), 3D
printing services, 3D publishing tools (e.g. Sketch-
Fab) and desktop-based or AR/VR-based interactive
applications.
The availability of free or low-cost options for
these technologies have significantly increased their
user base, in areas such as art, architecture, cultural
heritage, construction and entertainment. This means
that a growing number of users are not 3D model-
ing/3D processing experts, but 3D enthusiasts, 3D
hobbyists and professionals from other disciplines.
A common requirement in all applications above
is the need to perform some geometry processing
on the 3D models before they become useful for
the target application. Consider for example a cul-
tural heritage project for digitizing and publishing
an art work. A 3D model can be created by taking
a
https://orcid.org/0000-0001-7519-2201
b
https://orcid.org/0000-0002-8480-4713
photos and then using open-source MVS+SfM tools
such as COLMAP (Sch
¨
onberger and Frahm, 2016;
Sch
¨
onberger et al., 2016). However, the resulting
model will include background objects that have to
be removed and missing parts that have to be re-
paired. If a high-quality setting was used, the model
will also require some optimizations (simplification,
normal mapping) to be ready for publication. Dif-
ferent applications often require different processing
pipelines, although it makes sense for users to share
ready-to-use pipelines for specific tasks.
Today, there are many open-source libraries and
tools supporting geometry processing. Some exam-
ples we review in the next section are CGAL, VCG,
PMP, PCL and libigl (libraries) and MeshLab, Mesh-
Mixer and OpenFlipper (applications).
The libraries above provide efficient imple-
mentations of common geometry processing algo-
rithms (analysis, repairing, simplification, remeshing,
smoothing, parameterization...) and obviously excel
in terms of automation. Unfortunately, they have a
substantial entry barrier for non-experts, and most of
them require compilation, which makes it difficult to
iterate different pipelines or experimenting with as-
sociated parameters. Some libraries have been com-
Fons, J., Chica, A. and Andujar, C.
MeshPipe: A Python-based Tool for Easy Automation and Demonstration of Geometry Processing Pipelines.
DOI: 10.5220/0008935900710082
In Proceedings of the 15th International Joint Conference on Computer Vision, Imaging and Computer Graphics Theor y and Applications (VISIGRAPP 2020) - Volume 1: GRAPP, pages
71-82
ISBN: 978-989-758-402-2; ISSN: 2184-4321
Copyright
c
2022 by SCITEPRESS – Science and Technology Publications, Lda. All rights reserved
71

piled into JavaScript (e.g. MeshLabJS, PMP) to run
in a browser, but these incur a substantial performance
penalty and still require some background on geome-
try processing.
Besides libraries, open-source tools provide a
graphical user-interface and thus offer immediate
feedback on the geometry processing operations be-
ing applied. The main drawback is the lack of au-
tomation features. Some tools do offer automation
(e.g. MeshLab), but filters have an overly long in-
terface and iterating with different pipelines is not
straightforward. Automation is key for applying the
same pipeline to a collection of similar models (e.g.
scanned objects with similar properties). Another is-
sue is the size limitations when it comes to process
huge models such as those produced with 3D scan-
ning pipelines. First, most open-source tools require
the model to be kept in-core. Second, even if fits
in core memory, some operations like face selection
(cleaning) or mesh parameterization (texturing) take
a substantial amount of time on huge models. Try-
ing different pipelines on a simplified version is an
option, but some steps (e.g. face selection) cannot
be reused on a different mesh and thus working with
huge meshes is a tedious task. Finally, some of these
tools have been designed for 3D professionals (e.g.
Blender, MeshLab) and thus require some training.
In this paper we propose a tool to overcome these
limitations. We support the fast creation, re-use and
sharing of custom geometry processing pipelines (au-
tomation) through a simple high-level Python API.
We make extensive use of default parameters to sim-
plify the use by non-experts. We also provide a pow-
erful element selection mechanism so that any algo-
rithm (deleting, smoothing, simplifying...) can be ap-
plied to the desired part.
The tool itself is a 3D viewer with an inte-
grated Python console from which internal or external
Python code can be executed (see Figure 1). Process-
ing operations can be also selected via the GUI, which
automatically inserts the Python call with appropriate
parameters. User interactions such as lasso selections
can be saved and reused on a different version (e.g.
higher quality) of the model. Custom pipelines can
be created with any editor, and the tool keeps track
of changes to automatically load the pipeline. This
way we support rapid iterations while providing dy-
namic feedback to the user (demonstration). In or-
der to maximize performance, key data structures and
algorithms are implemented in C++, and accessible
via Python-C++ bindings. The library in turn pro-
vides typical geometry processing algorithms through
feature-rich libraries such as PMP and PCL.
The rest of the paper is organized as follows. Sec-
Figure 1: Intended usage of the Meshpipe viewer: side by
side with a text editor.
tion 2 reviews related work on geometry processing
software and libraries. Sections 3 and 4 describe the
design of the C++/Python API and the 3D viewer. Im-
plementation details are given in Section 5. Section 6
shows further script samples and results. Finally, Sec-
tion 7 concludes the paper and outlines future work.
2 PREVIOUS WORK
The variety of tools and libraries that cover the geo-
metric processing of 3D models is quite wide. Some
features are common to most of them (such as simpli-
fication). Others are only found in a subset of them.
Some tools serve to expose functionalities of a spe-
cific library. In any case, the goal of tools is not the
same as that of libraries. In the following two sub-
sections we analyze several of the available tools and
libraries.
2.1 Tools
Meshmixer
Meshmixer is a closed source software owned by Au-
todesk. Its main focus is to provide tools for mesh
processing and ”clay-like” sculpting. It has a very
powerful set of tools and a 3D viewport that helps the
user visualize the mesh properties as well as perform
all sorts of modification tasks.
Over the last year it has incorporated many fea-
tures related to 3D printing, such as support genera-
tion for manufacturing processes and integration with
various 3D printer models in order to provide a one-
click setup to start the prints. However, there is no
support for any kind of automation or scripting.
MeshLab
Meshlab (Cignoni et al., 2008) is a free and open
source tool built upon VCGlib 2.2 that excels in the
GRAPP 2020 - 15th International Conference on Computer Graphics Theory and Applications
72

acquisition and reconstruction of meshes. It has great
tools for working with 3D scanned data and for ob-
taining a clean and usable mesh from it. Additionally,
there is a web based variant called MeshLabJS, that
replicates many of the features found in the original
software in a web browser environment, thus requir-
ing no local installation.
Unlike Meshmixer, this tool introduces the con-
cept of ”filter scripts” which allow the user to define a
processing pipeline to be reused in as many meshes as
needed. However, these pipelines are fixed, they only
contain a list of predefined steps and parameters and
there is no possibility of changing them depending on
the properties of the mesh.
OpenFlipper
OpenFlipper (M
¨
obius and Kobbelt, 2010) is a very
powerful mesh processing suite. It provides all the ba-
sic elements of a mesh processing software: viewer,
selection and basic tools and data structures (based on
OpenMesh, see section 2.2), while exposing a com-
plete plugin development API.
This plugin system can load both C++ and Python
plugins to extend its functionality as needed. How-
ever, there is not a clear common interface for tools
and, for example, not every interactive action has a
one to one mapping with an API call, making it hard
to automate some tasks.
2.2 Libraries
OpenMesh
This free and open source library is developed by
the Visual Computing Institute in the RWTH Aachen
University. It provides the bare basics for develop-
ing a mesh processing algorithm and recent versions
also include implementations for mesh decimation,
smoothing and subdivision. It implements a half-edge
based data structure (Kobbelt et al., 2002) for stor-
ing mesh information as well as some infrastructure
for storing mesh properties. This makes it suitable
for any job that requires fast queries for traversing the
mesh and/or generating new geometry but it does not
include any of the more advanced mesh processing
algorithms. OpenMesh is a C++ library but Python
bindings are also provided.
VCGlib
VCGlib (Cignoni et al., 2004) is the base of most
of the tools developed by the Visual Computing Lab
and, as such, it is at the heart of Meshlab. A C++
open source library, it allows for the manipulation,
processing and displaying of triangular and tetrahe-
dral meshes. Its functionalities include simplification,
smoothing, parameterization, reconstruction, and sev-
eral others. The library is also well known because of
its use in The Digital Michelangelo Project.
CGAL
The Computational Geometry Algorithms Library
(CGAL) is by far the most extensive open library in
the context of computational geometry. The project
is developed via a collaborative effort from a commu-
nity of developers working at research institutes, uni-
versities and companies and it includes over a hun-
dred modules, all providing some algorithm or core
functionality to this huge ecosystem.
It is important to keep in mind that mesh process-
ing is only a part of the whole computational geome-
try scope, so only a subset of the CGAL modules will
be actually useful when developing a mesh process-
ing program. Still, CGAL has the highest amount of
geometry processing (Loriot et al., 2019b) techniques
and algorithms implemented out of the box. Some
of this algorithms include mesh subdivision (Shiue,
2019), simplification (Cacciola, 2019), deformation
(Loriot et al., 2019a) and parameterization (Saboret
et al., 2019).
PMP
The Polygon Mesh Processing library (PMP) (Sieger
and Botsch, 2019) is an MIT-licensed mesh process-
ing toolkit. It has its origins on the OpenMesh half-
edge implementation but evolved a lot from it. It pro-
vides all the usual tools of any modern mesh process-
ing library: a core mesh data structure plus a set of
well known algorithms to work with it. It also pro-
vides a clean and simple 3D viewer.
PCL
PCL (Rusu and Cousins, 2011) is a powerful point
cloud processing library that is developed by a large
group of companies and universities. The library im-
plements algorithms for feature detection, filtering,
registration, reconstruction, segmentation and visual-
ization of point clouds. With the goal of simplifying
development PCL is split into a set of smaller mod-
ules. This helps reduce the library’s footprint in plat-
forms with reduced capabilities.
libigl
libigl (Jacobson and Panozzo, 2017) is a geome-
try processing library with a wide array of imple-
MeshPipe: A Python-based Tool for Easy Automation and Demonstration of Geometry Processing Pipelines
73
mented algorithms that is built upon Eigen (Guen-
nebaud et al., 2010). As such it expects model in-
formation to be encoded as matrices. This allows to
easily express many geometrical problems as sparse
discrete differential geometry operators and finite-
element matrices. libigl also has python bindings that
make it possible to express geometry processing tasks
in this language. The library may be used to com-
pute several discrete geometric quantities and opera-
tors, apply shape deformation, parameterize models,
smooth them, and many others.
2.2.1 PyMesh
PyMesh is a Python library for rapid prototyping
of geometry processing scripts. It provides com-
mon mesh processing operations through a number
of state-of-the-art open source packages. PyMesh fo-
cuses on code simplicity as we do, but uses native
Python data structures. The platform has no associ-
ated viewer and thus interactive operations such as
mouse-driven selection are not supported.
2.2.2 Geogram
Geogram is a multi-platform C++ programming li-
brary of geometric algorithms. It provides a mesh
data structure, spatial search data structures, stan-
dard geometric predicates and geometric algorithms
such as Delaunay triangulation. Geogram is used
by Graphite, an experimental 3D modeler support-
ing pointsets, surface meshes and volumetric meshes
(tetrahedra and hybrid meshes). It features state-of-
the-art algorithms for mesh repair, remeshing and re-
construction.
2.2.3 Geometry-central
Geometry-central (Sharp et al., 2019) is another C++
library of data structures and algorithms for geometry
processing. It features algorithms for computing var-
ious geometric quantities on surfaces, and advanced
geometry-processing algorithms such as computing
geodesic distances and direction fields.
2.2.4 Py3DViewer
(Cherchi et al., 2019) is a new research-oriented
Python library for quickly prototyping geometry pro-
cessing algorithms. It supports editing and viewing
both surface and volume meshes. Unlike MeshPipe,
Py3DViewer uses Python libraries such as Numpy for
computing and PyThreeJS for visualization.
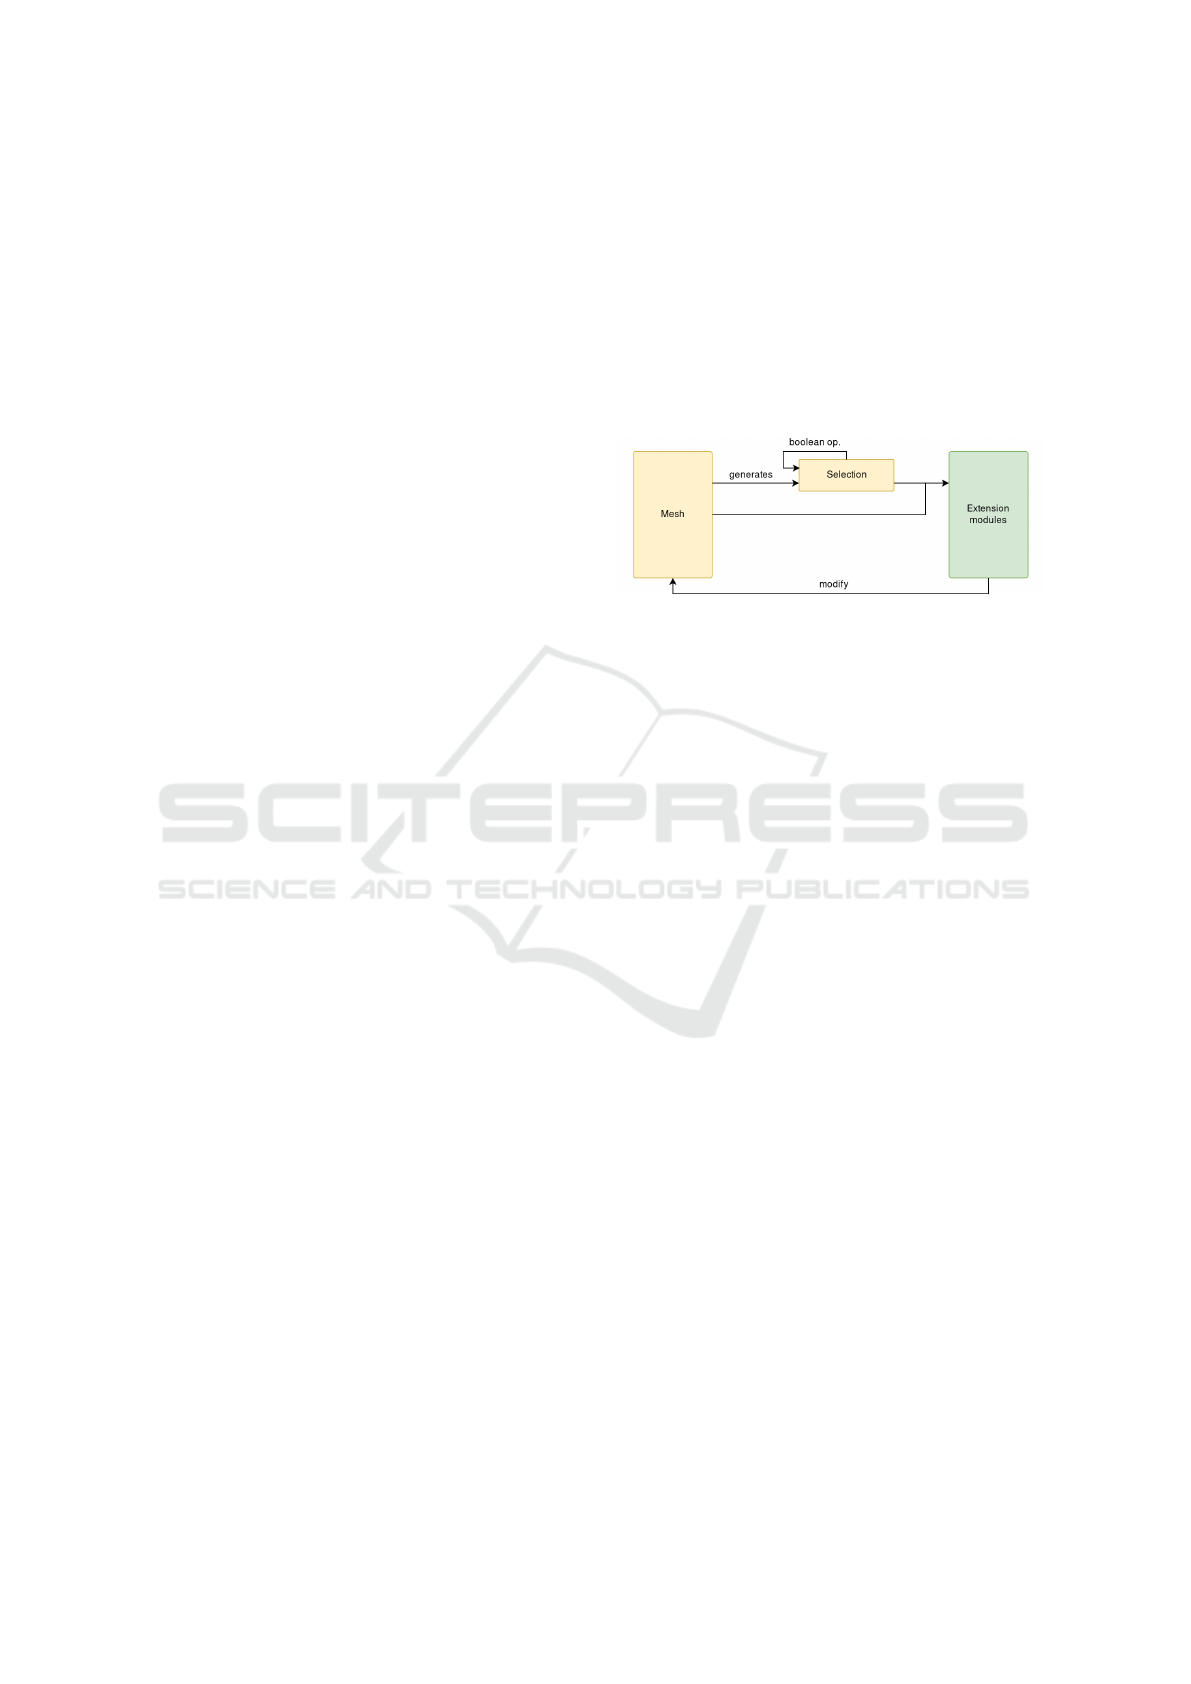
3 API DESIGN
The Meshpipe API has three major components: the
Mesh class, the Selection class, and a set of extension
modules that are built on top of the other two classes.
The Mesh and Selection classes work together to al-
low users to traverse a mesh and select parts of it
whereas the various extension modules provide differ-
ent operations that can be applied to the whole mesh
or a selection of it (see Figure 2).
Figure 2: Main components of the API.
We decided to use this global organization be-
cause we want to keep a clean and simple core library
with only the essential tools while at the same time
make it easy to extend the library to add new algo-
rithms or mesh processing techniques.
3.1 The Mesh Class
Mesh Representation
The Mesh class is the essential core of the Meshpipe
library. It is based on the classic half-edge data struc-
ture, which allows for quick traversals of the mesh
while keeping the memory requirements relatively
low. This representation stores all topological rela-
tionships on half-edges (from now on h-edges). H-
edges are split (i.e. an edge connecting vertex A and
vertex B becomes two directed h-edges from A to B
and vice versa). Each h-edge references one of its two
vertices (the vertex it points to), the face it belongs
to, the next h-edge inside the face, and the opposite
h-edge. Conversely, vertices reference one of its out-
going h-edges and faces reference one of the h-edges
bounding it.
Listing 1 shows a subset of mesh traversal meth-
ods supported by the API. The central element is the
h-edge, as it allows to navigate to other h-edges as
well as other elements in the mesh. The rest of the
navigation methods are just helper methods that do
the necessary conversions to move between different
elements and neighborhood types.
GRAPP 2020 - 15th International Conference on Computer Graphics Theory and Applications
74
# Get the next h-edge within the face
next halfedge(halfedge)
# Get the opposite h-edge
opposite halfedge(halfedge)
# Get vertex at the h-edge origin
from vertex(halfedfe)
# Get vertex at the h-edge destination
to vertex(halfedge)
# Get edge from a h-edge
edge(halfedge)
# Get iterator over vertices in a face
vertices(face)
# Get one h-edge from the given face
halfedge(face)
# Get one outgoing h-edge of a vertex
halfedge(vertex)
# Get iterator over adjacent vertices
vertices(vertex)
# Get all faces incident to a vertex
faces(vertex)
Listing 1: A subset of mesh traversal methods supported by
the API.
Selecting Elements
The Mesh class is also in charge of generating the
most basic selections, see Listing 2. These are
meant to be the basic building blocks which can
be later combined or modified using the methods in
the Selection class. As an example, a call to the
select_boundary_vertices() method generates a
selection including all the vertices that lay in the mesh
boundary. This selection can be expanded using the
expand() method in Selection or combined with
other selections using the provided Boolean opera-
tions.
Another interesting method in this family is the
select_vertices_by_expr() . This is a flexible op-
eration since it takes as parameter an arbitrary Python
expression, that gives users full power to select faces,
edges, h-edges and vertices by whatever criteria they
want to implement.
Finally, the Mesh class contains a set of user-
interaction related methods. These allow for repro-
ducibility of user actions independently of the mesh,
see Section 4.1 for more details.
Another task of the Mesh class is to convert be-
tween selection types. A user may want to select a set
of vertices and after that, select all the edges that are
connected to at least one of the selected vertices. The
methods in Listing 3 perform this kind of conversions.
They have some parameters that slightly change the
conversion behavior. For example, when converting
from a vertex selection to a face selection a minimum
select self intersecting edges()
select self intersecting faces()
# the following methods are available
# also for faces, edges and halfedges:
select all vertices()
select boundary vertices()
select non manifold vertices()
select vertices by expr(expression)
select vertices inside(volume)
lasso select vertices(camera, lasso_points)
click select vertices(camera, point)
Listing 2: Subset of selection methods. There are similar
versions of these methods for every topological element:
vertices, halfedges, edges and faces.
number of selected vertices can be specified so that
only faces with two (or however many) vertices in the
original selection get selected.
vertex to edge selection(sel, min_verts)
vertex to halfedge selection(sel)
vertex to face selection(sel, min_verts)
halfedge to vertex selection(sel)
halfedge to edge selection(sel)
halfedge to face selection(sel, min_he)
...
Listing 3: Subset of selection conversion methods.
Element Properties
The API allows to attach arbitrary properties to mesh
elements: faces, edges, h-edges and vertices. Proper-
ties can be of different types and come from different
sources. As an example, we can store color informa-
tion for every vertex in a mesh that has been recon-
structed using photogrammetry.
It is important that this kind of data is easily ac-
cessible both for reading and writing and that we
only store in memory the properties we actually use.
Adding a new property to a mesh returns a Property
type object that can be accessed as an indexed con-
tainer and each element can hold a value of one of
the following types: int, float, Vec2, Vec3 and Vec4.
Listing 4 shows some of the basic methods for adding,
retrieving and removing properties from a mesh, and
Listing 5 displays a little usage example.
Mesh Generation and Manipulation
In order to generate a mesh from scratch only two op-
erations are required: the addition of vertices and the
addition of faces (see Listing 6 for an example).
The Mesh class also includes many more utility
methods such as getting the total number of vertices,
getting the position of a vertex and checking whether
MeshPipe: A Python-based Tool for Easy Automation and Demonstration of Geometry Processing Pipelines
75
# Float property per-vertex
add vertex float property(name, default_value)
get vertex float property(name)
remove vertex float property(property)
has vertex float property(name)
vertex float property(name, def_val)
Listing 4: Property management methods. Equivalent
methods exist for every combination of data type and ele-
ment.
# Allocate a Vec3 property per-edge
prop = mesh.add_edge_vec3_property("my_prop")
# Access the edge property like array
prop[e] = Vec3(1.0, 1.0, 1.0)
Listing 5: Simple usage example of properties in Python.
# Available methods
add
vertex(position)
add triangle(v0, v1, v2)
add quad(v0, v1, v2, v3)
add face(vertices)
# Example
mesh = Mesh()
v0 = mesh.add_vertex(Vec3(0.0, 0.0, 0.0))
v1 = mesh.add_vertex(Vec3(1.0, 0.0, 1.0))
v2 = mesh.add_vertex(Vec3(0.0, 1.0, 0.0))
mesh.add_triangle(v0, v1, v2 )
Listing 6: Mesh generation methods.
a vertex belongs to the mesh boundary. See the code
repository for further details.
3.2 The Selection Class
The Mesh class holds all the mesh data and allows for
some low level modifications, but the bulk of the mesh
transformations are done via operators and modifiers.
These operators can often be applied to the whole
mesh or just some parts of it. For example, we may
want to smooth only some part of the mesh or com-
pletely delete some elements while keeping the rest of
the mesh intact.
In order to specify which elements will be modi-
fied and which not, we introduced the Selection class.
There are four different types of selection, all inher-
iting from the same Selection class: VertexSelection,
HalfedgeSelection, EdgeSelection and FaceSelection.
Each one of the classes holds a list of all the selected
and unselected elements of its type and provides a
way to iterate the selected elements. On top of that,
the Selection class holds some methods to select or
deselect elements, a group of topology-based opera-
tions (i.e. grow or flood the selection), and a set of
Boolean operators to generate more complex selec-
tions (see Listing 7).
# Selected elements iterator
selected()
# Check if selected
is selected(element)
# Select/deselect list of elements
select(elements)
deselect(elements)
# Topology operators
grow(mesh, steps)
shrink(mesh, steps)
flood(mesh)
# Boolean operators
invert()
subtract(selection)
combine(selection)
intersect(selection)
Listing 7: Subset of Selection methods.
Listing 8 shows a typical use case where we want
to detect small disconnected components of a mesh
(e.g. generated from a scan) and remove them.
to_delete = mesh.empty_vertex_selection()
for v in mesh.vertices():
if to_delete.is_selected(v): continue
s = mesh.empty_vertex_selection()
s.select(v)
s.flood()
if s.n_selected() < min_threshold:
to_delete.combine(s)
mesh.delete(to_delete)
Listing 8: Example of selection and deletion of small con-
nected components.
3.3 Extension Modules
Extension modules provide typical geometry process-
ing operations. Here we discuss only a subset of the
supported algorithms.
Simplification
The simplification module currently uses edge-
collapse mesh simplification (Listing 9). The edge
collapse method can take various parameters that de-
termine the complexity of the simplified mesh as well
as its quality.
GRAPP 2020 - 15th International Conference on Computer Graphics Theory and Applications
76
from meshpipe import MeshSimplification
MeshSimplification.simplify(mesh,
selection, n_vertices, aspect_ratio,
edge_length, max_valence, normal_deviation,
hausdorff_error)
Listing 9: Mesh simplification example.
Analysis
Our current implementation supports various curva-
ture metrics (minimum, maximum, mean and Gaus-
sian) as well as per-vertex, per-face and per-halfedge
normal computation, see Listing 10.
from meshpipe import MeshAnalysis as ma
# Curvatures are stored per-vertex
prop = ma.compute min curvature(mesh)
prop = ma.compute max curvature(mesh)
prop = ma.compute mean curvature(mesh)
prop = ma.compute gaussian curvature(mesh)
# Normals are also stored as a property
prop = ma.compute vertex normals(mesh)
prop = ma.compute face normals(mesh)
prop = ma.compute halfedge normals(mesh, angle)
Listing 10: Mesh analysis example.
Parametrization
Our current implementation uses a LSCM parameter-
ization (L
´
evy et al., 2002), which tries to reduce dis-
tortion by minimizing angle deformations and non-
uniform scalings, see Listing 11.
texture_size = mp.parametrize(mesh,
texels_per_unit)
Listing 11: Mesh parametrization example.
Property Transfer
A typical use case is to generate a simplified version
of a mesh and transfer the geometry detail from the
original mesh to the simplified one. We used a sim-
ple yet effective method for transferring properties be-
tween meshes (Cignoni et al., 1999). In order to com-
pute the appropriate value for each texel in the transfer
texture we first need to find its corresponding position
and surface normal on the simplified mesh. We get
this information by unfolding all the triangular faces
into two temporary textures: one containing the po-
sitions and the other containing the surface normals.
All the values in these textures are interpolated using
the texel’s barycentric coordinates to obtain a set of
smooth and continuous values across each face sur-
face.
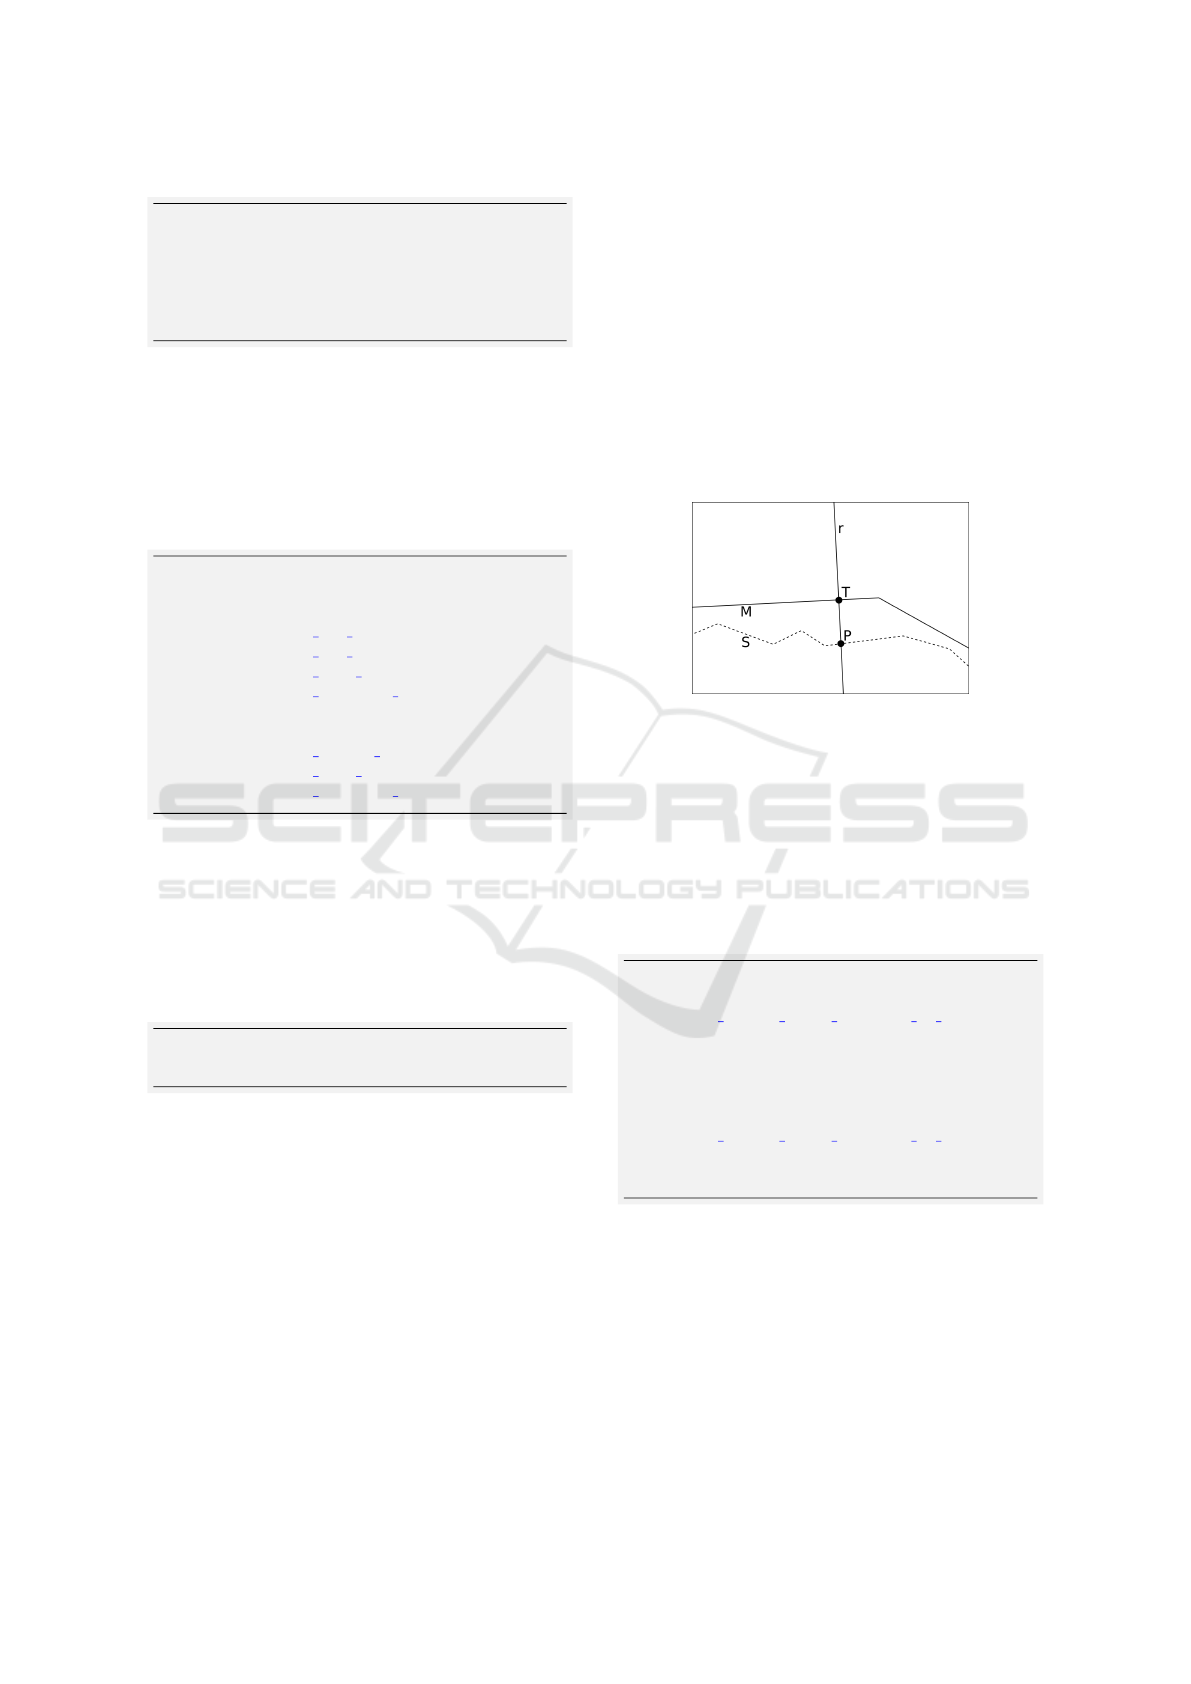
Once we know the position T and surface normal
N of a texel, all we need to do is find the point P
of intersection between the line r parallel to N that
goes through T , and the full detail mesh. The value
of the texel we are computing will be the same as the
value of the intersection point on the original mesh.
This value on the original mesh can be automatically
computed by interpolating a mesh property or by a
user-defined lambda function.
Figure 3: Property transfer diagram. M is the simplified
mesh, S is the original mesh, r is the intersection line and P
is the final sampled point.
By defining a custom lambda function users not
only get more control over the interpolation method;
they can also define properties that have different val-
ues at a texel; something which is not achievable with
the property system since values are always attached
to a mesh element rather than a surface point. Both
property transfer options are shown in Listing 12.
# Default property transfer, similar
# methods for every basic type
m.transfer vertex float property to texture(
source_mesh, target_mesh, prop , texture_path,
value_range = Vec2(0, 1))
# Custom property definition, similar
# methods for every basic type
m.transfer custom float property to texture(
source_mesh, target_mesh, prop_lambda,
texture_path, value_range = Vec2(0, 1))
Listing 12: Subset of property transfer methods.
Point Cloud Processing
Although we focused on mesh processing, the API
also supports point processing algorithms, such as
finding all the points within a radius, finding the K
nearest neighbors.
MeshPipe: A Python-based Tool for Easy Automation and Demonstration of Geometry Processing Pipelines
77

4 VIEWER DESIGN
Our 3D viewer (see Figure 1) provides a quick testing
iteration environment as well as some user interac-
tive tools (e.g. lasso selection, mouse based deforma-
tions).
4.1 Supporting Fast Testing Iterations
When developing a mesh processing pipeline, usually
at some point one parameter needs to be tweaked or
some changes need to be made iteratively until a good
solution is found. In these cases, testing iteration time
is very important. Testing iteration time can be de-
fined as the amount of time that passes between mak-
ing a change and being able to verify its effects. Typ-
ical steps involve compiling the processing pipeline,
waiting for the mesh to be processed, switching to a
3D editing software and loading the pipeline’s result.
This slows down the testing process considerably, so
we wanted to minimize iteration times as much as
possible.
Mesh-independent Code
Very often, when developing a processing pipeline,
only a subset of the real input data is used. For ex-
ample, the developer may want to focus on a specific
part of the input mesh or just wants to use a simplified
version of it in order to reduce processing times.
Once the pipeline is setup and working for the re-
duced input data, the developer proceeds to test the
pipeline on the real/whole data set. Meshpipe tries to
help this whole process as much as possible.
Every mouse driven operation that can be per-
formed in the 3D viewer has its own translation on
the Python API. This API calls are displayed in the
3D viewer console every time the users perform an
operation, so they have the option to copy the Python
code and paste it directly on their pipeline script.
All the interactive tools API methods are designed
to be mesh-independent. That means the operations
are not defined in terms of the mesh geometric el-
ements but in terms of the current point of view in
the 3D viewer and the mouse movements performed
by the user. As an example, the lasso select tool
could have been implemented as a viewer-only op-
eration. Knowing the current camera parameters and
the path traced by the user, we could check for all
the elements that lie inside the lasso area and call
select_elements on an empty selection. That would
mean that any change on the current mesh would
completely invalidate this operation: the API call
would no longer select all the elements in the lasso
area because some elements may have moved or the
indices could be completely different between to dif-
ferent meshes.
Instead, we added the lasso_select_vertices
method to the Mesh class (see Section 3.1), along
with similar methods for all the element types. These
methods only receive as parameters the camera set-
tings (position, rotation, FOV, etc.) at the moment
of the operation, and a set of screen-space points
that form the lasso selection path. With this infor-
mation we can reproduce the original operation inde-
pendently of any topology changes or even on a com-
pletely different (e.g. remeshed) model.
This property makes Meshpipe very suitable for
the previously stated workflow: start with small and
simple meshes and keep adding complexity until the
whole input data is used. This helps users focus
on specific problematic areas, or simply speeds up
the development process by having lower processing
times until a good pipeline is developed and is ready
to be tested on the real data set.
Python API Bindings
Another way to reduce iteration times is to completely
skip the compilation of the pipeline. For this reason,
we decided to implement the Python API bindings.
Python is an interpreted language, which means there
is no need to compile the program to a language na-
tive to the CPU. The interpreter adds some perfor-
mance overhead, but the benefit of skipping compila-
tion largely compensates the performance cost, espe-
cially when working with not-final (smaller) meshes,
as in the intended workflow.
Result Inspection
So far we proposed solutions for two steps of the typ-
ical testing iteration cycle. The Python bindings get
rid of the compilation time, the mesh independent op-
erators allow for working with smaller data sets there-
fore reducing processing time, so only one step is left
to tackle: the inspection of the pipeline results.
There are many great tools available that allow for
mesh inspection (see section 2.1) but all of them re-
quire the user to step out of the development environ-
ment, perform whatever steps are needed to load the
wanted mesh (usually 2 or more clicks), and only then
be able to take a look at the pipeline results.
Instead, Meshpipe offers an integrated solution.
The same application that runs the processing pipeline
has a 3D viewport that can display whatever mesh is
being processed as well as the process results. Apart
from the convenience of not leaving the development
environment just to take a look at a mesh, this system
has two other advantages: it can display intermediate
GRAPP 2020 - 15th International Conference on Computer Graphics Theory and Applications
78
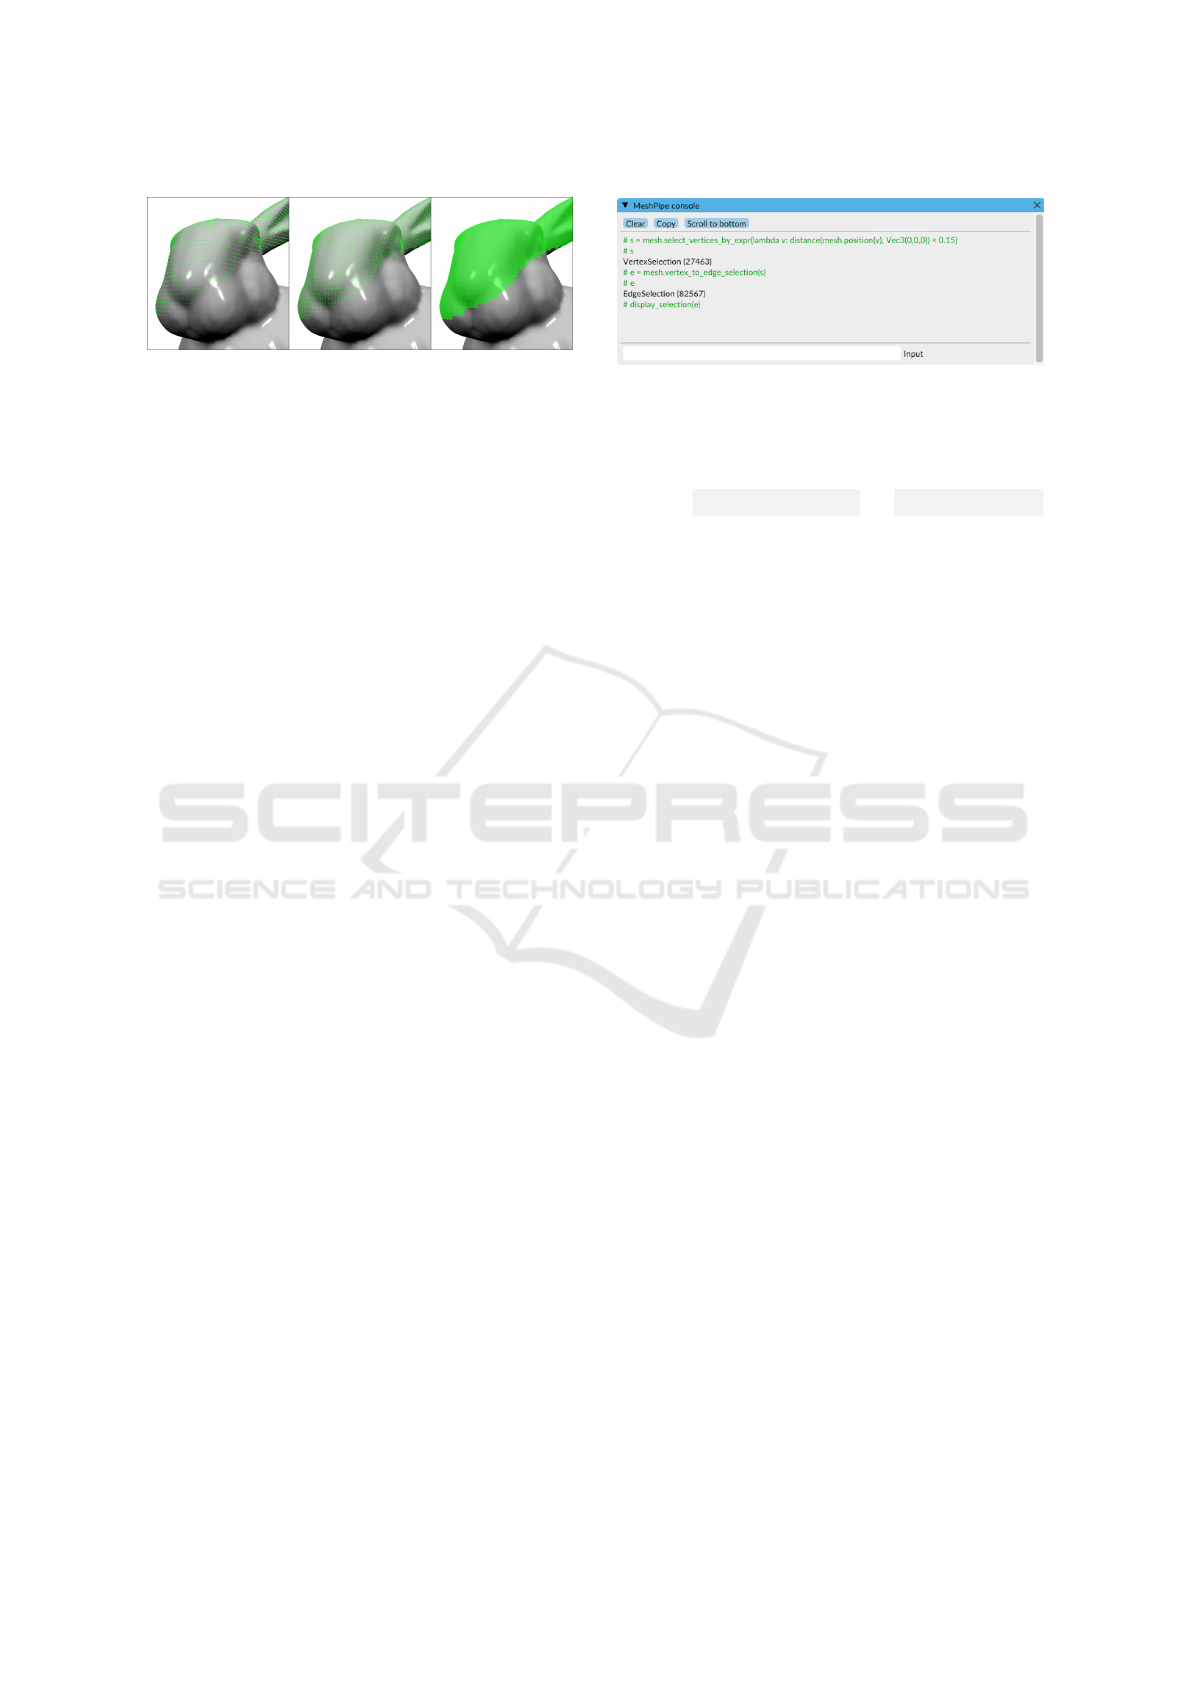
Figure 4: Display of different selection types. From left to
right: vertex selection, edge selection and face selection.
states, such as selections or properties and it does not
need to store any mesh files, since the rendered mesh
is already stored in RAM.
Intermediate states are important as they can help
understand what is happening internally when devel-
oping a processing pipeline. The same way a debug-
ger can help during the development process by al-
lowing the user to see the state of the program during
execution, the Meshpipe viewer can be used to visu-
alize what elements belong to a specific selection or
display the values of a mesh property by using color
scales, as well as overlay a given texture over a mesh.
All these display operations can be done either during
a pipeline execution or from the viewer’s console.
4.2 User Interface
Figure 1 shows a screenshot of the intended way of
using the viewer. Having two windows open side by
side: one with a text editor and the other one with the
viewer itself allows the developer to view and eas-
ily modify the code while having quick access to the
viewer display and console.
The 3D viewport includes all the basic interactions
present in many 3D editing software: zoom, rotation
and panning. All these interactions can be performed
using the mouse or using keyboard shortcuts. It can
display wire-frame and point cloud versions of the
loaded meshes and also vertex, edge and face selec-
tions (see Figure 4). Finally, it can also display tex-
ture data on top of the rendered mesh as well as any
of the properties defined on the mesh.
The Meshpipe console works the same way as any
other python console. It has a global context and al-
lows for executing any Python statement, including
variable definitions, that then can be used in future
statements. The executed lines are printed in green
(see Figure 5) and if the statement returns any value it
will be printed in black. Any errors in the input state-
ment or in the executed script will be displayed in the
console using a red font. Finally, any mouse opera-
tions performed by the user will print their equivalent
API call to the console in a dark blue font.
This console can be used to test simple operations
Figure 5: Console usage example.
without having to create a script file. Additionally,
it has some extra defined methods that give access
to the display capabilities of the viewport. Meth-
ods like display_selection or display_texture
change the way the mesh is rendered, adding infor-
mation in the form of overlays or changing colors de-
pending on the mesh and texture data.
5 IMPLEMENTATION
We wanted an easy to use scripting language for the
pipelines but at the same time have a robust and per-
formant implementation of the core data structures
and algorithms. For that reason, we decided to use
C++ as our core language and Python for pipeline
scripting.
C++ is a widely used language in the field of mesh
processing. The fact that it compiles directly into na-
tive code makes it a great candidate for this type of
performance-reliant tasks. In addition to that, there
already are many C++ based toolkits for mesh pro-
cessing development, so we can use one of them as
the base for our system and add any missing features
or algorithms on top of it.
In our case, we decided to use the Polygon Mesh
Processing library (Sieger and Botsch, 2019) for two
main reasons: it has a very flexible mesh data struc-
ture and it includes a basic 3D viewer that we can
build upon. This library serves only as a base and
many algorithms and features are implemented by
others or by us, for example: the point cloud API or
the whole selection system.
In order to expose all the functionality to Python
we started evaluating various possible solutions.
There are plenty of tools to generate the necessary
glue to interface Python and C++, many of which au-
tomatically generate bindings from the unedited C++
source. We did not want that, we wanted to be able
to control which parts of the API were exposed to
Python and which were not. PMP includes various
basic mesh processing algorithms, but in some cases
their implementation does not fully suit our needs. In
order to give the user the best possible experience,
MeshPipe: A Python-based Tool for Easy Automation and Demonstration of Geometry Processing Pipelines
79
we added external libraries that overlap with PMP’s
functionality. Exposing everything to the Python API
would mean that some functionality would be dupli-
cated, making the API harder to use.
For that reason, we decided to take advantage of
the PyBind11 library (Jakob et al., 2017). It gives us
the control we need while, at the same time, being rel-
atively easy to work with. Binding code is extremely
simple: just a class declaration and a series of method
calls to define what methods will be available in the
Python API. On top of that, it also supports the defi-
nition of C++ vectors as native Python lists as well as
automatic casting between Python and C++ objects.
Although this automatic casting is very conve-
nient, it also has a performance cost. Every time a
variable is converted from a Python object to its C++
counterpart or vice-versa the glue code takes a bit of
time to do the casting. While this is barely noticeable
for a single conversion, it can slow down the execu-
tion if the conversions happen on every iteration of a
long loop. For that reason we have been very careful
to minimize the automated castings. By using con-
stant references wherever possible, we can ensure that
an object lives entirely on the C++ side or the Python
side, but sometimes the conversion is inevitable. In
our case all the methods that take a lambda function
as an argument are significantly slower than similar
methods that can avoid the conversion.
Our viewer uses PMP boilerplate viewer imple-
mentation. We added code to display the various se-
lection types (see Figure 4), and the Python console,
which we implemented using IMGUI, a simple and
highly extensible ”immediate mode” UI library.
6 RESULTS
Even though Meshpipe is still a prototype, it is already
usable for a large variety of tasks. Simple tasks such
as selection, simplification, remeshing and attribute
preservation take a few lines of code and have been
presented throughout the paper. In this section we
present two more complex use examples (see reposi-
tory for full source code).
6.1 LOD Grid Generation
A widely used technique to improve performance on
large scenes is to have multiple levels of detail (LOD)
for each object inside them. This way, we can ren-
der the closest objects with the highest amount of de-
tail, while the furthest ones are rendered using simpler
LODs.
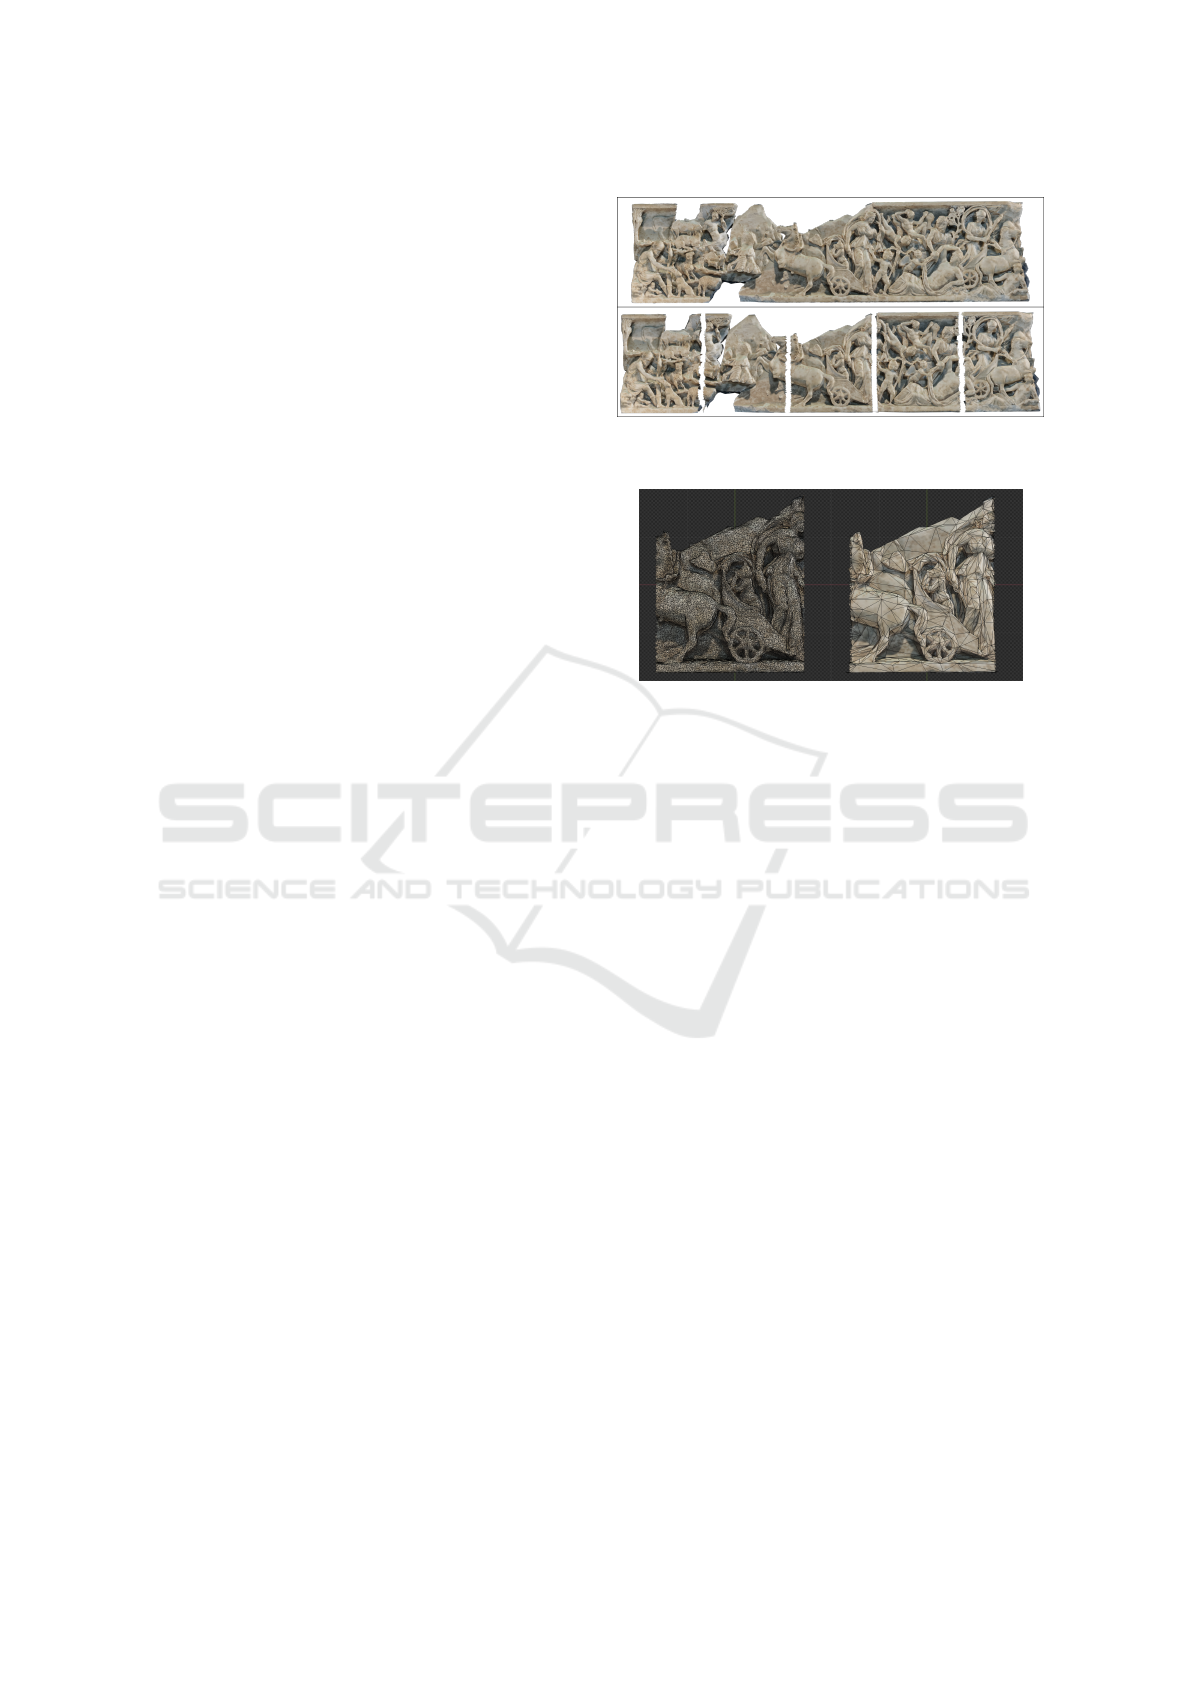
Figure 6: Top: original mesh. Bottom: visualization of the
5 simplified cells generated by the pipeline.
Figure 7: Detail comparison. Left: original. Right: simpli-
fied.
In our use case we also want to use levels of detail,
but instead of a large scene, we want to apply it on a
large scanned mesh. We put ourselves in an hypothet-
ical situation where we are developing an interactive
museum application. It should allow the user to fo-
cus on any part of the art piece (in our case an ancient
Greek sculpture), so the amount of detail needs to be
kept as high as possible to enable close-up inspection.
We want to create a simple pipeline that splits the
input mesh into a grid of smaller meshes (see figure 6)
and, for each of them, generates a high and low level
of detail version of them. This would allow our hy-
pothetical application to render only the focused part
in full detail, while keeping the context of the rest of
the piece by rendering the surrounding parts in low
detail. You can find the full pipeline Python code in
the supplemental material.
This pipeline has two configurable parameters, the
variables m and n, that define the amount of cell sub-
divisions in each axis. For our test model we have
chosen a grid of 5x1, since the model is quite elon-
gated. We iterate over each cell computing its bound-
ing box, then select all the faces belonging to it and
extract this selection as a new separate mesh. Then,
for each extracted mesh, we generate a lower detail
version of it using the simplification module.
In order to avoid artifacts where two cells join to-
gether, we take advantage of the fact that we can spec-
ify which vertices can be collapsed. We first generate
a boundary selection and then invert it, this will en-
GRAPP 2020 - 15th International Conference on Computer Graphics Theory and Applications
80
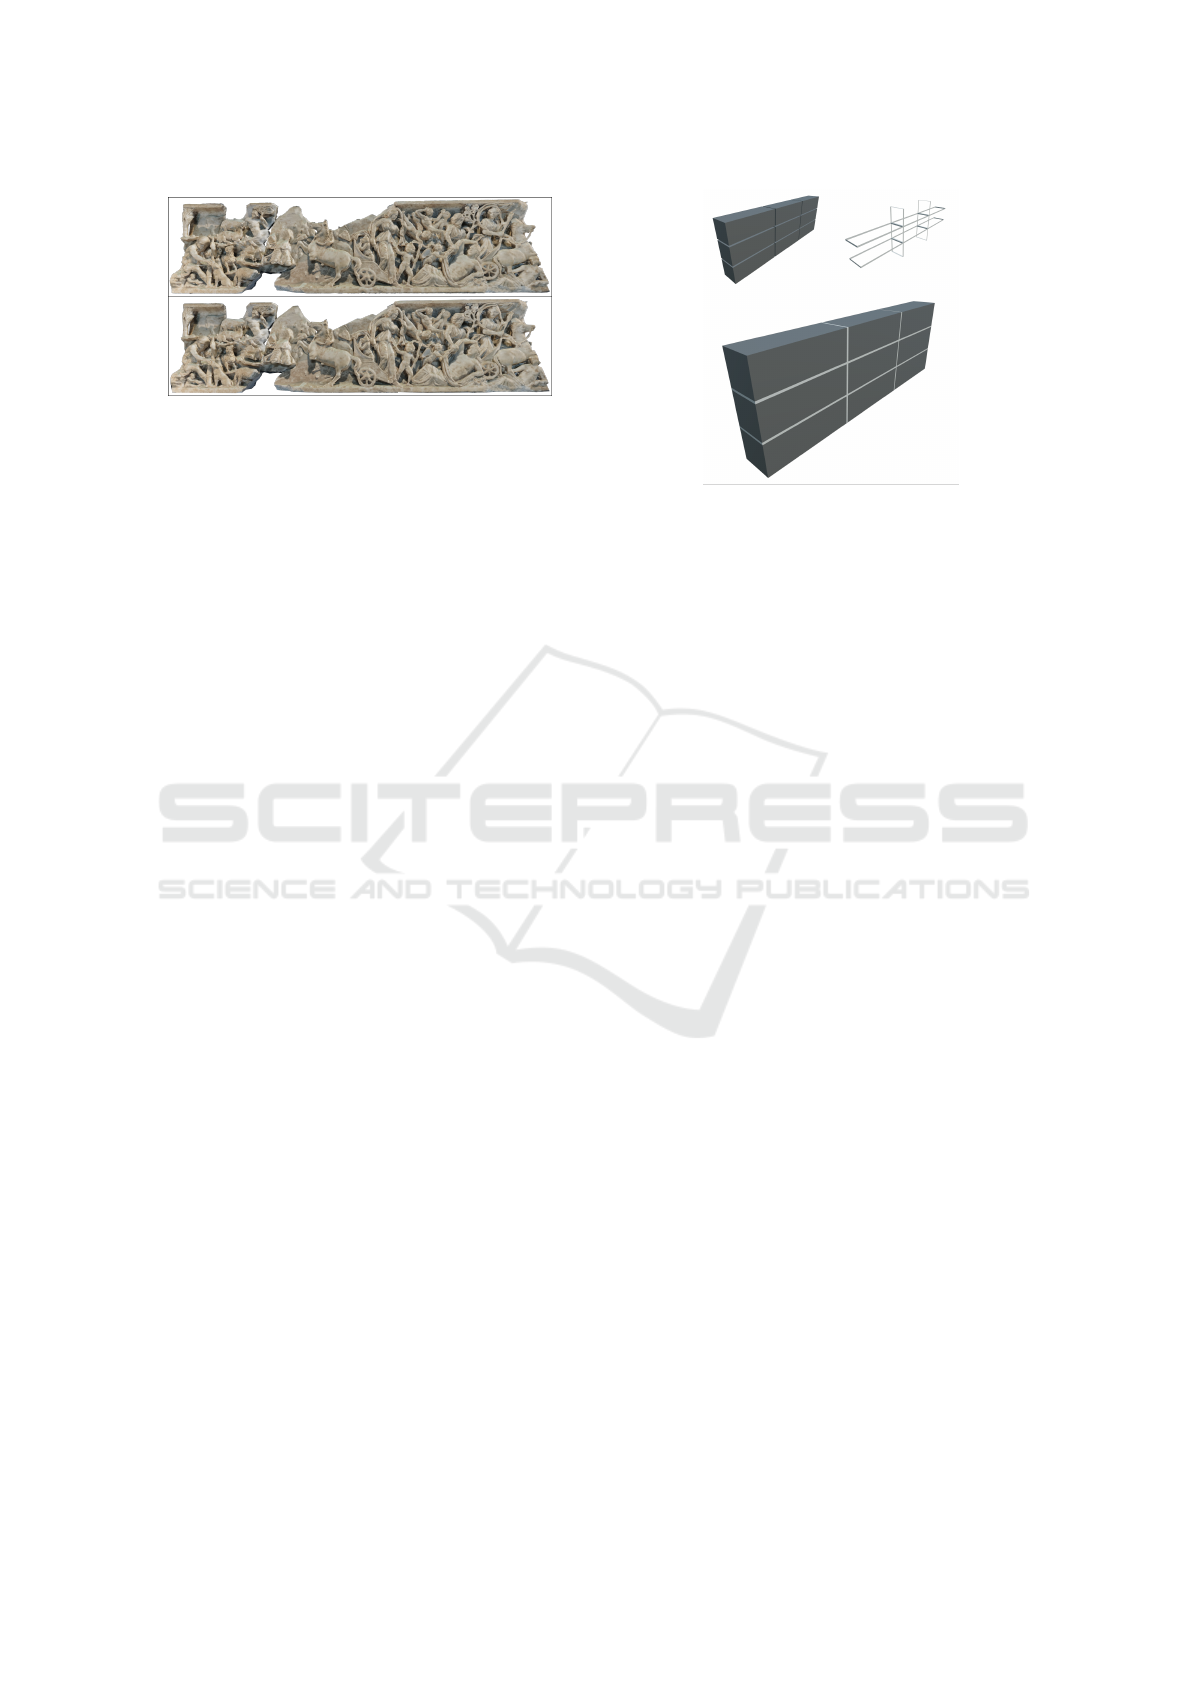
Figure 8: Comparison of the original mesh and all the sim-
plified cells together. Top: original. Bottom: simplified
cells.
sure that the boundary of the mesh will remain intact
while the rest of it can be freely simplified.
Once we have the simplified version of a cell, we
use the property transfer module to produce two tex-
tures: one color map and one normal map. These will
be used by the final application to render the low de-
tail meshes with correct colors and more detailed illu-
mination respectively.
With this simple pipeline, we reduced the 125k
vertices of the original mesh to about 6.5k vertices
(see Figure 7) while keeping most of the original de-
tail (see Figure 8) and, most importantly, having a
completely automated pipeline. If we wanted to pro-
cess a different mesh, all we would have to do is
change the grid size to an appropriate value and ex-
ecute the pipeline.
6.2 Generation of Brick Mortar
Another practical example of Meshpipe ’s capabilities
is the generation of a mortar mesh that fills in the gaps
between a wall of bricks. This example is inspired
by a real project that was developed in our research
group. During the planning of an architectural project
CAD designs are usually simple surfaces that repre-
sent the overall shape of the final building. When the
project advances to production, more detailed mod-
els are created, even to the point of modeling every
individual stone.
When visualizing the interior of such a model,
the gaps in between the bricks reveal the outside el-
ements. So the goal of this pipeline is to generate
a mesh that covers all the mortar gaps in a stone
model. This can be achieved with a simple processing
pipeline that can be found in the supplemental mate-
rial.
The algorithm first generates two neighborhoods:
the topological neighborhood and the distance neigh-
borhood. The first gives, for each vertex, all its topo-
logically adjacent vertices; and the second one all the
vertices that lay close to it. With these two sets of
neighbors we look for loops of four vertices: if we
Figure 9: Brick mortar generation results. Top left: input
mesh. Top right: generated mortar. Bottom: merged result.
can reach the same vertex using two different links
(distance → topological and topological → distance)
then we can create a face joining all the involved ver-
tices.
We do a similar check for distance → distance
pairs of links in order to fill the little square gaps that
appear at the intersection of four bricks. The result
is a full coverage of the mortar gaps (see Figure 9).
There are some extensions to the algorithm that can
handle staggered brick walls, but they have not been
included in order to keep this example short.
7 CONCLUSIONS
We have presented a new tool that supports easy au-
tomation and demonstration of geometry processing
tasks. Despite the myriad of tools available, we could
not find any existing software or library that focused
exactly on that: quick prototyping and pipeline re-
usability. The tool has a suitable visual interface
for quickly testing, comparing and sharing different
pipelines, supporting rapid iterations and providing
dynamic feedback to the user. Key algorithms are
provided by a high-level C++ library exposed to the
viewer via Python-C++ bindings. Unlike compet-
ing open-source alternatives, our tool has a minimal
learning curve (thanks to the high-level API and the
menu providing access to API functions) and typical
pipelines can be written in a few lines of Python code.
A key point is that that every interactive operation
has an equivalent API call that will appear on the ap-
plication’s console once applied. This will allow the
user to save the corresponding Python code and use
it in an automated pipeline without having to manu-
ally perform the same operation. This feature was in-
spired by the Blender modeling system, but our API is
designed to fully reproduce all operations in an inter-
MeshPipe: A Python-based Tool for Easy Automation and Demonstration of Geometry Processing Pipelines
81

active session, including e.g. mouse-based selection.
A clear route for improvement is to add new exten-
sion modules. On the other hand, the 3D viewer lacks
some features such as layer support, that we will add
in upcoming versions. We also plan to enhance the
Python console by adding an automatic completion
feature, speeding up even more its usage and making
the API more discoverable.
Repository. Source code for our tool and supple-
mental material is available in the following Git
repository: https://gitrepos.virvig.eu/jfons/meshpipe.
ACKNOWLEDGEMENTS
This work has been partially funded by the Span-
ish Ministry of Economy and Competitiveness and
FEDER Grant TIN2017-88515-C2-1-R.
REFERENCES
Cacciola, F. (2019). Triangulated surface mesh simplifica-
tion. In CGAL User and Reference Manual. CGAL
Editorial Board, 4.14.1 edition.
Cherchi, G., Pitzalis, L., Frongia, G. L., and Scateni, R.
(2019). The Py3DViewer Project: A Python Library
for fast Prototyping in Geometry Processing. In Smart
Tools and Apps for Graphics - Eurographics Italian
Chapter Conference. The Eurographics Association.
Cignoni, P., Callieri, M., Corsini, M., Dellepiane, M.,
Ganovelli, F., and Ranzuglia, G. (2008). MeshLab: an
Open-Source Mesh Processing Tool. In Eurographics
Italian Chapter Conference. The Eurographics Asso-
ciation.
Cignoni, P., Ganovelli, F., et al. (2004). Vcglib.
http://vcg.isti.cnr.it/vcglib/.
Cignoni, P., Montani, C., Rocchini, C., Scopigno, R., and
Tarini, M. (1999). Preserving attribute values on sim-
plified meshes by resampling detail textures. The Vi-
sual Computer, 15(10).
Guennebaud, G., Jacob, B., et al. (2010). Eigen v3.
http://eigen.tuxfamily.org.
Jacobson, A. and Panozzo, D. (2017). Libigl: Prototyping
geometry processing research in c++. In SIGGRAPH
Asia 2017 Courses, SA ’17, pages 11:1–11:172.
Jakob, W., Rhinelander, J., and Moldovan, D. (2017). py-
bind11 – seamless operability between c++11 and
python.
Kobbelt, L., Bischoff, S., Botsch, M., and Steinberg, S.
(2002). Openmesh: A generic and efficient polygon
mesh data structure.
L
´
evy, B., Petitjean, S., Ray, N., and Maillot, J. (2002). Least
squares conformal maps for automatic texture atlas
generation. ACM Trans. Graph., 21(3).
Loriot, S., Sorkine-Hornung, O., Xu, Y., and Yaz, I. O.
(2019a). Triangulated surface mesh deformation. In
CGAL User and Reference Manual. CGAL Editorial
Board, 4.14.1 edition.
Loriot, S., Tournois, J., and Yaz, I. O. (2019b). Polygon
mesh processing. In CGAL User and Reference Man-
ual. CGAL Editorial Board, 4.14.1 edition.
M
¨
obius, J. and Kobbelt, L. (2010). Openflipper: an open
source geometry processing and rendering frame-
work. In International Conference on Curves and Sur-
faces, pages 488–500. Springer.
Rusu, R. B. and Cousins, S. (2011). 3D is here: Point Cloud
Library (PCL). In IEEE International Conference on
Robotics and Automation (ICRA), Shanghai, China.
Saboret, L., Alliez, P., L
´
evy, B., Rouxel-Labb
´
e, M., and
Fabri, A. (2019). Triangulated surface mesh param-
eterization. In CGAL User and Reference Manual.
CGAL Editorial Board, 4.14.1 edition.
Sch
¨
onberger, J. L. and Frahm, J.-M. (2016). Structure-
from-motion revisited. In Conference on Computer
Vision and Pattern Recognition (CVPR).
Sch
¨
onberger, J. L., Zheng, E., Pollefeys, M., and Frahm, J.-
M. (2016). Pixelwise view selection for unstructured
multi-view stereo. In European Conference on Com-
puter Vision (ECCV).
Sharp, N., Crane, K., et al. (2019). geometry-central.
www.geometry-central.net.
Shiue, L.-J. A. (2019). 3D surface subdivision methods. In
CGAL User and Reference Manual. CGAL Editorial
Board, 4.14.1 edition.
Sieger, D. and Botsch, M. (2019). The polygon mesh pro-
cessing library.
GRAPP 2020 - 15th International Conference on Computer Graphics Theory and Applications
82
