
ICT ENHANCED LEARNING EXPERIENCE FOR AN
INTRODUCTORY OBJECT ORIENTED PROGRAMMING COURSE
A Case Study
Olivier Camp and Richard Woodward
GRI, ESEO, Angers, France
Keywords:
Teaching, Learning, Object oriented programming, Java, Unit testing, Plagiarism detection, Computer-aided
assessment.
Abstract:
Anyone used to teaching programming is aware of the difficulties that are behind this discipline. This, of
course, is also true for students who find programming very hard to learn. These difficulties are of many
orders: the teaching of the theoretical aspects of the language, the elaboration of adapted and relevant practical
labworks, the constant fight against plagiarism (either between learners in the same class, from work done by
learners in previous years or from the Internet) and finally the accurate assessment of the students’ programs.
This paper presents a case study in which an online tool was used during a beginner’s course on “Object
Oriented Programming in Java” to help counter balance these difficulties. The tool we present here, not
only supports the students by giving them constant feedback on their work and on its adequacy with what is
expected, but also helps the instructors in charge of the course in following the students’ progression, detecting
potential cases of plagiarism and assessing the practical work done by the students. This tool was developped
using simple Java APIs and opensource applications, and was made available to the learners through the
course’s page on the school’s Moodle e-campus.
1 INTRODUCTION
Learning programming is one of the first steps a stu-
dent wishing to study computer science has to face.
However, it is a very difficult task (so difficult that
it is claimed that it takes as long as 10 years for a
novice programmer to become an expert program-
mer (Winslow, 1996)) and teachers regularly need
to redesign their courses to try and make the learn-
ing process easier and more efficient. Many stud-
ies have revealed some of the reasons that make pro-
gramming such a difficult subject to learn (and con-
sequently to teach) and what are the main difficulties
faced by novice students when learning programming
(de Raadt et al., 2004; Garner et al., 2005; Lahti-
nen et al., 2005; Milne and Rowe, 2002; Robins
et al., 2003). Several articles have discussed issues
related to this topic (Pears et al., 2007) and tried to
determine the languages and programming paradigms
that are most suitable for such introductory program-
ming courses (K
¨
olling, 1999; Mannila and de Raadt,
2006), the types of pedagogical activities that are
most adapted (
´
Asr
´
un Matth
´
ıasd
´
ottir, 2006; Dijkstra,
1989) and the tools and environments that can help
support the students during the learning process (Al-
Imamy et al., 2006) or help the teachers during the as-
sessment of the students’ work (Mutka, 2005; Gerdes
et al., 2010).
In this article we focus on one of the aspects listed
above: the use of a tool to support the students and
the teachers during the course. More precisely, we
present the practical application of the “Test and As-
sessment Tool Suite” a set of software tools designed,
both, for students and teachers during the lab work
associated with an “Object Oriented Programming in
Java” course. On the one hand, our tool provides the
students with constant feedback on their work and in-
forms them of whether or not the programs they are
writing conform to what is expected. It also helps the
students in building an archive of the work they have
done at the end of a practical session so that it can be
handed in and marked. On the other hand, the tool
automatically assesses the students’ works and veri-
fies that the work handed in by a student is, indeed,
personal work and not plagiarism of another student’s
work.
We begin, in Section 2, by describing the context
of the case study: the design of the course and of
16
Camp O. and Woodward R..
ICT ENHANCED LEARNING EXPERIENCE FOR AN INTRODUCTORY OBJECT ORIENTED PROGRAMMING COURSE - A Case Study.
DOI: 10.5220/0003297000160025
In Proceedings of the 3rd International Conference on Computer Supported Education (CSEDU-2011), pages 16-25
ISBN: 978-989-8425-50-8
Copyright
c
2011 SCITEPRESS (Science and Technology Publications, Lda.)

its various activities, the level and the number of stu-
dents and the way the various activities are organised.
Section 3 focuses on the individual tools in the suite;
how the suite is used, both, by the students for feed-
back and by the teacher for automatic assessment and
plagiarism detection. This section also presents some
implementation details of the tool suite. Section 4 dis-
cusses the benefits and drawbacks of the tool and how
it influenced the students’ work. In Section 5 we con-
clude and present future directions of work to improve
the tool.
2 CONTEXT
This case study is relative to an “Object Oriented
Programming in Java” course taught to students in
their third year of Bachelor degree studies in ESEO, a
French graduate school of engineering in the fields of
electronics, computer science, networks and telecom-
munications.
The first two years of studies at ESEO, referred
to as the “preparatory cycle”, are mainly dedicated to
fundamental scientific disciplines - i.e., mathematics
and physics. During each of their first two years of
studies, approximately 50 hours of the mathematics
course is dedicated to a, mainly practical, introduction
to C programming. The students thus reach their third
year of study with a basic programming knowledge.
During the first semester of the third year, our stu-
dents follow a 30 hours course on “data structures and
algorithms”. This course consists of 15 hours of lec-
tures and an equal amount of time is devoted to practi-
cal sessions. In order not to confuse the students with
a new language and syntax, a simplified dialect of the
C programming language is used to illustrate the dif-
ferent aspects presented during the lectures and to put
them in practice during the practical sessions.
The “Object Oriented Programming in Java”
course starts at the beginning of the spring semester
and runs in parallel with an introductory course on
the UML language. The objectives of the course are
manifold:
1. Introduce the students to the fundamental prin-
ciples of object oriented programming (classes,
inheritance, instanciation and message passing):
UML class diagrams together with a pseudo ob-
ject oriented language are used to illustrate these
principles.
2. Teach the core of the Java language: an explana-
tion of the way the fundamental principles are im-
plemented in Java is followed by a presentation
of some of the important classes of the Java API
(exceptions, streams, Swing/awt and threads).
3. Show the students, through a guided practical ex-
ample, how the object oriented paradigm can be
put in action to develop a graphic application and
introduce them by example to design patterns.
4. Show the students that, through the course, they
have acquired enough competency to develop a
practical project of their own and give them the
opportunity to practice their skills and discover,
by themselves, new aspects of object oriented pro-
gramming in Java.
The course has a total audience of 180 students and
approximately 70 hours over a total period of 16
weeks are allocated to it. This time is divided into
three clear parts: the first 6 weeks are for lectures, the-
oretical tutorial classes and practical tutorial classes,
during the following 5 weeks the students are guided
in the individual development of a real application and
for the last 5 weeks they develop a personnal project
in pairs.
The teacher in charge of the course has 15 years
experience in teaching object oriented programming
mainly in Java, but also with object-oriented Lisp di-
alects and Smalltalk, to various audiences, both in the
academic and professional contexts. For the tutorial
sessions and the practical aspects of the course he is
assisted by another teacher with over 5 years experi-
ence in the teaching of computer science and involved
in various aspects of the computer science curriculum.
He is the developer of the tool suite discussed in this
paper. Two PhD students are also involved in the tu-
toring of the practical activities and the tutorial classes
related to this course.
2.1 Lectures (17.5 Hours) and Tutorial
Classes (10 Hours)
This part of the course consists of 2-4 lectures and
1-2 tutorial classes a week. The lectures are rather
traditional and the number of students does not allow
for much interaction between the teacher and the stu-
dents. However, for the tutorial classes, the students
are divided in smaller groups of approximately 30 stu-
dents. Half of these classes (5 hours) concentrate on
theoretical (non-practical) aspects of the course and
are aimed at giving the students a first experience with
the object oriented modelling of small problems and
to show them how these models can be translated into
Java. One of the objectives of these tutorial classes
is to help the students shift their mind-set from a pro-
cedural to an object-oriented view of the world. The
rest of the time (5 hours) is dedicated to practical tu-
torial classes and give the students an occasion to get
used to the practical aspects of Java and learn by ex-
ample the use of the compiler, the virtual machine,
ICT ENHANCED LEARNING EXPERIENCE FOR AN INTRODUCTORY OBJECT ORIENTED PROGRAMMING
COURSE - A Case Study
17

the API’s documentation. The results of the exercices
seen during the theoretical tutorial classes are used as
examples and put into practice during these sessions.
2.2 Practical Lab Sessions (20 Hours)
The practical lab sessions are held over 5 weeks, after
the students have gone through the lectures and the
tutorial classes. By that time, they have had a chance
to be introduced to the main aspects of object orienta-
tion and of the Java language, both at the theoretical
and practical levels. A total of 20 hours, held as 4
hour weekly sessions are dedicated to this part of the
course. During these sessions, the students are given
access to the written subject of the project. In its first
parts, this document gives very detailed instructions
of the work to be done: creation of the package di-
rectories, explanations of the Java classes to be used
and written. As the students progress in the subject,
the explanations are much less detailed to encourage
the students to study the official Java API specifica-
tion and to learn by themselves. All the classes the
students are asked to develop are illustrated by UML
class diagrams in order to get them used to the se-
mantics of these diagrams and to make them practice
their translation in Java. For this first practical part
of the course, each student works individually and is
forbidden to use an integrated development environ-
ment. The aim of pushing the students to use such a
“command line” approach is to help them understand
the various steps involved in Java programming: com-
pilation of the source code, understanding of the error
messages and correction of compile time errors, in-
terpretation of the byte code, correction of run time
errors. We prefered to go through this manual ap-
proach rather than have them rely on a IDE such as
Eclipse or NetBeans. Indeed, we believe the capacity
of these IDEs to “automagically” correct compile er-
rors by adding missing import statements, methods or
constructors should only be used once the program-
mer has a first idea of how these errors should be cor-
rected errors manually.
2.3 Practical Project Sessions
(20 Hours)
The last 5 weeks of the course is dedicated to the de-
velopment of a practical project. Weekly 4 hour ses-
sions are scheduled for this activity. The aim of the
practical project is to give the students an occasion
to broaden their knowledge on the Java programming
language through the development of an application
of their own. For this project, the students have the
choice between developing a totally new application
of their choice or of providing evolutions to the ap-
plication they developed over the previous 5 weeks
during the practical lab sessions. To give the students
a first taste of team programming this work is done in
pairs and the students can use programming environ-
ments to support their developments.
This article concentrates on the practical lab ses-
sions presented in Section 2.2. More specifically it
presents an online tool suite that was developed for
this part of the course to help the students verify their
work and hand it in at the end of each session. The
tool suite is also for the teachers to detect blatant cases
of plagiarism, to follow the progression of their stu-
dents and to serve as a first pass for marking the work
done.
3 THE TEST AND ASSESSMENT
TOOL SUITE
The tool suite discussed in this section is a set of 3
online software tools made available to the students
and teachers through the course’s page on the school’s
Moodle e-campus. During the practical lab work, the
students are asked to use two of them for: 1) checking
whether their work conforms to what is asked for in
the subject and 2) packaging their work so that it can
be handed in for marking through the course’s page
on the e-campus. A third tool is the teacher’s coun-
terpart for this software and serves for plagiarism de-
tection and as an aid for assessment. This section will
present these two sides of our tool suite and, in the
final subsection, describe the technologies that were
used for its implementation.
3.1 Student Side of the Tool
3.1.1 The Test Centre
The aim of the practical sessions is for the students
to develop a graphical editor giving a user the capa-
bility to draw various shapes (rectangles, squares, el-
lipses, circles, lines, ...) using the mouse. The ap-
plication implements the Model-View-Controller pat-
tern and the graphic editor obtained should ressemble
the typical applications delivered with most operat-
ing systems. To guide their work, the students are
given a subject in which all the details are given con-
cerning what is expected from them. These details
include the names of the different packages that are
expected, the exact names of the public classes and
methods that are asked for and, of course, the spec-
ifications of the methods to write. For instance, the
wording of the first question, given in Figure 1, gives
CSEDU 2011 - 3rd International Conference on Computer Supported Education
18
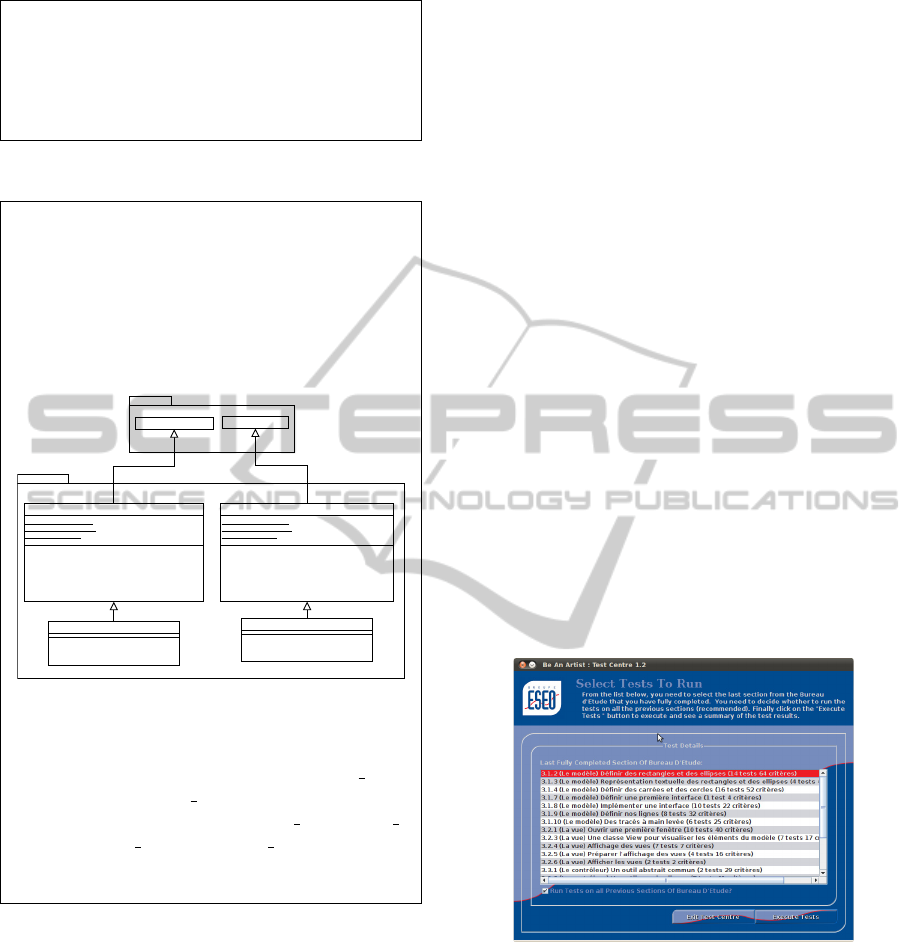
3.1.1) Create the directories beanartist,
beanartist/model, beanartist/view and
beanartist/controller in which the Java classes
of the packages beanartist, beanartist.model,
beanartist.view and beanartist.controller will
be stored.
Figure 1: First question of the subject.
3.1.2) Define the classes:
1. beanartist.model.Rectangle, subclass of
java.awt.geom.Rectangle2D.Double
2. beanartist.model.Ellipse, subclass of
java.awt.geom.Ellipse2D.Double. as they
are represented in the class diagram in the
following figure.
beanartist.model
java.awt.geom
Rectangle
#DEFAULT_WIDTH: double
#DEFAULT_HEIGHT: double
#DEFAULT_X: double
#DEFAULT_Y: double
+Rectangle()
+Rectangle(x:double,y:double,width:double,height:double)
+Rectangle(pos:java.awt.geom.Point2D.Double,width:double,
height:double)
+toString(): String
+moveShapeTo(x:double,y:double): void
+getLineColour(): java.awt.Color
+setLineColour(colour:java.awt.Color): void
Rectangle2D.Double
Ellipse
#DEFAULT_WIDTH: double
#DEFAULT_HEIGHT: double
#DEFAULT_X: double
#DEFAULT_Y: double
+Ellipse()
+Ellipse(x:double,y:double,width:double,height:double)
+Ellipse(pos:java.awt.geom.Point2D.Double,width:double,
height:double)
+toString(): String
+moveShapeTo(x:double,y:double): void
+getLineColour(): java.awt.Color
+setLineColour(colour:java.awtColor): void
Ellipse2D.Double
Square
+Square()
+Square(x:double,y:double,size:double)
+Square(pos:java.awt.geom.Point2D.Double,
size:double)
Circle
+Circle()
+Circle(x:double,y:double,size:double)
+Circle(pos:java.awt.geom.Point2D.Double,
size:double)
The default constructors (with no arguments) should
create shapes (Rectangle or Ellipse) whose
width (respectively height) is given by the value
of the protected class constant DEFAULT WIDTH
(respectively DEFAULT HEIGHT). A default shape
should be placed at point (DEFAULT X, DEFAULT Y)
where DEFAULT X and DEFAULT Y are, also, class
constants. The toString() method of these two
classes will be written in the next question.
Figure 2: Asking for classes.
no freedom concerning the names of the packages to
be used for the application.
The same level of detail is given when the stu-
dents are asked to write a class. For example, Fig-
ure 2 shows the explanations given to help the student
write the first two classes, Rectangle and Ellipse.
Together with these details, the subject also give ex-
planations concerning the software architecture im-
plemented and on the API classes to be used.
It is expected that the students respect all the de-
tails (class/method/attribute visibilities, names, im-
plementation of public methods and constructors) in
their code. However, they are totally free to write
all the private methods they wish to support their im-
plementation. Furthermore, all the functionalities de-
scribed in the subject are mandatory and should be
respected.
The subject is subdivided in three distinct sections
each corresponding to one of the facets of the MVC
approach - i.e.; the model section, the view section
and the controller section.
The first tool in our suite, the “Test Centre”, comes
in handy after the completion of each of the subject’s
questions. The students are then asked to submit the
code they have written to the “Test Centre” to check
that what they have written conforms to what is ex-
pected. The tool is written in Java and can be executed
directly, using the Java Web Start technology, from
the course’s Moodle page on the school’s e-campus.
When run, the tool asks the student to point to the
directory that hosts the project’s top package. The
student is then invited to choose, in a list, the last
question that was completed and to run the tests (in
Figure 3 the user has just completed question 3.1.2
in the model section of the subject). When the tests
are executed, the student’s code is tested and its ad-
equacy with what is expected is verified. If the sub-
mitted work contains errors and does not verify the
specified functionnalities or if it does not contain the
required methods, attributes or constants, the user is
informed that some tests have failed.
Figure 3: Choosing the last question handled by the student.
The user can then ask to see the details of the fail-
ure in order to be guided for its correction.
In the example in Figure 4 the user is informed
that two tests have failed for question 3.1.2 (those
dedicated to the static structure of classes Rectangle
and Ellipse - we will see later in Section 3.3
that these tests are referred to as “existence tests”).
The student is also informed that the classes sub-
mitted for testing have the required functionalities
and have passed this category of tests. The student
can, on demand, have a detailed report on the fail-
ICT ENHANCED LEARNING EXPERIENCE FOR AN INTRODUCTORY OBJECT ORIENTED PROGRAMMING
COURSE - A Case Study
19
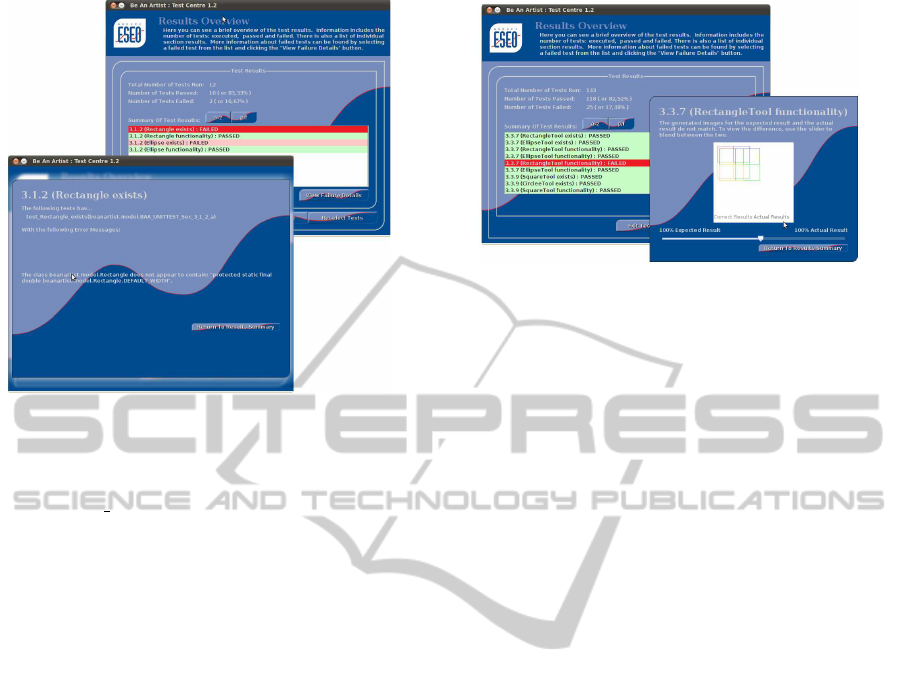
Figure 4: Overview and detailed view of the test results.
ure. In the example in Figure 4 the problem comes
from the inexistence of the protected class con-
stant DEFAULT WIDTH in class Rectangle; The stu-
dent should thus correct this oversight before going
any further in the subject and should only move on to
the next question in the subject once question 3.1.2
has been totally corrected.
The students are invited to follow such a test
driven iterative approach throughout the whole sub-
ject and, as explained above, they should run the “Test
Centre” to check their answers to each question of
the subject. In the examples presented previously, the
“Test Centre” is only used to verify very simple char-
acteristics of a class, constructor or method. However,
this type of test is possible for all types of function-
ality, and the “Test Centre” can verify graphic func-
tionalities, response of the application to user events
or other more complex specification details. In the
case of a failure in a graphic functionality, the “Test
Centre” shows the result obtained by the application
under test and the expected result, in order to help
the student correct the problem. Figure 5 shows the
details given by the “Test Centre” in case of such a
graphic failure. In this view, both the expected result
and the actual result are shown to the student. Us-
ing the slider, the student can switch between the two
views to try to determine what is wrong with the pro-
gram’s result.
At the end of each session, the students should up-
load the current state of their application on the Moo-
dle e-campus. For this, and to ease the assessment
process, they are required to use the second tool on
the student side of the suite: the “Jar Creation Cen-
tre”.
Figure 5: Feedback given on failure of graphic functionnal-
ities.
3.1.2 The Jar Creation Centre
The “Jar Creation Centre” is the second tool for the
students. Its main aim is to take care of the pack-
aging of a student’s work before it can be uploaded
for evaluation on the e-campus. Just like it is the case
with the “Test Centre”, when the students submit their
work to this tool, they should: 1) point to the direc-
tory containing the root package of their application
and 2) select the item in the subject that was last com-
pleted. Once given this information, the “Jar Creation
Centre” starts by testing the submitted classes using
the “Test Centre” tool. After achieving this pass, the
“Jar Creation Centre” knows: the number of steps
achieved by the student, and for each of the subject’s
sections (model, view and controller): the total num-
ber of tests gone through by the submitted program
and the number of tests that failed. Once this has
been done, the student’s source files are added to the
archive and, finally, the information resulting from the
tests is included in the archive’s manifest.
Before exiting, the “Jar Creation Centre” informs
the student of the name of the archive and of where it
was stored on the local machine and copies this path
in the clipboard. The student then, just needs to up-
load it to the Moodle e-campus.
3.2 Teacher Side of the Tool
Once it has been uploaded on the course’s space on
the e-campus, the students’ works can be graded and
checked for plagiarism. To help the teacher in this
task a third tool was developed: the “Assessment Cen-
tre”. This tool takes a bundle (we chose to use a zip
archive because of their easy creation and retrieval
through the Moodle platform) of all the java archives
handed in by the students as input and processes them
in order to calculate an individual grade for each of
the student’s work and check whether there are no bla-
CSEDU 2011 - 3rd International Conference on Computer Supported Education
20
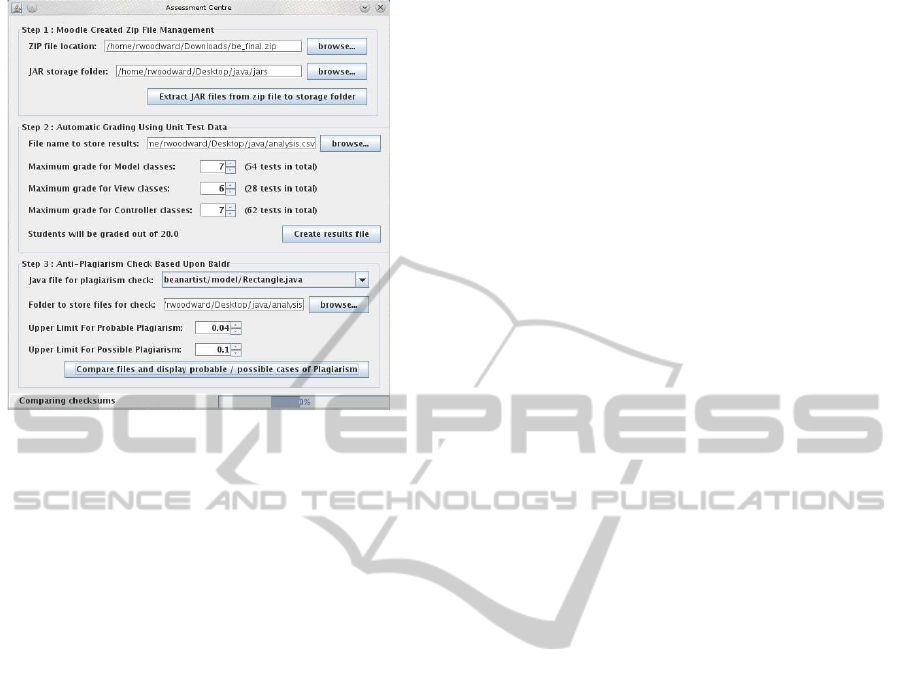
Figure 6: Using the “Assessment Center”.
tant cases of plagiarism between the students.
3.2.1 Configuration of Storage Spaces
Figure 6 shows a screenshot of the “Assessment Cen-
tre”. In a first step the teacher is asked to point to
the zip archive file containing all the work that was
handed in by the students and to give the directory
in which the system should extract all the jar files it
contains. Once this information has been given to the
system, the teacher can ask for the extraction of the
files in the storage directory and move on to the sec-
ond step of the “Assessment Centre” devoted to the
marking of the work.
3.2.2 Assessment
Before proceeding to the actual assessment of each
student’s program, the teacher should choose the
number of points that should be assigned to each of
the sections of the subject. In the example in Fig-
ure 6, 7 points are assigned to the Model part of the
subject, 6 points to View part and another 7 points are
for the Controller classes of the application. For this
second step, the teacher should also indicate the name
of the file in which the “Assessment Centre” should
store the detailed assessments for each student work;
in our case file analysis.csv.
The assessment phase is rather simple, since it
only uses the information added by the “Jar Creation
Centre” in the Java archive’s Manifest file. As stated
in Section 3.1.2, the Manifest file contains informa-
tion regarding the proportion of passed tests per sec-
tion. This information, together with the points as-
signed per section are sufficient to calculate a grade
per section and thus a total grade for the work. In
this first version, the calculation of the grade is some-
what basic, giving a grade that is directly proportional
to the number of successful tests. In future versions
of the “Test and Assessment Tool Suite”, rather than
assigning points to entire sections of the subject, we
have planned to let the teacher dispatch the points
with more precision on a per item basis.
The result provided by the “Test Centre”, takes the
form of a CSV file giving the grade obtained by each
student, the details of its calculation, the number of
files in the bundle handed in by each student and the
size of the bundle. For example, table 1 shows the
first 10 lines of the “Assessment Centre’s” result file.
Each line reports the score (with a maximum of 20)
obtained by the student whose userid on the schools
network is given in the first column. The details con-
cerning this global evaluation are given in the follow-
ing columns. For instance, columns 3, 4 and 5 give
the number of tests passed in the model (out of a total
of 54 tests), view (out of a total of 28 tests) and con-
troller (out of a total of 62 tests) sections of the subject
by the student. The last column is an indication of the
last item of the subject completed by the student. This
last information is used when the sudying the progres-
sion of a student’s work over the 5 weeks of the lab
work.
3.2.3 Plagiarism Detection
Finally the third step, is used to configure the plagia-
rism detection phase. The teacher should first give
the name of the file to be checked (Rectangle.java
in our example), the working directory in which the
system should store the files (or classes) it checks and
two threshold values (between 0 and 1) indicating the
upper limits between “no plagiarism”, “probable pla-
giarism” and “possible plagiarism”; all pairs of files,
of the given name, are checked for plagiarism. We
will discuss in Section 3.3 the tool and the mechanism
used for this verification.
3.3 Implementation
The implementation of the various applications in the
“Test and Assessment Tool Suite” is done in Java and
relies on opensource softwares and platforms for test-
ing and plagiarism detection. The deployment of the
various tools in the tool suite relies on the Java Web-
start technology; By using this technology, all the
tools can be run locally on the user’s machine and
do not stress the servers or the network. Moreover,
with this technology, we can ensure that the students
always execute the last and most up to date version of
the software. This facilitates maintenance and allows
ICT ENHANCED LEARNING EXPERIENCE FOR AN INTRODUCTORY OBJECT ORIENTED PROGRAMMING
COURSE - A Case Study
21

Table 1: Excerpt of an “Assessment Centre” result file.
userid score
model
tests
passed
view
tests
passed
controller
tests
passed
last
section
com-
pleted
beulepi 20.0 54 28 62 3.3.14
beaubeju 18.0 54 28 44 3.3.9
nogueral 11.7 54 22 0 3.2.4
bertinpi 13.0 54 28 0 3.3.1
diallo 13.1 54 28 1 3.3.1
razmkhre 7.0 54 0 0 3.1.10
crepinem 17.9 54 28 43 3.3.11
deberle 8.3 54 6 0 3.2.6
nivollpi 14.0 54 28 9 3.3.2
faligopa 11.5 52 22 0 3.2.4
.
.
.
.
.
.
.
.
.
.
.
.
.
.
.
.
.
.
for transparent evolutions of the “Test Centre” result-
ing from corrections or modifications of the subject.
3.3.1 Testing
The “Test Centre” relies on the Junit unit testing plat-
form. Every item of the subject is verified using a
number of Junit test cases. Each test case consists of
several assertions to check the criteria that should be
verified by the program under test. The “Test Centre”
counts a total of 151 tests and 565 assertions to test
the entire application. The test cases are subdivided
in two large categories: existences tests and function-
ality tests.
Existence tests rely on the Java reflection API.
They check whether the submitted classes respect the
static requirements. Existence of the required classes
is tested together with the proper declarations of their
public and protected members (constants, vari-
ables and methods).
Functionality tests fall in two subcategories: In-
put/output testing and graphical interface tests. In-
put/output tests are the simplests of these tests to im-
plement. They check that the results returned by the
tested methods are indeed what they should be when
they are given certain specific parameters. This cate-
gory of tests is also responsible for verifying that all
the required side effects expected by the execution of
a method occur.
The graphical interface tests are in charge of ver-
ifying the correct response of the application to spe-
cific user interactions. They are implemented in com-
paring the image obtained by the application under
test when events are artificially fired and feeded to the
event loop with the expected image drawn directly in
a graphic context.
3.3.2 Plagiarism Detection
For the plagiarism detection step, the “Assessment
Centre” relies on Baldr, an opensource tool
1
that uses
measures of similarity distance between source code
to detect plagiarism amongst a, potentially, large col-
lection of source code. The Baldr software is written
in Java, it was thus naturally interfaced with the “As-
sessment Center” and its functionalities were quite
simply integrated in the tool.
In this version of the Assessment Centre”, the
teacher must choose which class needs to be checked
for plagiarism. For the chosen class, the system then
checks all of the students versions of this class for pla-
giarism, using Baldr.
For some parts of the subject, the classes and
methods requested are short and simple and false pos-
itives could be detected if solely the code were to be
tested. For those questions, it is the commented code
that should be submitted to plagiarism detection. If
the code is similar and the comments are also simi-
lar then there is suspicion of plagiarism. Other ques-
tions demand more sophisticated answers for which
the resulting code differs quite significantly from one
student to another. For these questions and to prevent
students from just modifying the comments in plagia-
rised code it is the uncommented code that should be
checked for plagiarism. In order to allow for these
two types of comparisons, two versions of the code
are submitted to plagiarism detection: one complete
version including the comments and another version
from which all the comments have been removed by
the “Assessment Centre”. This can help the teacher
1
Baldr was developped by H. Wassner and can be down-
loaded from http://sourceforge.net/projects/baldr/ .
CSEDU 2011 - 3rd International Conference on Computer Supported Education
22

when trying to determine cases of plagiarism before
visually verifying the suspected programs.
4 DISCUSSION
The “Test and Assessment Tool Suite” was experi-
mented with 180 students dispatched in 3 groups of
60 students. Each of the groups were supervised by
three teachers. Discussions with the students regard-
ing the use of this tool showed that, on the whole, they
appreciated the tool and considered it of great help
when programming. One of the most cited reason
for such positive evaluation was the capacity for the
students to obtain an immediate feedback concerning
each step of their work. Such feedback gives them a
better understanding of the subject, both concerning
the translation of UML class diagrams to Java classes
and regarding the MVC architecture of the applica-
tion. It was also noted that both novice programmers
and students with prior experience in Java benefitted
from the “Test Centre”. Novice students were mostly
guided by the tool’s functionality tests, when students
with more experience relied on it to get hints on the ar-
chitectural aspect of the application. This immediate
feedback also helps those students who wish to work
on their programs outside the timetabled practical ses-
sions in verifying, as they progress in the subject, the
adequacy of their work and its compliance with what
is expected.
Another positive point of the “Test Centre” lies in
its incremental testing policy. Since all the function-
alities are tested incrementally, there is little possibil-
ity that errors in the first steps of the subject influence
further steps. This is of course helpful for the students
and helps them in writing software incrementally and
allows them to rely on existing and tested pieces of
software. It is also of great help for the supervisors
who, usually, do not have to go back to very early
stages of the subject to help a student find a problem
in the code.
On the supervisor’s side, the “Assessment Centre”
makes it easy to obtain an immediate view of the pro-
gression of the whole class on a weekly basis, thus
helping the supervisors to target their interventions
for the following week.
Concerning the plagiarism detection capacity of
the “Assessment Centre”, the students were informed
of its use and of the tool that was used. By commu-
nicating widely on the use of such a tool, we noticed
that the students tended to help each other through
explanations rather than by using a much less peda-
gogical copy/paste solution.
The use of the tool suite also has certain draw-
backs compared to a more traditional approach in
which the students need to write the code to test their
programs. For instance, we noticed that some stu-
dents tended to not test their programs at all before
submitting it to the “Test Center”. It was not rare
to see students that had never executed their program
prior to submitting it to the “Test Centre” and, some
of the code submitted to the “Test Centre” looped in-
definitely or raised exceptions during execution. The
first of these problems was simply solved by using
the timeout functionality inherent to Junit. However,
with the latter, the “Test Centre” was quite confused
and returned unexpected messages sometimes not re-
lated to the cause of the error. Similar problems arose
when a class did not compile or had not been com-
piled; the “Test Centre” did not detect the existence
of the source code and simply reported the fact that a
class was missing. These problems were only due to
an incomplete study of user behaviour. Innocently,
we thought that the students would follow a tradi-
tional code-compile-test approach before submitting
their work for verification to the “Test Centre”. We
had not thought about them adopting a less traditional
code-compile-”Test Centre” approach or even less a
code-”Test Centre” cycle forgetting the compilation
step altogether.
Another problem we faced with the tool suite con-
cerned the fact that it was specifically tailored for the
subject. For this reason, modifications or corrections
in the subject were sometimes difficult to integrate in
the “Test Centre”.
On the whole however, we feel this first experi-
ence with the tool suite was very positive and def-
initely helped the students in their productivity. As
an example, a very similar subject was given, for the
same course, the previous year but was not supported
by such tools. This year, we noticed that, after 5
weeks, more students had managed to complete the
entire application than the previous year. Some of
them even managed to go through the entire subject
after as little as 3 weeks. Is this due to the use of
these tools or to more competent students? This has
not been measured and is thus not clear. However, af-
ter discussions with the students the impact of these
tools on the work done is undoubtedly positive.
5 CONCLUSIONS AND FUTURE
WORKS
In this paper we have presented our experience of an
ICT enhanced approach used for the practical aspects
of an object oriented programming course in Java. We
have described the different elements of a tool suite
ICT ENHANCED LEARNING EXPERIENCE FOR AN INTRODUCTORY OBJECT ORIENTED PROGRAMMING
COURSE - A Case Study
23
that helped both, the students and the teachers in their
work. The first tool of the suite, the “Test Centre”,
helps the students in verifying, through a unit test
driven approach, that their work respects the subject’s
requirements. With the second tool of the suite, the
“Jar Creation Centre”, they can package their work,
together with information concerning it, in a format
that can easily be managed by the last tool in the
suite: the “Assessment Tool”. This last tool allows
the teachers of the course to follow each student’s
individual progression, to automatically assess their
works and to detect plagiarisms amongst the students’
works.
On the whole, the introduction of these tools in
our Java course was very much appreciated by the stu-
dents and helped them in their work. It was also of
great help for the teachers, since they could base their
assessments on the response of the student’s programs
to functional requirements stated in the subject.
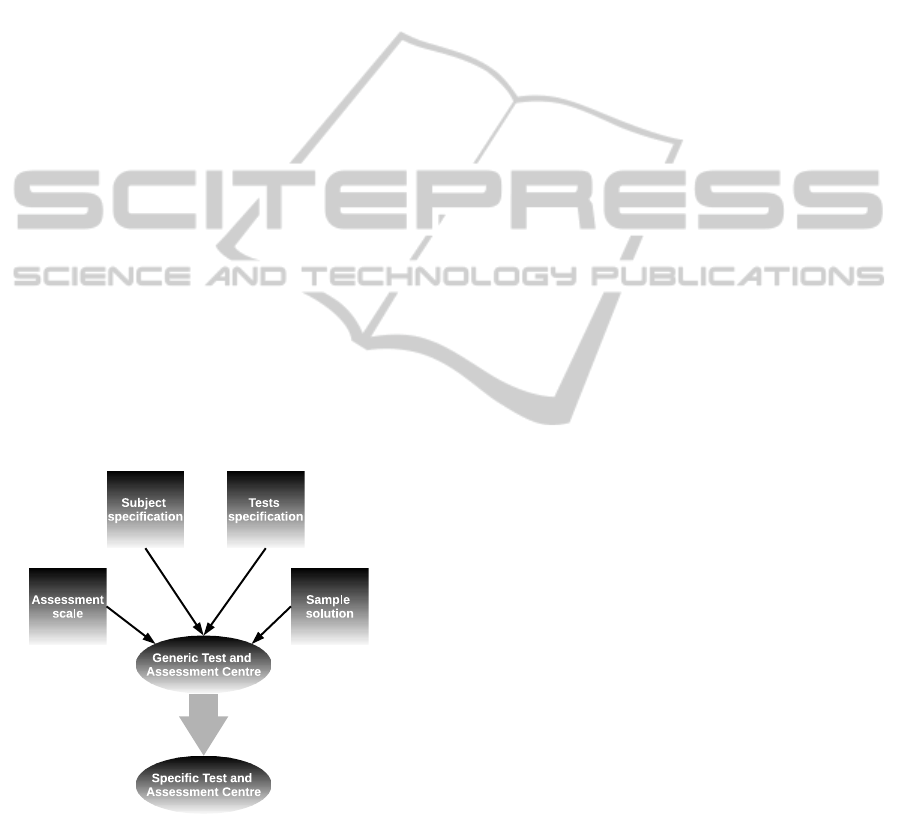
Yet, we have pointed a number of limitations of
the approach and are working to overcome them. Our
first objective is now to develop a more generic tool
that can easily be adapted (or parameterised) for a
given set of tests, a given subject, a specific assess-
ment scale and a sample solution. For this we are in-
vestigating a model driven approach in which, given
a set of models, a specific “Test and Assessment Cen-
tre” is generated from a generic specification of the
tool suite, using an appropriate transformation (see
Figure 7).
Figure 7: Generation of a specific Test and Assessment
Centre.
In order to prevent the students from submitting
code that still contains run time errors and raise ex-
ceptions, we will refine the error messages returned
by the “Test Centre” and have three types of messages
those indicating that a test failed or passed and a third
message indicating that a test has failed because an
exception prevented its execution. In parallel to that,
to make it easier for the students, we are also think-
ing of merging both, the “Test Centre” and the “Jar
Creation Centre” into one single tool. With this new
approach, a Java archive is created everytime the tests
are run. We believe this will make things less confus-
ing for the students when having to decide which tool
to use. We are also planning on asking the students to
digitally sign the submitted work declaring it is their
own which will clarify matters when faced with cases
of plagiarism.
Furthermore, our exploitation of the results of the
Baldr plagiarism detection tool is very minimal, we
must find a means for the detection to set the thresh-
olds that define probable and possible cases of pla-
giarism. These threshold will most probably have to
be specific to each class for the results to be realis-
tic, such dynamic assignment still needs to be studied.
Together with these reflections, we must also study
ways to intuitively display the detection results to the
teacher.
Another direction of work would be to study the
portage of our approach to other langages using the
appropriate Xunit framework as support. Such a
choice could then be included in our model driven
generation approach.
Moreover, and this is probably the most important
point, the subject of the practical assignment should
be very precise and still needs to be refined.
Finally, we must study and quantify the impact of
the “Test Centre” on the students’ learning process. In
future runs of the course we are planning on setting up
intermediate tests and questionnaires as an attempt to
quantify this issue.
REFERENCES
Al-Imamy, S., Alizadeh, J., and Nour, M. A. (2006). On the
development of a programming teaching tool: The ef-
fect of teaching by templates on the learning process.
Journal of information Technology education, 5:271–
284.
´
Asr
´
un Matth
´
ıasd
´
ottir (2006). How to teach programming
languages to novice students? lecturing or not? In
Proceedings of the International Conference on Com-
puter Systems and Technologies (CompSysTech’06).
de Raadt, M., Watson, R., and Toleman, M. (2004). In-
troductory programming: what’s happening today and
will there be any students to teach tomorrow? In
ACE ’04: Proceedings of the sixth conference on Aus-
tralasian computing education, pages 277–282, Dar-
linghurst, Australia, Australia. Australian Computer
Society, Inc.
Dijkstra, E. (1989). On the cruelty of really teaching com-
CSEDU 2011 - 3rd International Conference on Computer Supported Education
24

puter science. Communications of the ACM, 32:1398–
1404.
Garner, S., Haden, P., and Robins, A. (2005). My program is
correct but it doesn’t run: a preliminary investigation
of novice programmers’ problems. In ACE ’05: Pro-
ceedings of the 7th Australasian conference on Com-
puting education, pages 173–180, Darlinghurst, Aus-
tralia, Australia. Australian Computer Society, Inc.
Gerdes, A., Jeuring, J. T., and Heeren, B. J. (2010). Using
strategies for assessment of programming exercises.
In Proceedings of the 41st ACM technical symposium
on Computer science education, SIGCSE 10, pages
441445, New York, NY, USA. ACM.
K
¨
olling, M. (1999). The problem of teaching object-
oriented programming. Journal of Object-Oriented
Programming, 11(8):8–15.
Lahtinen, E., Ala-Mutka, K., and J
¨
arvinen, H.-M. (2005).
A study of the difficulties of novice programmers.
SIGCSE Bulletin, 37(3):14–18.
Mannila, L. and de Raadt, M. (2006). An objective com-
parison of languages for teaching introductory pro-
gramming. In Baltic Sea ’06: Proceedings of the
6th Baltic Sea conference on Computing education re-
search, pages 32–37, New York, NY, USA. ACM.
Milne, I. and Rowe, G. (2002). Difficulties in learning and
teaching programming - views of students and tutors.
Education and Information Technologies, 7(1):55–66.
Mutka, K. A. (2005). A survey of automated assessment
approaches for programming assignments. Computer
science education, vol. 15:83–102.
Pears, A., Seidman, S., Malmi, L., Mannila, L., Adams, E.,
Bennedsen, J., Devlin, M., and Paterson, J. (2007).
A survey of literature on the teaching of introductory
programming. In ITiCSE-WGR ’07: Working group
reports on ITiCSE on Innovation and technology in
computer science education, volume 39, pages 204–
223, New York, NY, USA. ACM.
Robins, A., Rountree, J., and Rountree, N. (2003). Learning
and teaching programming: A review and discussion.
Computer Science Education, 13:137–172.
Winslow, L. E. (1996). Programming pedagogy—a psycho-
logical overview. SIGCSE Bull., 28(3):17–22.
ICT ENHANCED LEARNING EXPERIENCE FOR AN INTRODUCTORY OBJECT ORIENTED PROGRAMMING
COURSE - A Case Study
25
