Perceptual Evaluation of Photo-realism in Real-time 3D Augmented
Reality
Mathias Borg
1
, Martin M. Paprocki
1
and Claus B. Madsen
2
1
School of Information and Communication Technology, Aalborg University, Aalborg, Denmark
2
Department of Architecture, Design and Media Technology, Aalborg University, Aalborg, Denmark
Keywords:
Augmented Reality, Photo-realism, Perceptual Evaluation.
Abstract:
We present a framework for creating photo-realism of three-dimensional augmented objects, as well as a per-
ceptual evaluating of the scenes. A setup utilizing different lighting conditions is created. Different parameters
affecting the realism are evaluated. These are camera artefacts, shadows, number of lights for shading, high-
lights and geometry. The results show that silhouettes of the shadows and the geometry, and highlights on
specular objects are important, as well as the simulation of noise, for creating a photo-realistic augmentation.
Furthermore, a side by side comparison is conducted to verify that it is possible to render a virtual object in
real-time, which is perceived as real under the best conditions.
1 INTRODUCTION
Virtual realism or photo-realism has always been a
goal within 3D computer graphics (CG), where still
art and the film industry have already benefited from
photo-realistic rendering to integrate virtual elements
and effects with a high level of realism. Augmented
reality (AR) which by definition is a mix of a video-
feed and virtual elements would also benefit from
having the virtual visualisations reaching this level of
realism. Nevertheless, several challenges still exist
and realistic rendering of 3D graphics in real-time is
still a future goal.
The goal of this work is to investigate whether
it is possible to obtain such realism in a static envi-
ronment. The purpose of the experiments is for test
subjects to assess the realism of an object. The test
subjects will be shown a scene with either a virtual
or a real object and assess whether or not he or she
believes it is real. Furthermore, a side by side com-
parison will be conducted (see example in Figure 1).
Even today the development of photo-realism
within AR could help some industries. Some exam-
ples could be the medical (Azuma, 1997), architec-
tural and entertainment industry, where precise repli-
cation of the real world is important and/or where aes-
thetic factors play a role.
It is well recognized in computer graphics that
parameters such as high model complexity, accu-
rate highlights and both low frequency shadows (soft
Figure 1: In one experiment test subjects assess virtual ob-
jects and compare them with real objects in an AR context.
The scenes are rendered in real-time and artefacts of the
camera, as well as the surrounding environment, are con-
sidered to integrate an object in the video-feed such that it
is indistinguishable from a real object.
shadows) and high frequency shadows (hard shad-
ows) are important for realistic synthesis (Elhelw
et al., 2008; Rademacher et al., 2001). Elhelw et
al. mentions the importance of context in a scene,
as well as the complexity of the human visual sys-
tem and how to assess what is perceived by the user.
Verbal answers combined with Likert scales are of-
ten too biased, therefore, Elhelw et al. performed a
gaze study using eye-tracking. The results showed
that highlight and silhouettes are important. More-
over, as the rendering in AR occurs in real-time the
377
Borg M., Paprocki M. and Madsen C..
Perceptual Evaluation of Photo-realism in Real-time 3D Augmented Reality.
DOI: 10.5220/0004683203770386
In Proceedings of the 9th International Conference on Computer Graphics Theory and Applications (GRAPP-2014), pages 377-386
ISBN: 978-989-758-002-4
Copyright
c
2014 SCITEPRESS (Science and Technology Publications, Lda.)

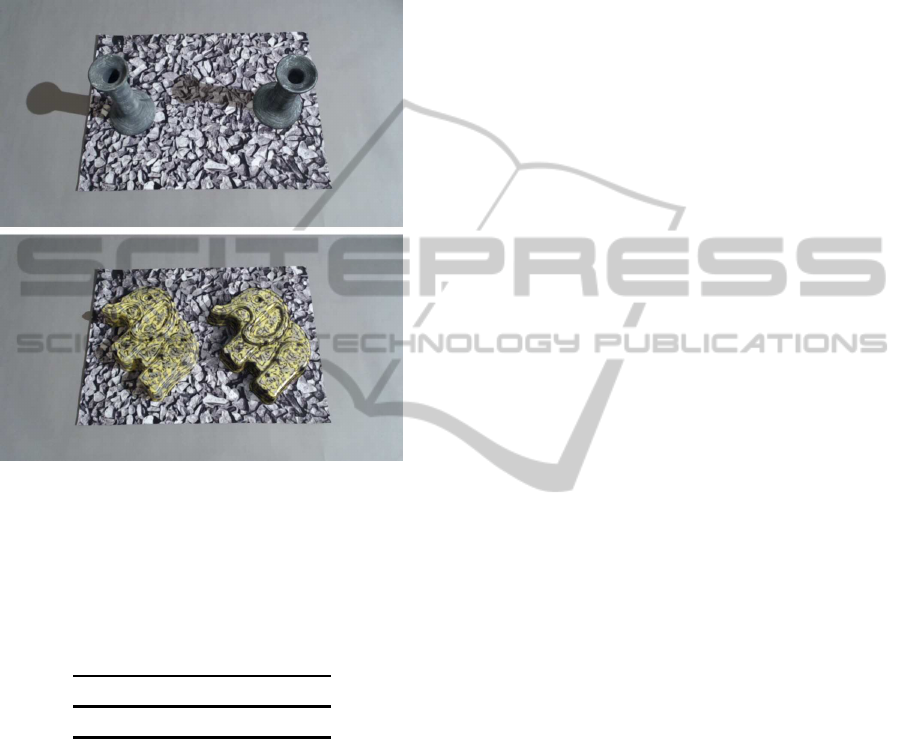
Figure 2: A photograph of the diffuse candlestick and the
specular toy elephant chosen for the experiments.
minimization of computation usage is a requirement,
hence a guidance for which quality of the different
parameters to use would be beneficial and will be ad-
dressed in this work.
An overview of the framework will be described
in the next section. Afterwards, the experiment setup
and procedure is described in section 3 and 4, while
the results are presented in section 5, followed by the
discussion and conclusion.
2 FRAMEWORK
In order to investigate whether it is possible to obtain
realism in AR, a controlled setup was needed to be
able to isolate the parameters for the experiment. This
setup should utilize the ability of watching the scene
from different perspectives. To obtain a correct per-
spective, from which the virtual objects are rendered,
marker based tracking was used. Additionally, test
objects were needed, both in a physical and a virtual
form. These should have different shapes and materi-
als, to be able to evaluate the geometry and the shad-
ing. Two objects were chosen for the experiments,
which can be seen in Figure 2. One way to transfer the
physical objects into virtual objects is to reconstruct
the objects from multiple images or by scanning. This
way, a mesh and a texture can easily be generated. To
illuminate the objects lights were needed. A common
way to achieve realistic lighting given a static envi-
ronment is to use an environmental map (Debevec,
1998; Agusanto et al., 2003). Lastly, it is important to
address artefacts in relation to the rendering and the
web-camera to integrate a virtual object into a video-
feed (Klein and Murray, 2008). Therefore, some of
the most important artefacts were addressed.
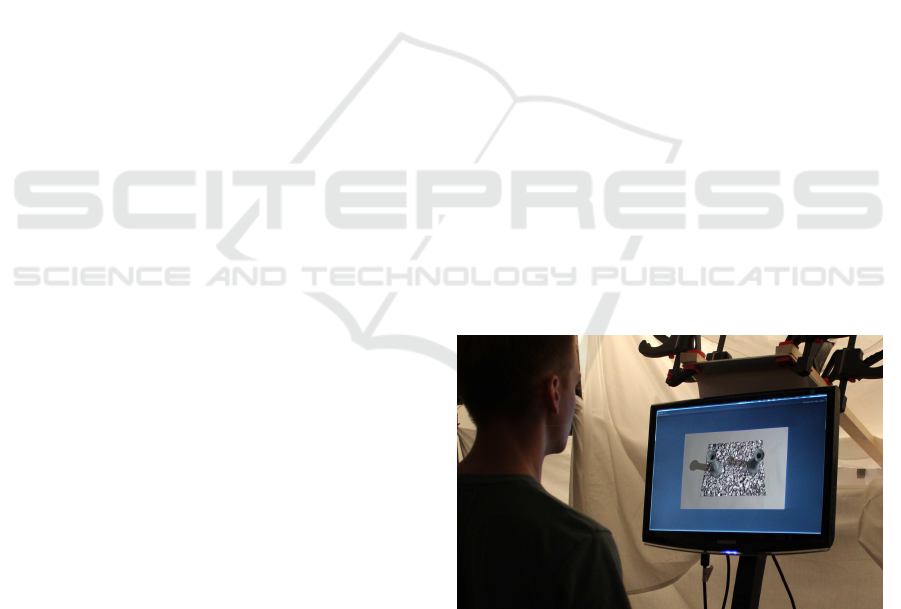
Figure 3: Top: An image of the setup. The test subjects
are only able to watch the monitor and not the scene. Fur-
thermore, they are able to rotate the metal arm on which
the monitor is attached. Bottom: An image of the scene
that the web-camera captures. Using a protruding stick the
web-camera was positioned closer to the centre to be able to
track the marker and to be able to see details in the objects.
3 EXPERIMENT SETUP
Five lights with diffusers (three 65 × 65 cm and two
53 × 53 cm) were set up in a circle with a radius of 1.5
meters and with a distance to each other of 65 degrees
(see Figure 3). In the centre was a table on which the
marker to be tracked was placed. The five lights were
located one meter higher than the table and pointed
upwards with a 45 degree angle to reflect the light in
the white ceiling. A spot light was located higher than
the ambient lights to minimize the length of the high
frequency shadows from the objects, such that they
were visible in the field of view of the camera. The
whole setup was covered by white sheets to enhance
the ambient illumination of the scene and to visually
shield off the test scene from the test subjects.
To prevent the real object and the virtual object
from occluding each other the angle of the positions
from which the web-camera was capturing the scene
was restricted to 90 degrees. Additionally, the cam-
era had to be directed at the centre of the scene at all
GRAPP2014-InternationalConferenceonComputerGraphicsTheoryandApplications
378

time. To ensure this, a metal arm was installed onto
the celling above the table which was able to rotate 90
degrees. However, this restricted the users’ freedom
of movement, since only one rotational axis was used
and only one distance from the web-camera to the ob-
ject on the table was available. The web-camera was
positioned closer to the centre of the scene to be able
to see the details in the objects (see Figure 3).
To ensure real-time rendering, the screen space ef-
fects and tracking were performed on a desktop PC.
The following specifications were given for the hard-
ware used in the setup:
1. A Logitech C920 Pro web-camera, which features
HD video recording in 1080p.
2. A 22” Samsung SyncMaster 226BW monitor,
which has a resolution of 1680 by 1050 pixels and
a contrast of 700:1.
3. A PC with an Intel i5 CPU, an AMD 6950 HD
1024MB RAM graphics card and 6 GB RAM.
For the execution of the 3D rendering and the marker
based tracking Unity was used in combination with
Qualcomm’s AR solution Vuforia. A 540p resolution
was used for the tracking, as well as for displaying
the scenes, because of the limitations of the camera in
relation to real-time execution.
3.1 Test Objects
Instead of manually modelling the objects virtual
replicas were generated using Autodesk’s 123D
Catch. The replicas were generated through a cap-
ture of around 20 – 40 images per object taken from
360 degrees. Thereafter, the program reconstructed
a 3D object from the images and generated the mesh
and the corresponding UVs and texture map. Over-
all, the process was difficult because contrast features
had to be added to the toy elephant and much manual
refinement was required. However, the quality of the
3D object was acceptable, especially given the low
cost of such a reconstruction of objects into a virtual
space.
Additionally, two low-poly versions were created,
which can be seen in Figure 4. A reflective object
was initially included, but preliminary tests showed
that the quality of it was too poor to be included in
the experiments.
3.2 Light Generation
For illuminating the augmented objects in the ren-
dering directional lights were used, which was au-
tomatically extracted from High Dynamic Range
(HDR) latitude-longitude environmental maps, simi-
lar to approach taken in (Debevec, 2005; Madsen and
Laursen, 2007).
In order to acquire an environment map, from
which the virtual lights would be generated, the setup
needed to be captured. Five photographs were taken
with a fish-eye lens covering 180 degrees of view. The
camera was placed at the position where the objects
were presumed to be placed on the marker, such that
the surfaces of the virtual objects received the cor-
rect light given in the environment. Moreover, the
photographs were taken with nine different exposures
ranging from 1/2000 of a second to 30 seconds, all
with a aperture-stop of 8. Also, the process was re-
peated for both light conditions; ambient lighting only
and ambient lighting with the spot light turned on. For
the ambient setup only 7 exposures were used (1/125
to 30 seconds).
The raw image files were imported into the pro-
gram Panoweaver 8 Professional Edition and then
stitched into a latitude and longitude environment
map for each exposure. Thereafter, the environment
maps were merged into a HDR image using all the
exposure levels. This was achieved with Adobe Pho-
toshop CS5.
To acquire the lights with the correct intensity,
colour-temperature and distribution the HDR envi-
ronment map was imported into HDR Shop (USC
Institute for Creative Technologies, 2013). Here a
plug-in using the median cut algorithm was used (De-
bevec, 2005). Median cut generates the lights in ac-
cordance with the intensity distribution in the environ-
ment map, and exports them to a text file. For use in
Unity a custom script was written to read the exported
text file correctly.
Median cut divides the energy because the im-
age is interpreted as areas of light. This approach is
good for ambient light scenes, since each light radia-
Figure 4: From left to right: The specular toy elephant in
two low complexity versions, as well as the scanned origi-
nal. Bottom row shows the same objects in wire frame. The
polygon count is noted in the top.
PerceptualEvaluationofPhoto-realisminReal-time3DAugmentedReality
379
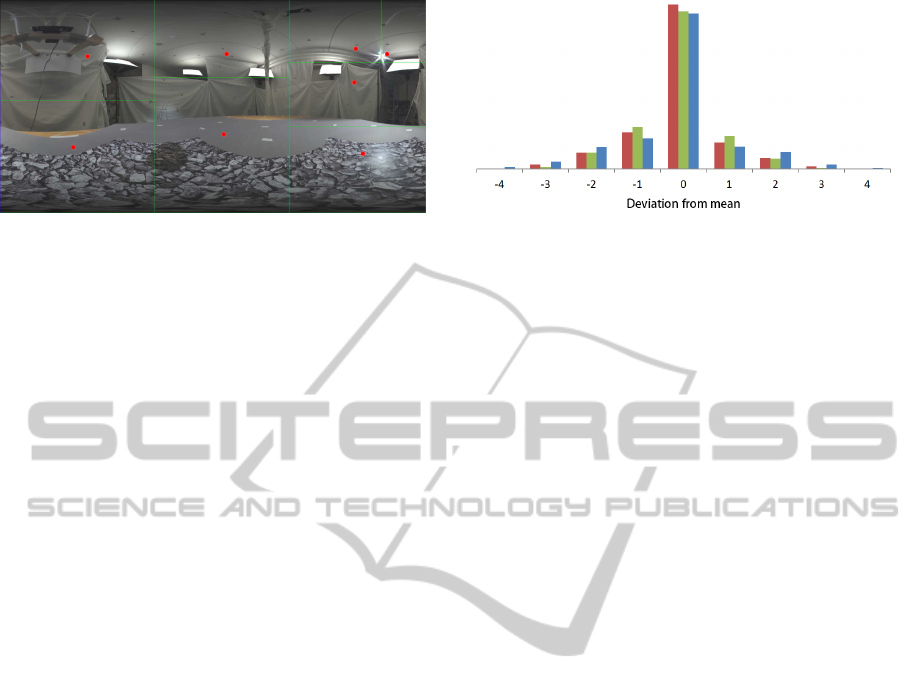
Figure 5: Example of how the generated lights (red dots)
does not exactly align with the spot light in the upper right
corner.
tion from a given area of a surface is correctly repre-
sented. However, if a scene with a spot light is rep-
resented by a low number of lights, the generated po-
sition of the spot might not be exactly on the right
latitude-longitude position (see example in Figure 5).
This could influence the shading of the virtual ob-
jects. Therefore, the spotlight was masked out from
the environment map and lights were generated from
this modified map. The spot light was then manually
added to the scene and the intensity was matched with
the physical spot light.
A set of 1024 lights was extracted from the HDR
environmental maps with the ambient lighting to be
used for global illumination. Additionally, sets of
2, 4, 8 and 16 lights was extracted from each of the
two HDR environmental maps, hence for the ambient
lighting and the spot lighting. These sets were to be
used for evaluation of the number of lights needed to
create a realistic shading.
3.3 Integration of the Virtual Objects
In order to integrate the augmented object as if it
was a part of the video-feed, some artefacts had to
be replicated and applied to the virtual object (Klein
and Murray, 2008; Klein and Murray, 2010; Fischer
et al., 2006). One of those is noise, which can be in-
terpreted as a random deviation from a “true” pixel
value. Therefore noise was measured by capturing
a sequence of images (Bovik, 2005). The mean be-
tween the individual pixels in these images is assumed
to be the “true” pixel value. From this mean the de-
viation is considered to be the noise. The deviation
sampled from 50 images can be seen in Figure 6.
The noise samples did not account for the cor-
relation between the RGB channels, therefore a co-
variance matrix was calculated, which addressed the
noise variance and covariance in relation to the chan-
nels. With a Cholesky decomposing of the matrix,
the random samples from the three channels could be
transformed into correlated samples (Apiolaza, 2011;
Figure 6: The pixel deviation from a mean calculated
per pixel coordinate accross all images, where the column
height indicate number or occurrences. The red, green
and blue channel are shown correspondingly. The graph is
based on data from 50 images with resolutions of 960 × 540
pixels, all capturing a gray paper.
van den Berg, 2012). The correlated samples were
randomly sampled for each pixel and saved in a tex-
ture, which was used by a screen-space shader that
only added the deviation from the noise texture to the
virtual object in the scene and not on the video-feed.
The noise texture was repeated, and offset randomly
for each frame in x- and y-directions, so the noise was
not static. Moreover, anti-aliasing (AA) was used on
the entire screen space. Because AA was applied on
screen space it created a bit of blur and smoothed out
the silhouettes of the 3D objects.
As the colours of the texture on the virtual ob-
ject were noticeably different from the colours of the
real objects in the video-feed a colour correction was
needed. To balance the texture colour of the 3D
objects, an implementation of colour matching was
implemented. The implementation used histogram
matching and required a region of interest (ROI) in
a capture of the video-feed and a target texture. A
summed histogram was created for the source ROI
and the target texture. For a given pixel value in the
target texture the number of occurrences was found in
the histogram. For the given number of occurrences a
pixel value was found in the histogram of the source
ROI. Now the pixel value of the target texture could
be mapped to the pixel value of the source ROI. The
RGB channels were converted to HSV and each chan-
nel was histogram matched as this resulted in the most
satisfying colour correction.
Internal tests showed that the quality of the
method was not acceptable and it was realised that
further corrections were needed to match the colours
more exactly. The main problem was that if the tex-
ture was matched to a region of an image of the real
object, the texture of the virtual object would gain
double light — both from the lights implied in the
image of the real object used for colour matching and
from the shading of the lights in the virtual scene.
GRAPP2014-InternationalConferenceonComputerGraphicsTheoryandApplications
380
Instead, the colour and intensity of the texture was
matched manually by perceptually modifying the am-
bient colour of the materials. This way, a plausible
simulation of the real surface was created, yet not in
a strict way.
4 EXPERIMENT DESIGN
In the original experiment design the users were able
to move the web-camera freely to see the scene from
different perspectives. However, a preliminary test
showed that the tracking of the marker was not sta-
ble enough resulting in noticeable jittering. As this
would compromise the purpose of the experiment, the
experiment design was altered. In the altered design
the test subjects were allowed to watch the scene from
three positions. The test subject would move the mon-
itor to the first position, where the tracking would be
locked and the scene would be shown for 4 seconds.
Then, the monitor would become black and the track-
ing would be enabled again, such that the test subject
could move the monitor to the second position. Again
the tracking would be locked and the scene would be
shown for 4 seconds. The same procedure applied to
the third position. The three positions was positioned
with approximately 20 degrees of disparity.
By locking the position of the web-camera (and
the virtual camera) to pre-defined positions, no jit-
tering could be observed. However, it removed the
element of a changing perspective dynamically. The
test subject had to keep a distance of 60 cm from the
screen to keep the basis consistent between the trials.
The scene was visible for 4 seconds at each position,
before the test subject had to assess. This procedure
was repeated for each trial.
Before proceeding to the actual trials some men-
tal calibration scenes were shown to the test subjects.
These scenes contained examples of real and virtual
objects (ones not used for the experiments) shown in
both spot and ambient light. These examples provided
all of the information needed about the lighting, the
environment, the objects and the quality of the video-
feed. This ensured that the test subjects knew what to
expect in the scene and how the experiment would be
conducted.
We performed two different types of experiments:
1) experiments with only the virtual object in the
scene rendered with varying approaches and quality
conditions — or the real object — and 2) experiments
with both a virtual and a real object present simulta-
neous in a direct side by side comparison.
The first experiment intended to identify the
thresholds or necessity of certain parameters. At first,
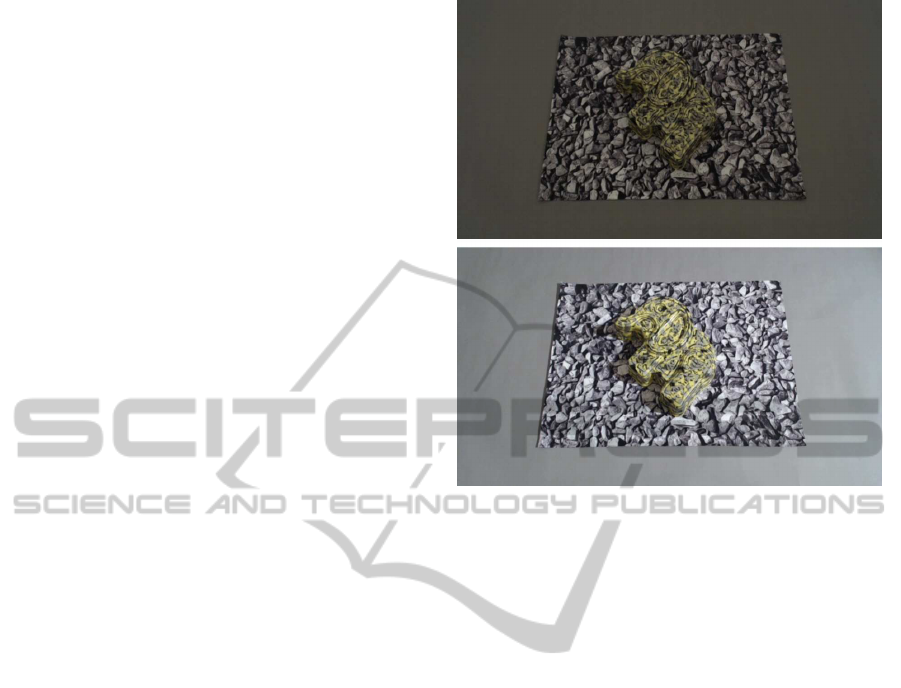
Figure 7: The two lighting conditions used in the first ex-
periment. Top: The real object shown in ambient light. Bot-
tom: The real object shown in spot light.
the effect of artefacts (noise and anti-aliasing) was
evaluated, as a lack of it might make it possible to
identify the virtual objects. Given both a spot and
an ambient light setup, both low and high frequency
shadows could be present in the scene (see Figure 7).
The high frequency shadow was evaluated both as
rendered in real-time and as pre-rendered (baked into
a semi-transparent ground plane, so the underlay was
visible). The low frequency shadows were always
baked, since they were a product of global illumina-
tion given 1024 lights from the environmental map,
approximating the real light distribution in the scene.
The number of lights needed to shade the objects (2
to 16 lights) was also evaluated, which was always
performed in real-time. The number of lights was
suppose to determine how accurate the light distribu-
tion should be to in order to have a realistic shading
on the objects. This is important since it is difficult
to generate lights from the surrounding environment
and the minimization of the light calculations could
be beneficial. Moreover, the lack of highlights were
also evaluated to assess the importance in AR solu-
tions. This was achieved by displaying a specular ob-
ject with and without specular highlights. Lastly, in
order to confirm that model complexity is important
and to see how important smooth silhouettes are in an
AR context, the augmented objects were evaluated at
three different polygon resolutions (see Figure 4).
Only the specular object (the toy elephant) was
PerceptualEvaluationofPhoto-realisminReal-time3DAugmentedReality
381
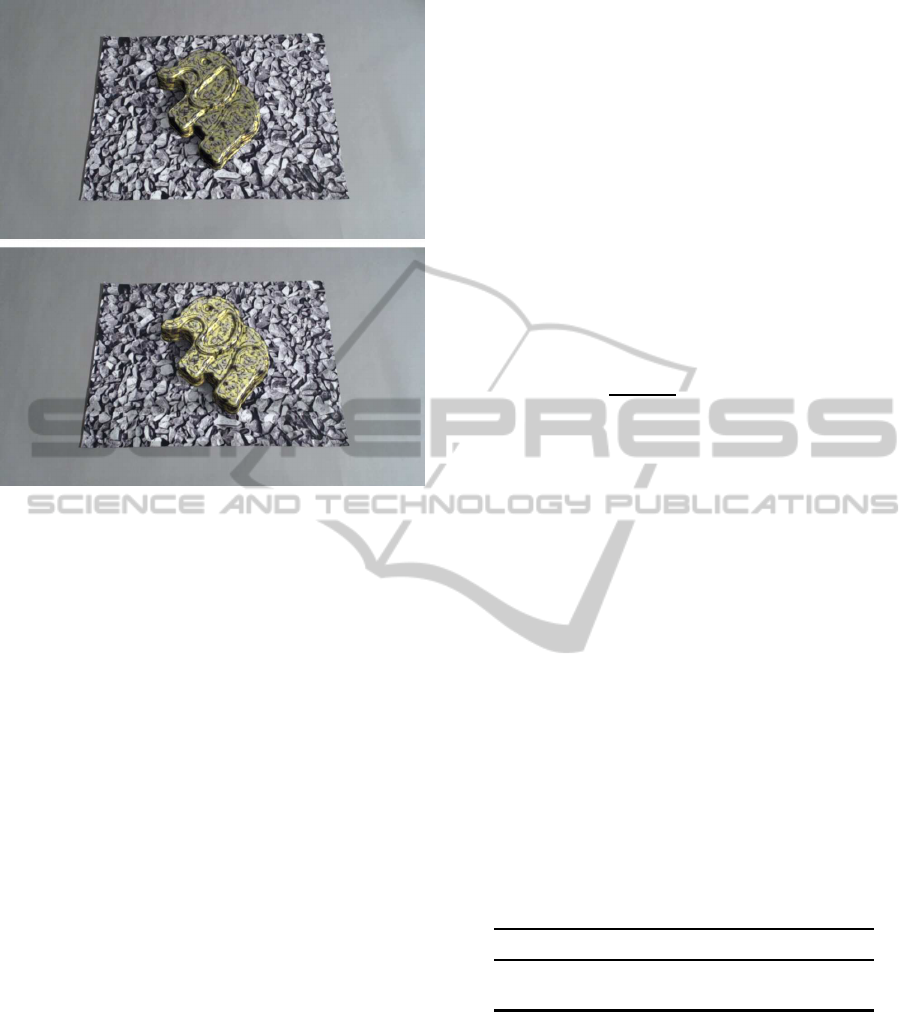
Figure 8: Top: Image from scene with specular elephant
shaded by two lights and with pre-rendered shadows. Bot-
tom: Image from scene with specular elephant shaded by
16 lights and with pre-rendered shadows.
used for evaluating the artefacts, the shadows and
shading, the highlights and the geometry. The real
object was used as control to verify the realism of the
representation of the physical scene.
The second experiment aimed at revealing the
possibility of making a virtual object that could be
perceived as real under the most difficult condition,
that is when the virtual object is compared side by
side to the real object and the test subjects are allowed
to watch the scene for as long time and as many posi-
tions as wanted. The side by side comparison scenes
were illuminated by the spot light. In this experiment
the test subjects watched a scene with the diffuse ob-
jects side by side and a scene with the specular objects
side by side.
The sequence of the scenes was randomised in
both experiments, as well as the position of the ob-
jects was switched randomly in the side by side com-
parison.
5 RESULTS
The virtual objects were considered indistinguish-
able from the real objects if the ratio of answers
approached random chance, that is when test sub-
jects were just guessing. The probability for random
chance is 50 %. However, this only holds for at least
100 observations (McKee et al., 1985), for smaller
sample sizes it might not even be possible to get a
significant result with the best possible data (Chris-
tensen, 2013). Therefore, another probability of 19 %
is suggested to compensate for smaller samples sizes
(Borg et al., 2012) and relates to the commonly used
threshold of people guessing incorrectly at least 25 %
of the times. It is beyond the scope of the presented
paper to explain the advantage of using a probability
of 19 %.
The null hypothesis is that people are able to
recognise a virtual object. The critical number, i
c
,
of answers to significantly reject the null hypothesis
can be calculated by the probability mass function for
binomial distributions:
f(i|n, p
null
) =
n!
i!(n− i)!
(p
null
)
i
(1− p
null
)
(n−i)
(1)
where p
null
= 0.19, n is the sample size and i is the
number of incorrect assessments. The critical value,
i
c
, can then be calculated:
i
c
(n, p
null
) = min
(
i
n
∑
j=i
f( j|n, p
null
) < 0.05
)
(2)
The number of assessments that a virtual object is real
have to be equal to or exceed the critical value i
c
for
an object to be perceived as real in a statistically sig-
nificant manner.
5.1 Evaluation of Parameters
Table 1: Number of answers out of 16 that a scene was real
when evaluating camera and rendering artefacts. The scenes
are shown in ambient lighting. Results in bold is equal to
or exceed the critical value of 7 that a scene is significantly
perceived as real. In the table it can be seen that 9 out of 16
test subjects assessed the real object to be real, hence it is
above the critical value of 7.
Noise No noise Real
Anti-aliasing 5 4 9
No anti-aliasing 5 5
The experiment was conducted with 16 test subjects
in the age of 21 to 30 years — one woman and 15
men. All had normal or corrected-to-normal vision
and most test subjects were experienced with 3D com-
puter graphics and augmented reality. The critical
value for an object to be perceived as real given 16
test subjects is 7, as calculated by Equation 2.
The simulated artefacts of the camera and the ren-
dering was evaluated to verify their importance in
GRAPP2014-InternationalConferenceonComputerGraphicsTheoryandApplications
382

Table 2: Number of answers out of 16 that a scene was
real when evaluating the number of ambient lights to create
a perceptual correct shading and when evaluating different
methods for creating shadows in a spot light and an ambient
light setup. Results in bold is equal to or exceed the critical
value of 7 that a scene is significantly perceived as real.
Spot light Number of lights
2 4 8 16 Real
(Real object) 14
Baked high and low
frequency shadows
9 10 13 11
Real-time high fre-
quency shadows and
baked low frequency
shadows
7 10 7 9
Ambient light Number of lights
2 4 8 16 Real
(Real object) 9
Baked low frequency
shadows
6 8 3 4
No shadows 7 3 4 4
augmented scenes. Each test subject watched each of
the five scenes shown in Table 1 once in randomised
order. As can be seen in the table, none of the virtual
scenes were perceived as real, as they did not reach
the critical value of 7. Only the real object was as-
sessed as real.
The number of lights needed to create a percep-
tually realistic shading was evaluated in combination
with different methods for creating shadows (see ex-
ample in Figure 8). For the spot light environmenttwo
different methods for creating high frequency shad-
ows were used; one pre-rendered and one in real-
time. Both of these include pre-rendered low fre-
quency shadows. For the ambient lighting environ-
ment pre-rendered low frequency shadows were eval-
uated, as well as a lower limit without any shadows.
For this test the test subjects watched each of the 18
scenes once in randomised order. The results for these
18 combinations can be seen in Table 2. All of the
scenes for the spot light environment were perceived
as real. This means that just 2 ambient lights (plus the
spot light) can be used to shade the object and both
the pre-rendered and real-time high frequencyshadow
can be used when wanting to create photo-realisticob-
jects. On the other hand, for the ambient lighting en-
vironment only the object with pre-rendered low fre-
quency shadows shaded with 4 lights and the object
without shadows shaded with 2 lights were signifi-
cantly perceived as real.
The necessity of highlights on specular objects
was also evaluated and the results can be seen in Ta-
Table 3: Number of answers out of 16 that a scene was real
when evaluating highlights on a specular object. Results in
bold is equal to or exceed the critical value of 7 that a scene
is significantly perceived as real.
Specular
highlight
No specular
highlight
Real
Spot light 9 3 9
Table 4: Number of answers out of 16 that a scene was real
when evaluating the model quality. Results in bold is equal
to or exceed the critical value of 7 that a scene is signifi-
cantly perceived as real.
461
poly-
gons
1028
poly-
gons
52387
poly-
gons
Real
Spot light 5 8 11 15
Ambient light 2 2 7 9
ble 3. The three scenes were showed once for each
test subject. The results showed that only the object
with specular highlights was perceived as real.
Lastly, the quality of the geometry of the object
was evaluated. The quality in this context relates to
the number of polygons that the object consist of. The
quality was evaluated in both lighting conditions to
assess whether or not the light had an influence. Test
subjects watched the eight scenes once in randomised
order. The results of the test can be seen in Table 4
where the high-polygon model was perceived as real
in both lighting conditions. This does not apply for
the object consisting of the medium amount of poly-
gons as it is only perceived as real in the spot light
environment. The low-polygon model was not per-
ceived as real for any of the two lighting conditions.
5.2 Side by Side Comparison
As some of the virtual scenes in the first experiment
were assessed to be real, it was of interest to deter-
mine if a virtual object could be assessed as real un-
der the best conditions possible for the test subjects,
namely in a direct side by side comparison. Addition-
ally, test subjects should be able to watch the scene
for as long as they want, for as many angles as they
want (within the restricted 90 degrees of rotation).
This experiment was conducted with 15 test sub-
jects between the age of 21 and 27, where one woman
and 14 men participated. All had normal or corrected-
to-normal vision and most test subjects were famil-
iar with 3D computer graphics and augmented reality.
The critical value for an object to be significantly per-
ceived as real given 15 test subjects is 6.
PerceptualEvaluationofPhoto-realisminReal-time3DAugmentedReality
383
Examples of the scenes that test subjects are
watching can be seen in Figure 9. The results of the
side by side comparison can be seen in Table 5, where
it can be noted that only the diffuse virtual object was
perceived as real in a statistically significant sense,
when compared directly to a real object.
Figure 9: Image of the side by side comparison. Top: the
real diffuse object to the left and the virtual diffuse object
to the right. Bottom: the real specular object to the left and
the virtual specular object to the right.
Table 5: Number of incorrect answers out of 15 for the side
by side comparison of the two objects. Results in bold is
equal to or exceed the critical value of 6 that a scene is sig-
nificantly perceived as real.
Diffuse Specular
Spot light 6 0
6 DISCUSSION
In the process of conducting the experiments many
interesting subjects were found, which could be dis-
cussed. We present a selection of these that we find
most interesting.
Even though the evaluation of artefacts did not
prove any results, the generation of artefacts is still
considered important to integrate a virtual object into
a scene. We believe that virtual objects would oth-
erwise look uncanny. This is supported by prelimi-
nary tests which showed that test subjects were able
to pinpoint virtual objects solely based on the missing
noise. However, the lack of noise was first noticed af-
ter a while, when the test subjects had gotten familiar
with the scene. This indicates that noise is a subtle
effect which must be evaluated over several trials.
When evaluating the shading and the shadows all
of the objects in the spot light were perceived as real.
This means that it is possible to use only two lights for
creating ambient lighting when a strong spot light is
present in the scene. Additionally, there is no need of
pre-rendering high frequency shadows as they can be
rendered in real-time, as long as they are of sufficient
quality. Especially, the edges must be of a quality
where no artefacts are present, as test subjects in par-
ticular were looking at the silhouettes of the shadows
to determine the realism. For the scenes with only
ambient lighting just two were perceived as real; two
with few lights for shading the object. One reason
might be that people are not used to watching scenes
without any noticeable shadows, and therefore assess
them as virtual, even though they are actually real.
Otherwise, the ambient scenes might not have been
set up and adjusted appropriately to be able to match
the real one.
The results showed that highlights are important
on specular objects in AR, as they would otherwise
look uncanny. This extends the findings in previous
research focusing on photo-realistic imagery (Elhelw
et al., 2008).
Preliminary tests not described in this paper
showed that if mental calibration is not used, test sub-
jects will assess more objects as being virtual, even
though they might be real, because the test subjects
might not be familiar with the object used or the arte-
facts of the camera makes the scene look unnatural.
In other words, the knowledge of the context is very
important when conducting a perceptual experiment
evaluating photo-realism. Therefore, mental calibra-
tion is suggested to compensate for bias in relation
to the environment, the lighting, the objects and the
quality of the video-feed. Without this knowledge the
test subjects will have no basis for evaluating the ob-
jects displayed on the screen.
The texture maps of the virtual objects were gen-
erated from images taken in the lighting conditions in
the setup. Additionally, the virtual objects with the
texture maps applied were shaded by the lights gener-
ated from the HDR environmental maps. Therefore,
the virtual object gained double lighting. One way to
avoid double lighting on texture of the virtual objects
would be to calculate the intensity and colour of the
virtual lights hitting each point on the mesh, assumed
that the intensities and colours of the virtual lights are
adjusted to the corresponding physical light. Then the
texture of the object could be divided with this UV
GRAPP2014-InternationalConferenceonComputerGraphicsTheoryandApplications
384

map with baked lights. This would remove the dou-
ble lighting and only leave the albedo. However, as
a perfect match of intensity and colour between the
physical and virtual light is difficult to obtain this op-
tion was skipped due to time and resource limitations.
Despite best efforts we experienced that it was a
difficult task to capture the physical setup and convert
it to a virtual — and maintaining the right illumina-
tion throughout the pipeline. In most cases, the ma-
jority of the pipeline has to be redone if a step fails.
Therefore, it is crucial to have a clearly defined setup
and approach of how to capture it. In the best case, no
changes are applied to the setup and hardware when
capturing the environment and the objects.
As long as marker based tracking is not stable
enough to be unnoticed the freedom of movement has
to be restricted. Optionally, the tracking might be
more stable on the expense of the frame-rate. Oth-
erwise, another tracking method can be used.
7 CONCLUSION
It is proven that it is possible to render an aug-
mented object in real-time (besides pre-rendered am-
bient shadows) which cannot be distinguished from a
real object, even when compared side by side. This
has been achieved by creating a setup to evaluate the
visual realism of augmented objects, which took into
consideration the environment and the artefacts of the
video-feed. Results showed that highlights are im-
portant for the perception of realism, as well as sil-
houettes of objects and shadows. Furthermore, it
was shown that real-time shadows can be of sufficient
quality to enhance the perception of reality. Addition-
ally, preliminary tests showed that simulation of cam-
era noise is an important factor to integrate a virtual
object.
8 FUTURE WORK
It would be of great interest to create a common
way to capture the environment and maintain the
units throughout the pipeline. With such guidelines
it would be easier to quickly set up a photo-realistic
scene, which can be used in an application.
More research is suggested evaluating other pa-
rameters, for instance colour bleeding and a larger
variety of materials and shapes. Movement and an-
imation, as well as context, could also be interest-
ing. With moving objects the influence of motion
blur could be evaluated. Also, the attention to an ob-
ject would presumably be different. When evaluating
context different sceneries and their influence on the
objects could be evaluated.
REFERENCES
Agusanto, K., Li, L., Chuangui, Z., and Sing, N. W. (2003).
Photorealistic rendering for augmented reality using
environment illumination. In Proceedings of the 2nd
IEEE/ACM International Symposium on Mixed and
Augmented Reality, ISMAR ’03, pages 208 – 216.
IEEE Computer Society.
Apiolaza, L. A. (2011). Simulating data
following a given covariance structure.
http://www.quantumforest.com/2011/10/simulating-
data-following-a-given-covariance-structure/. Last
seen: 13-03-2013.
Azuma, R. T. (1997). A survey of augmented reality.
Presence: Teleoperators and Virtual Environments 6,
4:355–385.
Borg, M., Johansen, S., Thomsen, D., and Kraus, M.
(2012). Practical implementation of a graphics tur-
ing test. In Advances in Visual Computing, volume
7432 of Lecture Notes in Computer Science, pages
305–313. Springer Berlin Heidelberg.
Bovik, A. C. (2005). Handbook of Image and Video Pro-
cessing. Elsevier, 2nd edition.
Christensen, R. H. B. (2013). Statistical method-
ology for sensory discrimination tests and
its implementation in sensR. http://cran.r-
project.org/web/packages/sensR/vignettes/
methodology.pdf. Last seen: 07-11-13.
Debevec, P. (1998). Rendering synthetic objects into real
scenes: bridging traditional and image-based graph-
ics with global illumination and high dynamic range
photography. In Proceedings of the 25th annual con-
ference on Computer graphics and interactive tech-
niques, SIGGRAPH ’98, pages 189 – 198. ACM.
Debevec, P. (2005). A median cut algorithm for light probe
sampling. In ACM SIGGRAPH 2005 Posters, SIG-
GRAPH ’05. ACM.
Elhelw, M., Nicholaou, M., Chung, A., Yang, G., and
Atkins, M. S. (2008). A gaze-based study for in-
vestigating the perception of visual realism in simu-
lated scenes. ACM Transactions on Applied Percep-
tion, 5(1):3:1 – 3:20.
Fischer, J., Bartz, D., and Straßer, W. (2006). Enhanced vi-
sual realism by incorporating camera image effects. In
ISMAR ’06, Proceedings of the 5th IEEE/ACM Inter-
national Symposium on Mixed and Augmented Real-
ity, pages 205 – 208.
Klein, G. and Murray, D. W. (2008). Compositing for
small cameras. In ISMAR ’08, Proceedings of the 7th
IEEE/ACM International Symposium on Mixed and
Augmented Reality, pages 57 – 60.
Klein, G. and Murray, D. W. (2010). Simulating low-cost
cameras for augmented reality compositing. IEEE
Transactions on Visualization and Computer Graph-
ics, 16(3):369 – 380.
PerceptualEvaluationofPhoto-realisminReal-time3DAugmentedReality
385

Madsen, C. B. and Laursen, R. E. (2007). Performance
comparison of techniques for approximating image-
based lighting by directional light sources. In Image
Analysis, volume 4522 of Lecture Notes in Computer
Science, pages 888 – 897. Springer Berlin Heidelberg.
McKee, S. P., Klein, S. A., and Teller, D. Y. (1985). Statis-
tical properties of forced-choice psychometric func-
tions: Implications of probit analysis. Perception &
Psychophysics, 37(4):786–298.
Rademacher, P., Lengyel, J., Cutrell, E., and Whitted, T.
(2001). Measuring the perception of visual realism
in images. In Proceedings of the 12th Eurographics
Workshop on Rendering Techniques, pages 235–248.
Springer-Verlag.
USC Institute for Creative Technologies (2013). Hdr shop.
http://www.hdrshop.com/. Last seen: 28-05-2013.
van den Berg, T. (2012). Generating correlated random
numbers. http://www.sitmo.com/article/generating-
correlated-random-numbers/. Last seen: 13-03-2013.
GRAPP2014-InternationalConferenceonComputerGraphicsTheoryandApplications
386
